CRM module - overview
Introduction
CRM stands for customer relationship management. A CRM solution allows you to manage the business relationship and interactions you have with customers, prospects, vendors, etc. and store all the data about these relationships. These interactions can be sales-related calls, emails, meetings and demonstrations as well as support-related service tickets and projects. The benefit of a CRM is having all your business data stored and accessible from one central location. The CRM module provides:
- Immediate employee access to the data they need.
- Sharing of important data between departments.
- Management insight into activity across the organization and helps them understand where they can improve processes.
Customers are first added as accounts in CRM. After that you can create projects, open tickets, and set up contracts on their behalf.
CRM Dashboard (Revenue Intelligence Dashboard)
For information on CRM Dashboard, see Revenue Intelligence Dashboard.
Accounts
Admin > CRM > Accounts
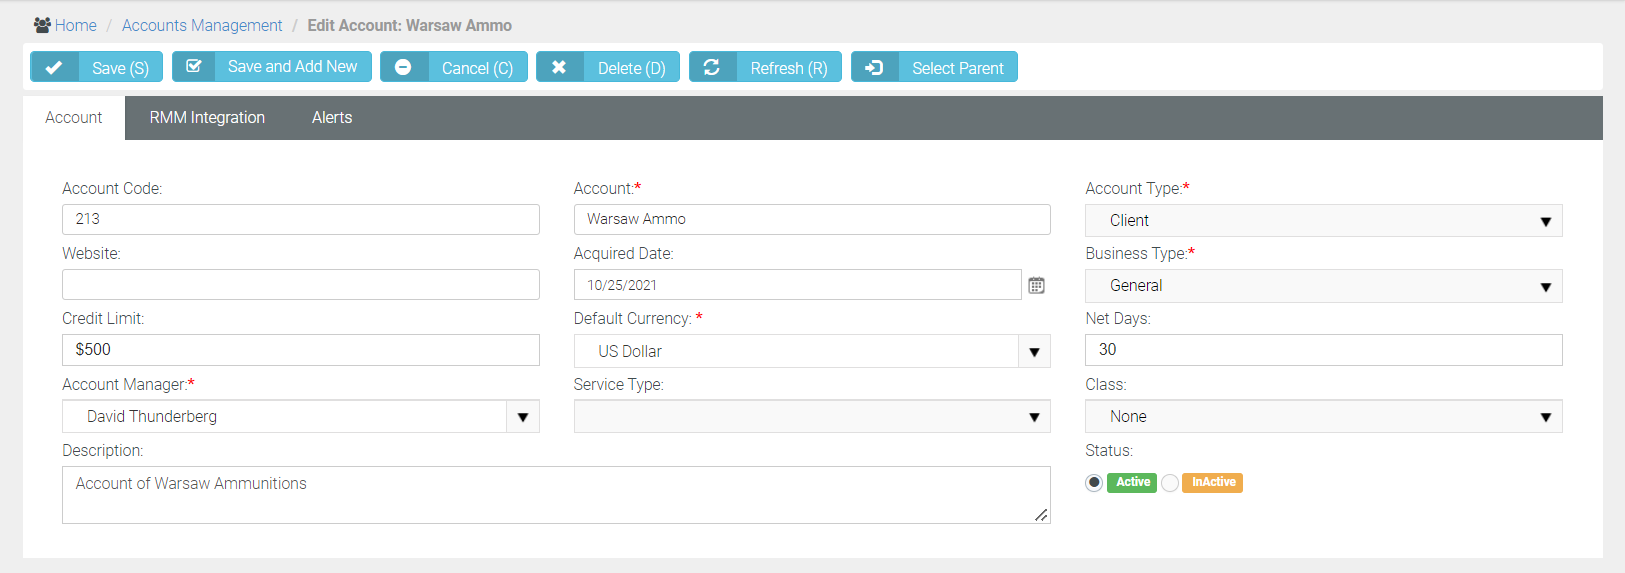
The Accounts Management page maintains your account profiles for every organization you do business with. This includes clients, prospects, vendors, competitors, former clients, business partners, and miscellaneous organizations. This same page displays in the CRM module if you have permission. Initially, you can create a basic account. After you save an account the first time, multiple tabs display for you to enter additional details.
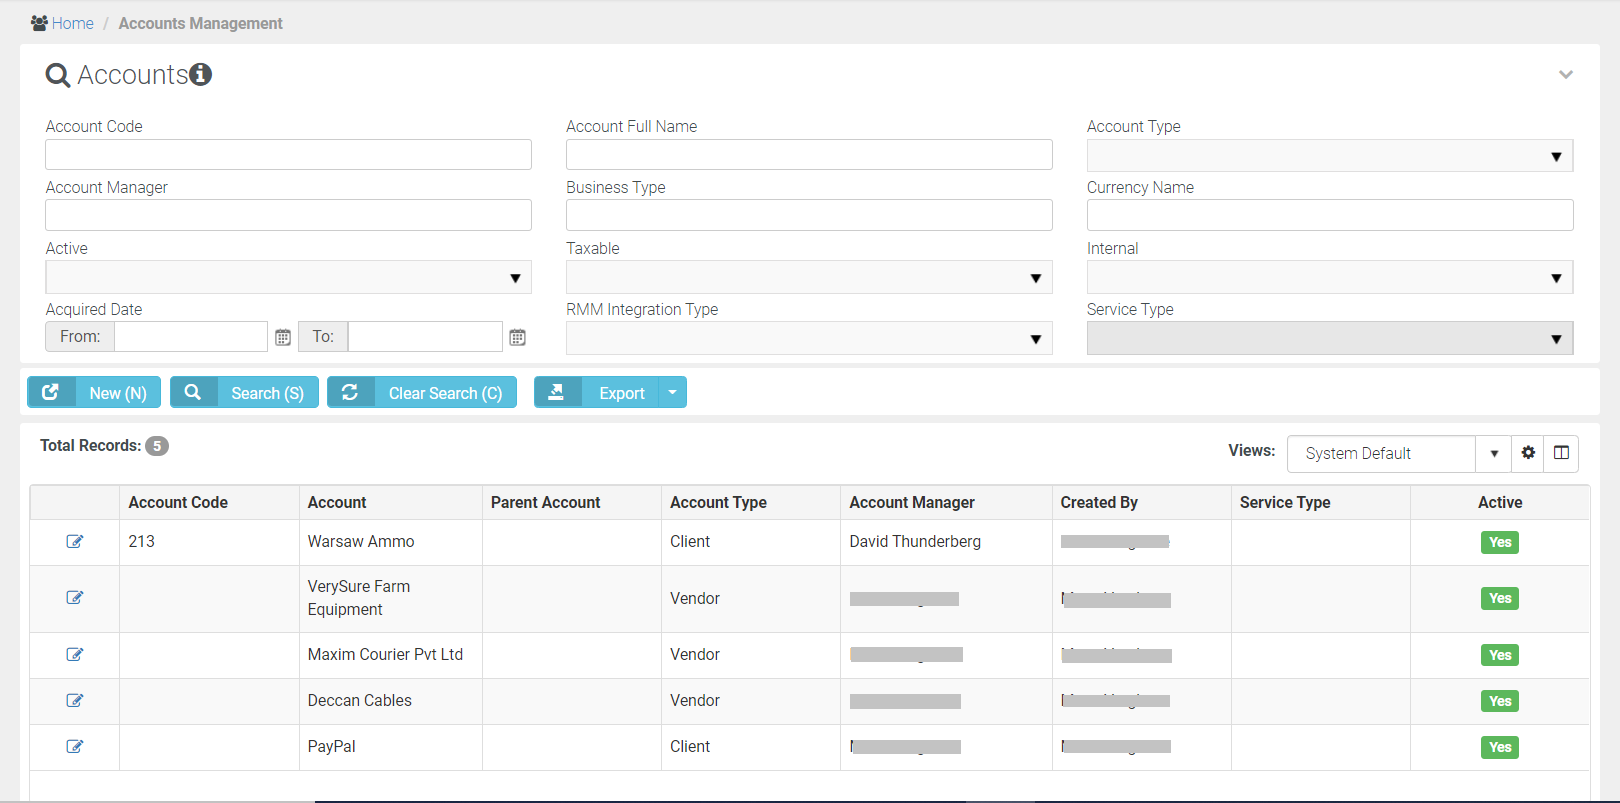
Searching for accounts
You can search for an account using one or more of the following search criteria:
- Account Code
- Account Full Name
- Account Type
- Account Manager
- Business Type
- Currency Name
- Active status
- Taxable
- Internal
- Acquired Date (From __, To __)
- RMM Integration Type
- Service Type
Creating an account
- Select the Admin > CRM > Accounts page.
- Click New.
You can select two types of accounts.- Account - The main account name for a customer organization. If you select this option, a new account page automatically opens.
- Child Account - An subordinate account for a larger customer organization. If Route Invoice to Parent is set to Yes for this child account, billables are routed to the parent organization for payment. If set to No, parent-child accounts are used for reporting purposes only. Click Create after you select the above.
- Enter the following fields in the Account header section.
- Account Name - Enter the name of the account.
- Account Type - Select one of the following options from the dropdown - Client, Competitor, Former Client, Miscellaneous, Partner, Unknown, Vendor.
NOTE One of your accounts is an internal account. The internal CRM customer account is created for you and matches your company name by default. Your internal CRM customer account is used when you ship inventory between warehouses. You can filter accounts to identify your internal account.
- Business Type - This list is maintained using Admin > My Company > Lists page.
- Website - Enter the website related to the account.
- Acquired Date - Enter the date on which the account came into existence in BMS.
- Credit Limit - Enter an amount that acts as a credit limit.
- Default Currency - Select the default currency from the dropdown.
- Net Days - Enter the number of days to be treated as net days.
- Account Manager - Select the employee in your company assigned to manage this account.
- Description - Enter a brief description for the account.
- Enter the main business address in the Main Address Info tab. Optionally, you can click Copy From Billing to populate these fields from the Billing Address Info tab if you already have info in the Billing Address Info tab and vice versa.
- Enter the address, city, state, post code (zip code), country, phone number, fax number, longitude (if you know) and latitude (if you know)
- Enter the billing account address in the Billing Address Info tab. Optionally, click Copy From Main to populate these fields from the Main Address Info tab if both are same.
- The format is the same for Billing Address Info tab except for one field which is Email Address. Enter the email address of the contact person of the account.
- Click Save. Saving will create additional tabs at the bottom. The page will now switch module, and the account will now open in Admin > CRM > Accounts page.
- Click the row of the new account you just created to add additional information.
- The Status option in the header is now available to maintain. If Yes, the account is being used.
- Use the tabs at the bottom of the page to maintain more details about each account.
Accounts > Alerts tab
Creating an alert for an account
You can create three different types of alerts for an account. You can create an:
- Account Detail Alert (This will appear on the Account Detail page.)
- Ticket Detail Alert (This will appear on the Ticket Detail, New Ticket, and Edit Ticket page.)
- New Ticket Alert (This will appear on creating a new ticket for this account.)
- Go to CRM > Accounts > Edit particular account. (For new accounts, the Alerts tab will appear after you enter relevant details in the Account tab and click Save.)
- Go to Alerts tab.
- Click the Active radio button of each category of alert that you want to generate.
- Click Save.
Creating an alert for a non-paying account
If an account has stopped paying dues at some point and if we do not want to offer your services to the account anymore, you can create an alert for such an account together with a custom field that would alert another user.
- Go to CRM > Accounts > Alerts.
- Go to Account Detail Alert. Click the Active radio button next to it to make it active.
- Fill in the alert message.
- Click Save.
- Go to Admin > My Company > Custom Fields.
- Fill in or select the fields as shown in the image below.
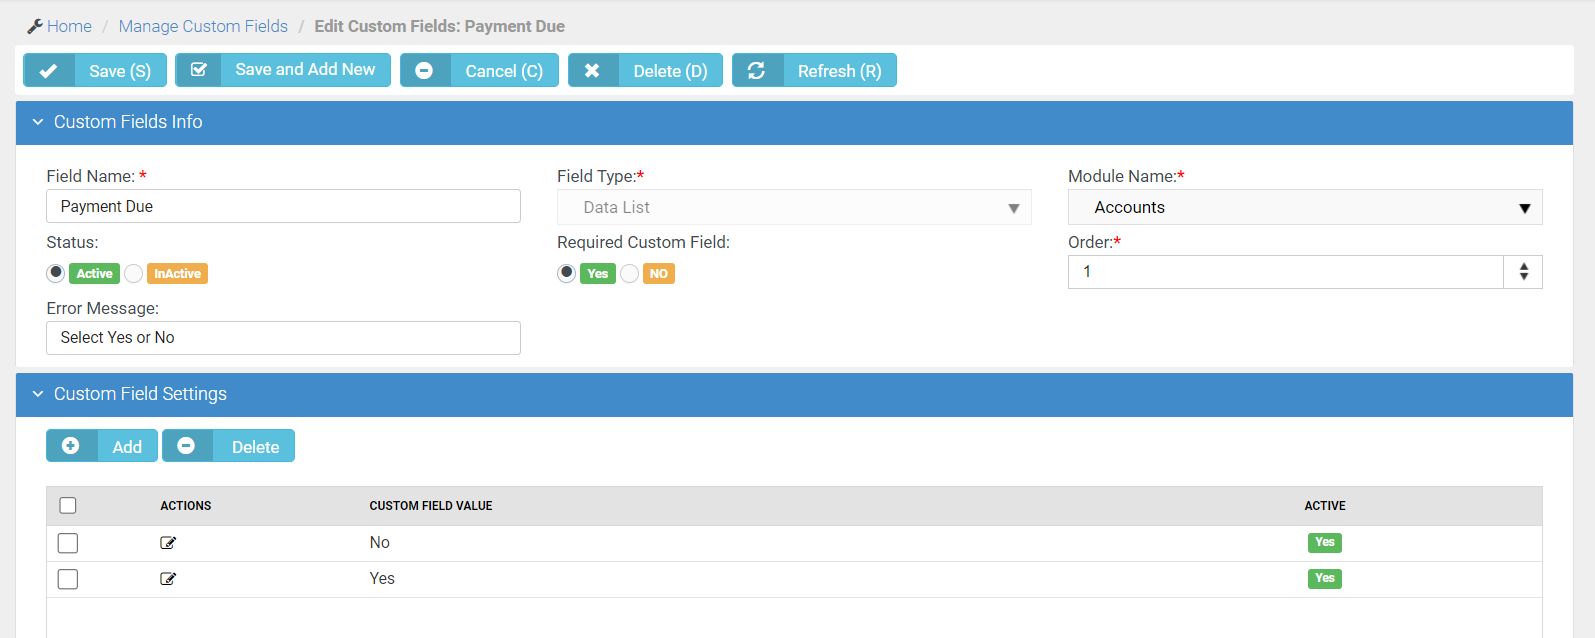
- Then, go to the Custom Field Settings section at the bottom and add the two components of the data list that you see there.
- Click Save. The custom field called Payment Due will appear in any account that you create.
We recommend a combination of the above two process as a way to alert a user about a non-paying account.
Editing an account
- Go to CRM > Accounts.
- Click the Open/Edit icon of the account that you want to edit.
- Make changes wherever necessary.
- Click Save. The changes will be saved.
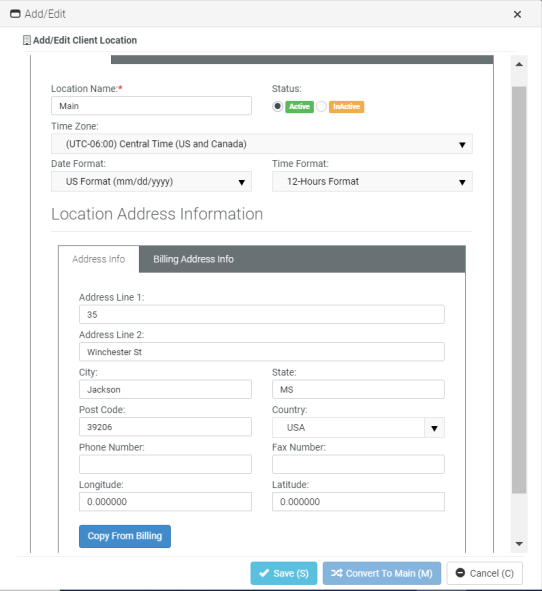
Locations
CRM > Accounts > Locations
Use the Locations tab to maintain physical address of locations for each account.
Adding a new account location
- Open the account that you have previously saved from CRM > Accounts page.
- Click Add.
- Enter the following fields in the Address Info tab.
- Location Name
- Status
- Address Line 1
- Address Line 2
- City
- Post Code
- State
- Country
- Phone Number
- Fax Number
- Longitude
- Latitude
- Optionally click Convert to Main (M) set a location as the 'main address' for an account.
- Click Save.
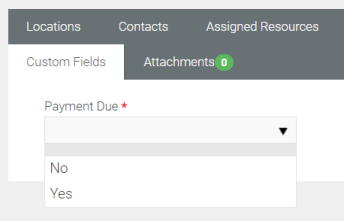
- Click the Custom Fields tab.
- Enter values in the custom fields, as appropriate for this record.
- Custom fields are maintained using the Admin > My Company > Custom Fields page.
- Click Save. This will save the Location details.
Contacts
CRM > Accounts > Contacts
Admin > CRM > Accounts > Contacts
Similar to CRM > Contacts
Use the Account Contacts tab to maintain contacts for each account. These are the individuals that the sales team work with to sell products and services. These are the people that your project team is delivering a completed project to. These are the people that are calling you for support and who you are opening tickets for.
Searching for new contacts
You can search for new contacts by either Contact name or Location name.
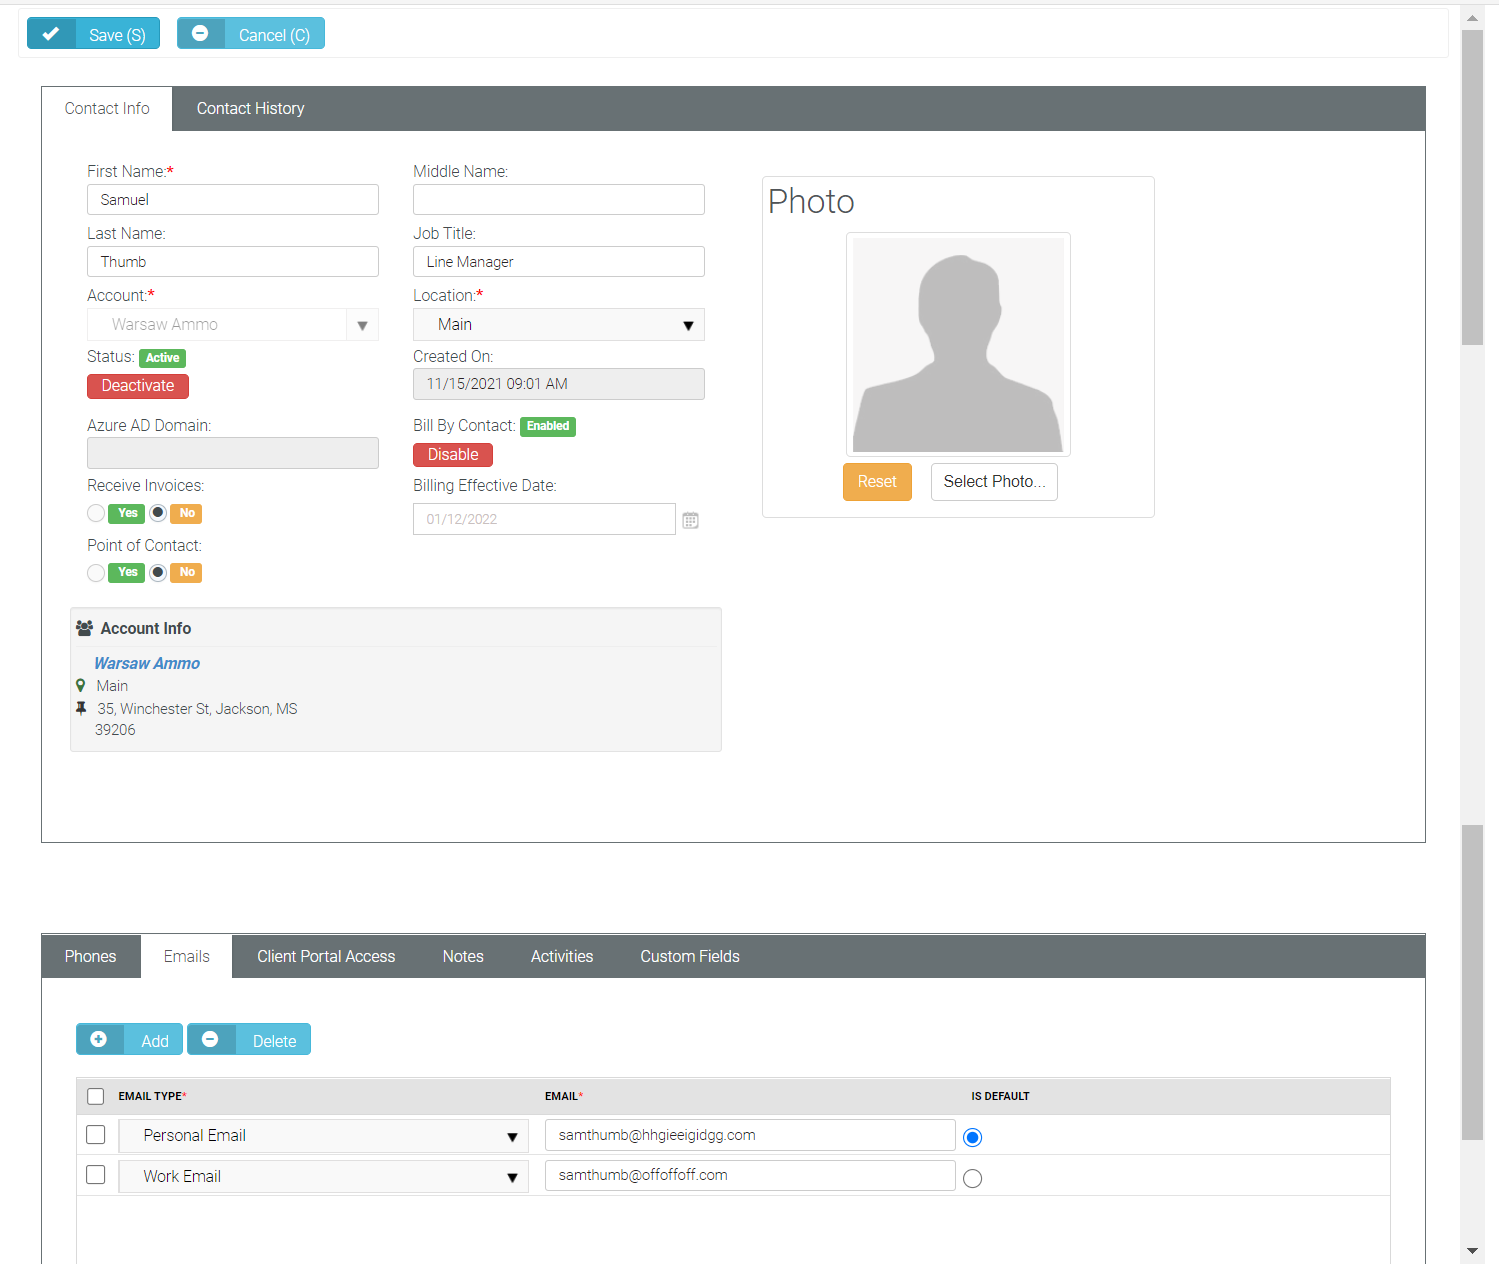
Adding a new contact
- Go to CRM > Accounts > Contacts tab.
- Click Add.
- Enter the following fields in the Contact tab.
- First Name: Enter the first name of the account's contact.
- Middle Name: Enter the middle name of the account's contact.
- Last Name: Enter the last name of the account's contact.
- Job Title: Enter the job title of the contact.
- Location Name: Select the contact's location from the dropdown.
- Status: Select either Active or Inactive depending on the case.
- Created on: The date of creation appears automatically here.
- Azure AD Domain: The Azure AD domain appears automatically here.
- Bill by Contact: Select either Enabled or Disabled. By default, Disabled is selected.
- Receive Invoices: Select either Yes or No.
- Billing Effective Date: Select a date from the calendar on which the billing should start.
- Point of Contact: Select either Yes or No. If Yes, this person will be notified if a workflow rule is configured to send notifications to Point of Contact.
- In the Phone tab, enter the contact's phone number.
- In the Email tab, enter the contact's email.
- In the Client Portal Access tab, under Has Client Portal Access, select either Yes or No. If Yes, the contact will get access to Client Portal. Two extra fields Username and Security Role display. The first time this setting is saved, the contact is sent an email with a user name, password and instructions on how to login to the portal. For configuring Client Portal Access, see Working with Client Portal Access.
- Receive Invoices
- In the Custom Fields tab, enter values in the custom fields, as appropriate for this record. Custom fields are maintained using the Admin > My Company > Custom Fields page.
- Click Save. The contact details are saved.
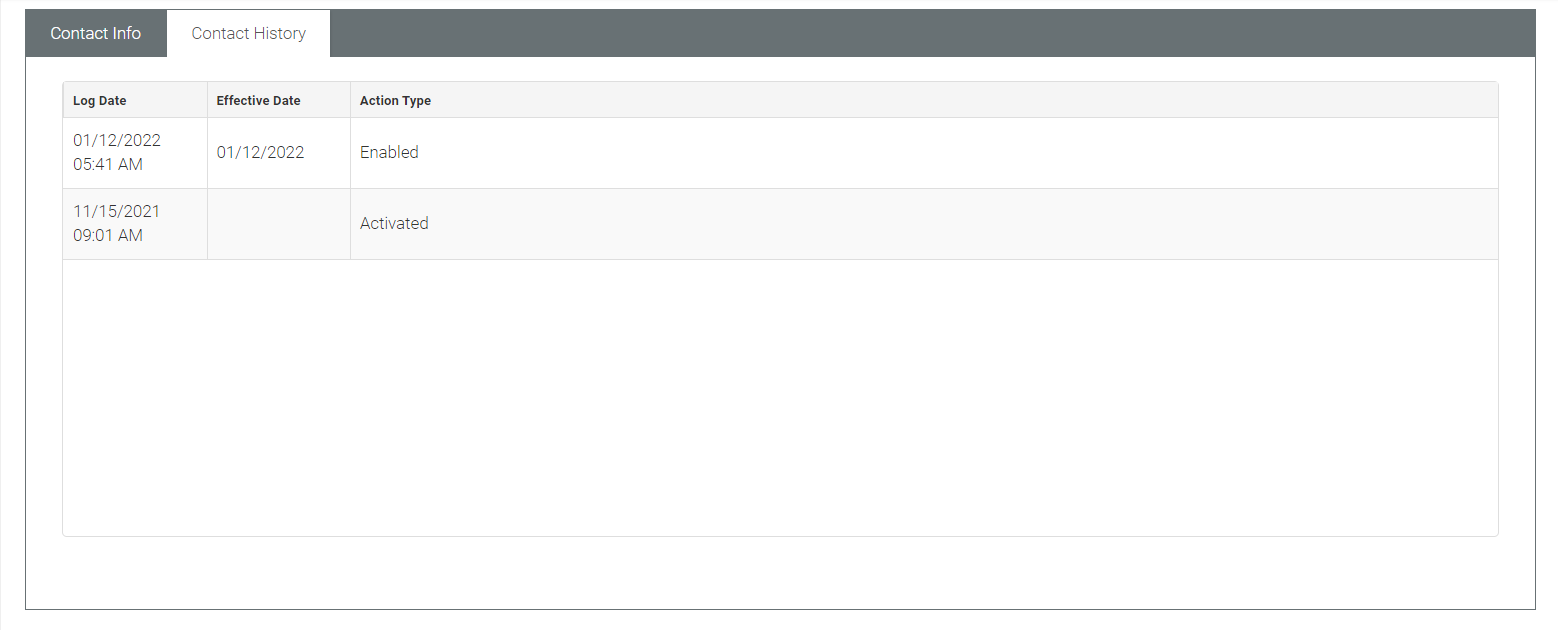
The Contact History tab shows the history of the contact from the date the contact was created.
Assigned Resources
CRM > Accounts > Assigned Resources
Admin > CRM > Accounts > Assigned Resources
Use the Assigned Resources tab to link employees—typically a technician—to an account.
When a client composes a message in Client Portal, Assigned Resources display in the client's recipient search list.
Assigned Resources can be notified when a ticket workflow is triggered.
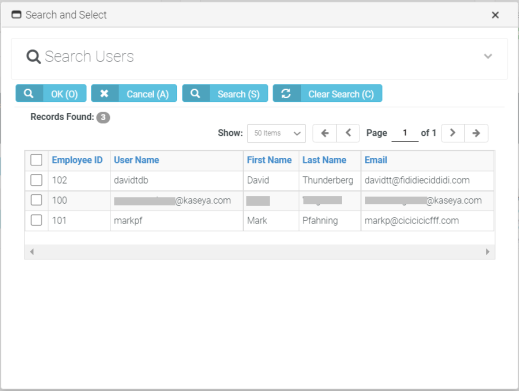
Adding assigned resources
- Go to CRM > Accounts > Assigned Resources tab.
- Click Add.
- Check one or more employee rows.
- Click OK.
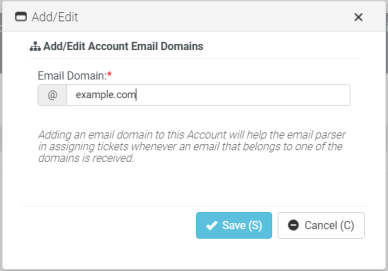
Email Domains
CRM > Accounts > Email Domains
Admin > CRM > Accounts > Email Domains
Associate one or more Email Domains with a CRM customer account. This enables the BMS email parser to determine the related account to create tickets for in Service Desk. If used, creates a new contact record for the sender of the email and associates that new contact with the new ticket.
- Only applies if the sender's email address is not recognized as an existing contact record. In this case, a ticket is created and associated with the existing contact.
- If an email cannot be associated with any existing contact or email domain record, the email parser creates the ticket and identifies its sender as Unknown.
- Specified email domain names should not be public domains such as yahoo.com, google.com or hotmail.com, and should be unique for each account.
Adding an email domain
- Go to CRM > Accounts > Email Domains tab.
- Click Add.
- Check one or more email domains rows.
- Click OK.
Departments
You can add different departments to an account. Adding department is a simple process.
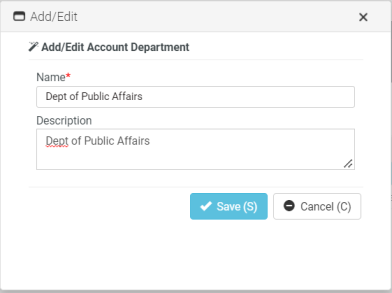
Adding a department
- Select CRM > Accounts > Departments tab.
- Name: Enter a name for the department.
- Description: Enter a brief description for the department.
- Click Save.
Tax Settings
CRM > Accounts > Tax Settings
Admin > CRM > Accounts > Tax Settings
The Tax Settings tab specifies tax related information for an account.
- Tax ID - The tax identifier for this account.
- Tax Rate - Applies to the labor entered on tickets and tasks. Displays on invoices.
- Is Taxable - Yes or No. Select as applicable.

Opportunities
CRM > Accounts > Opportunities
Admin > CRM > Accounts > Opportunities
Similar to CRM > Opportunities
The Opportunities tab maintains opportunities for each account.
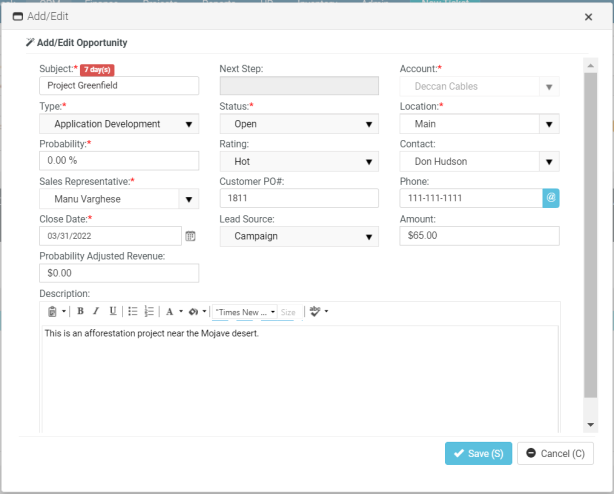
Adding an opportunity
- Select Admin > CRM > Accounts > Opportunities tab.
- Click Add.
- Enter the following fields.
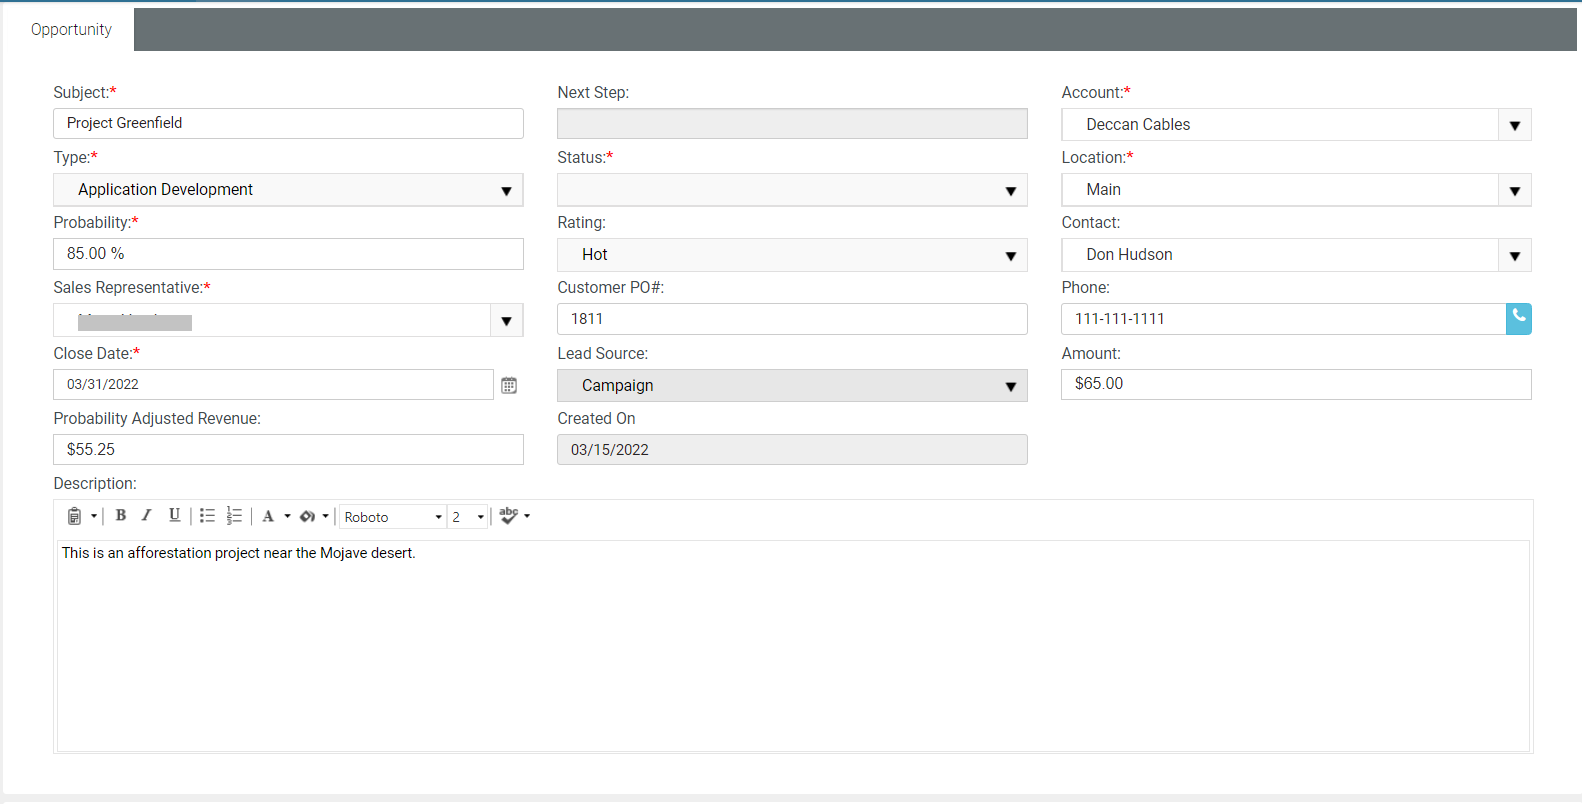
- Subject: Enter a short subject name.
- Next Step: This field is not editable.
- Account: The account name appears automatically.
- Type: Select the appropriate type from the dropdown.
- Status: Select the appropriate status from the dropdown.
- Location: Select the appropriate location from the dropdown.
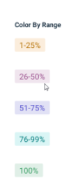
- Probability: Enter the percentage of probability. Probability percentage is shown with additional color ranges. The range is pre-defined by the system.
- Rating: Select the appropriate rating from the dropdown.
- Contact: Select the appropriate contact from the dropdown
- Sales Representative: Select the appropriate sales representative from the dropdown.
- Customer PO#: Enter the customer PO number.
- Phone: The phone number appears automatically.
- Close Date: Select a close date from the calendar.
- Lead Source: Select the appropriate lead source from the dropdown.
- Amount: Enter the amount.
- Probability Adjusted Revenue: This is automatically calculated according to the percentage entered in the Probability field.
- Description: Enter a short description.
- Click Save.
- Click Save. This will save the edits to the account.
Activities
CRM > Accounts > Activities
Admin > CRM > Accounts > Activities
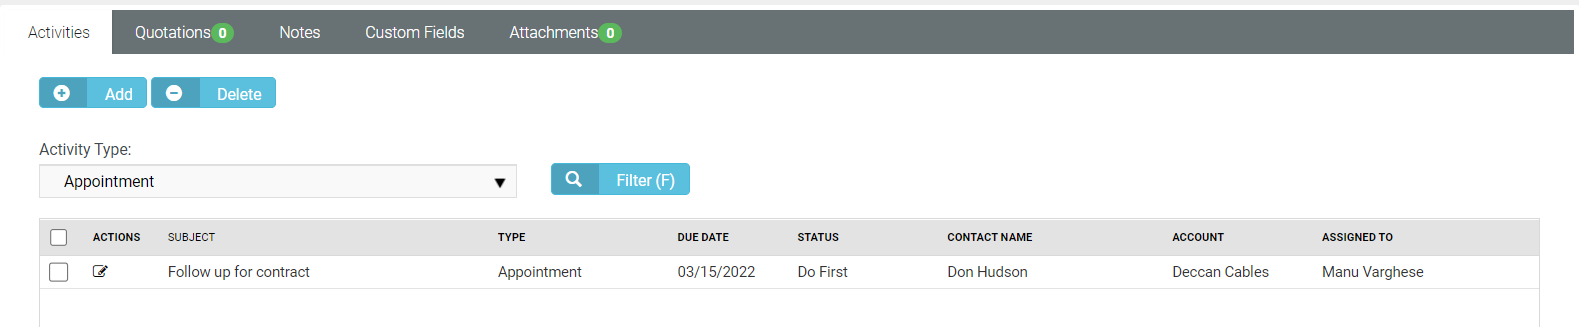
You can add different types of activities to an account. You can filter activities according to Activity Type.
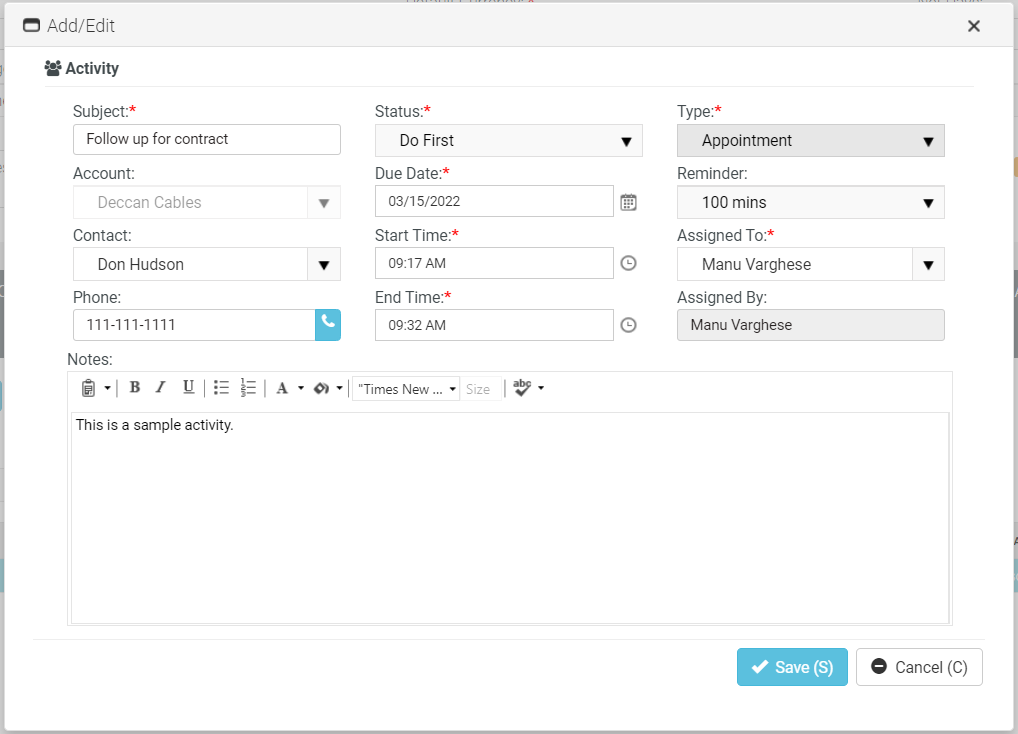
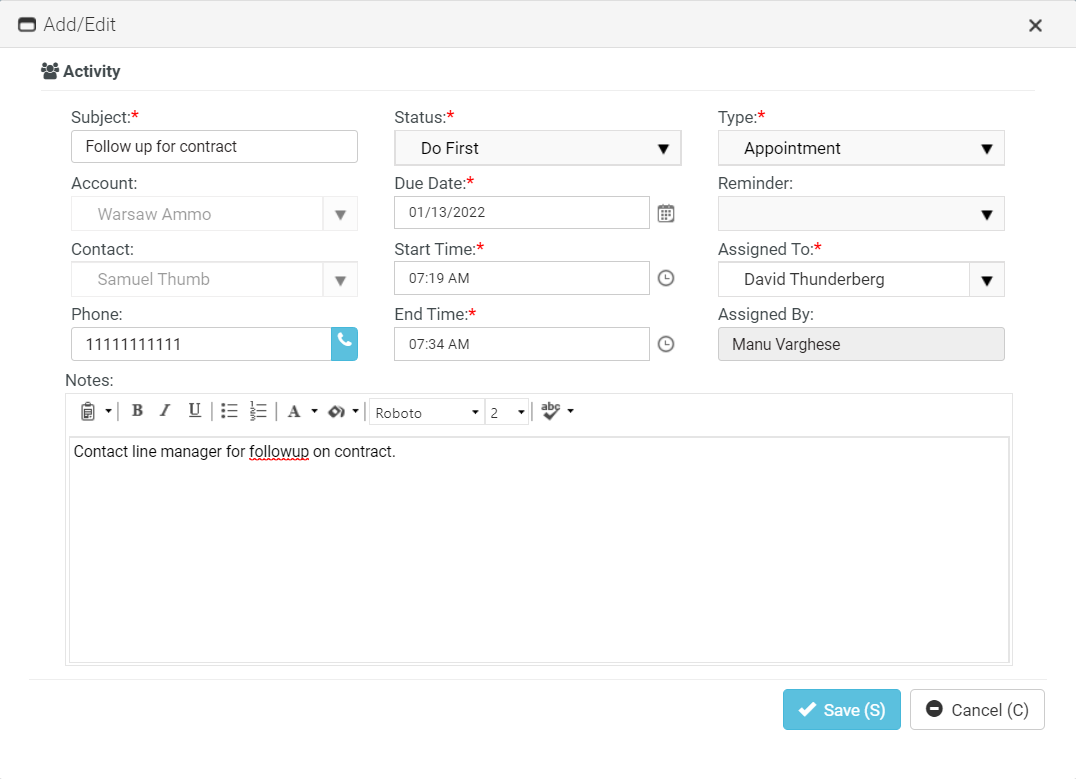
Adding an activity
- Select CRM > Accounts > Activity tab.
- Click Add.
- Enter the following fields.
- Subject: Enter an appropriate subject.
- Status: Select an appropriate status from the dropdown.
- Type: Select an appropriate type from the dropdown.
- Account: This is already selected and is a non-editable field.
- Due Date: Select a due date from the dropdown.
- Reminder: Select a duration from the dropdown.
- Contact: Select the appropriate contact from the dropdown.
- Start Time: Select a start time from the dropdown.
- Assigned To: Select an employee from the dropdown. By default, this is the person who is logged in.
- Phone: The phone number automatically appears here.
- End Time: End time is usually one hour from start time.
- Assigned By: This is the person who is logged in. This field is a non-editable field.
- Notes: Enter relevant notes.
- Click Save. This will save the info related to the activity.
- Click Save. This will save the info related to the account.
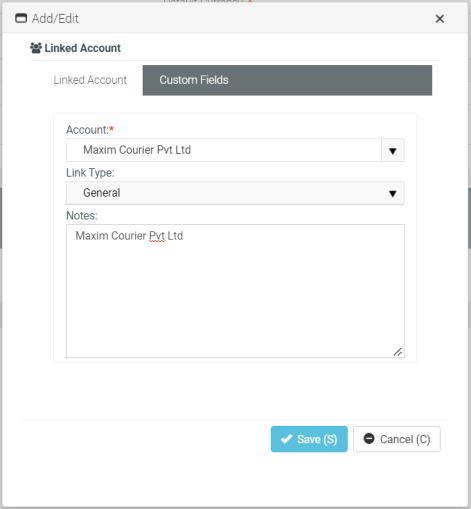
Linked Accounts
The Linked Activities tab associates an accounts with other accounts in your system.
Adding a linked account
- Select CRM > Accounts > Linked Accounts tab.
- Click Add.
- Enter the following fields in the Linked Account tab.
- Account: Select another account to link with this account.
- Link Type: General
- Notes: Enter any appropriate notes.
- Click the Custom Fields tab.
- Enter values in the custom fields, as appropriate for this record.
- Custom fields are maintained using the Admin > My Company > Custom Fields page.
- Click Save. This will save the linked account.
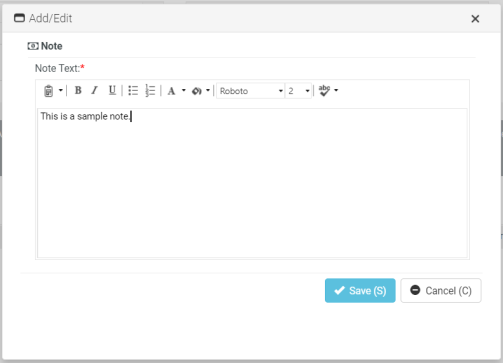
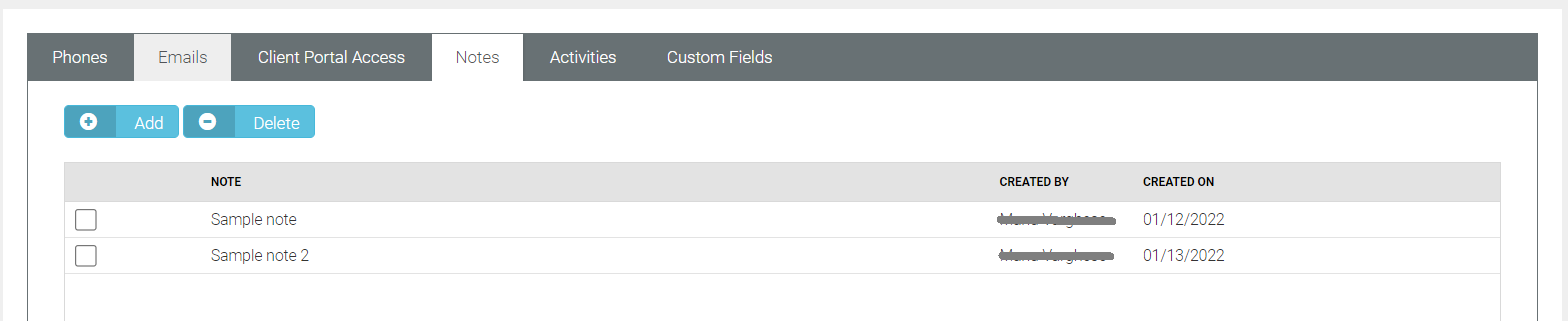
Notes
CRM > Accounts > Notes
Admin > CRM > Accounts > Notes
The Notes tab stores notes for an account. Copy text from proposals, signed contracts, statements of work, network diagrams, user guides, etc.—anything important about this client you want to reference quickly.
Adding notes
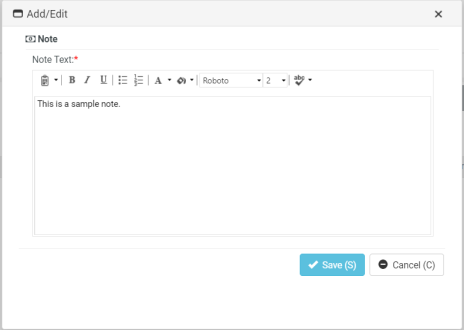
- Go to CRM > Accounts > Notes tab.
- Click Add.
- Type or paste text into the Note Text edit box.
- Click Save.
Custom Fields
CRM > Accounts > Custom Fields
Admin > CRM > Accounts > Custom Fields
The Custom Fields tab maintains data entered in custom fields for account profiles. Data types for custom fields can be Free Text, Date or Data List. Custom fields can be set to required. Custom fields are created using the Admin module > My Company > Custom Fields page.
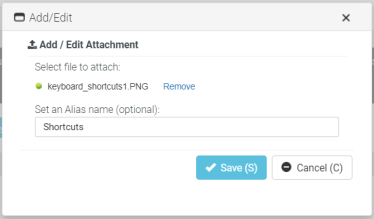
Attachments
CRM > Accounts > Attachments
Admin > CRM > Accounts > Attachments
Use the Attachments tab to upload files to an account profile.
Adding attachments
- Select CRM > Accounts > Attachments tab.
- Click Upload a new file.
- Browse and select the file to upload from the location.
- Optionally enter an Alias name.
- Click Save.
Contacts
CRM > Contacts
Use the Contacts tab to maintain contacts for each account. These are the individuals that the sales team work with to sell products and services. These are the people that your project team is delivering a completed project to. These are the people that are calling you for support and who you are opening tickets for.
Searching for contacts
You can search for contacts by one or more of the following search criteria:
- Contact Name
- Account
- Phone
- Has Client Portal Access
- Receive Invoices
- POC
- Location
- Active
Adding a new contact
- Click CRM > Contact > New. The Contact Info tab opens by default.
- In the Contact Info tab, do the following:
- First Name: Enter the first name of the contact.
- Middle Name: Enter the middle name of the contact.
- Last Name: Enter the last name of the contact.
- Job Title: Ener the job title of the contact.
- Account: Select the appropriate account from the dropdown.
- Location: Select the appropriate location from the dropdown.
- Status: By default the status is set to Active. If you want to deactivate the contact, you can do so by clicking Deactivate just below the Active status.
- Created On: This date is displayed automatically. This date is the date on which the contact is created. It is the current date.
- Bill by Contact: This is Disabled by default. You can Enable if you want to. To enable, click Enable below the Bill by Contact field. If you enable Bill by Contact, you will be able to select the Billing Effective Date. By default, this is the current date.
- Receive Invoices: By default, this is set to No. You can click Yes if you want to.
- Billing Effective Date: This field is activated only if Bill by Contact is enabled.
- Point of Contact: By default, this is set to No. You can click Yes if you want to.
- Photo: If you have a picture of the contact, you can upload the same here. Click Select Photo to upload the contact's picture here.
- A brief summary of the account info is displayed below the above field.
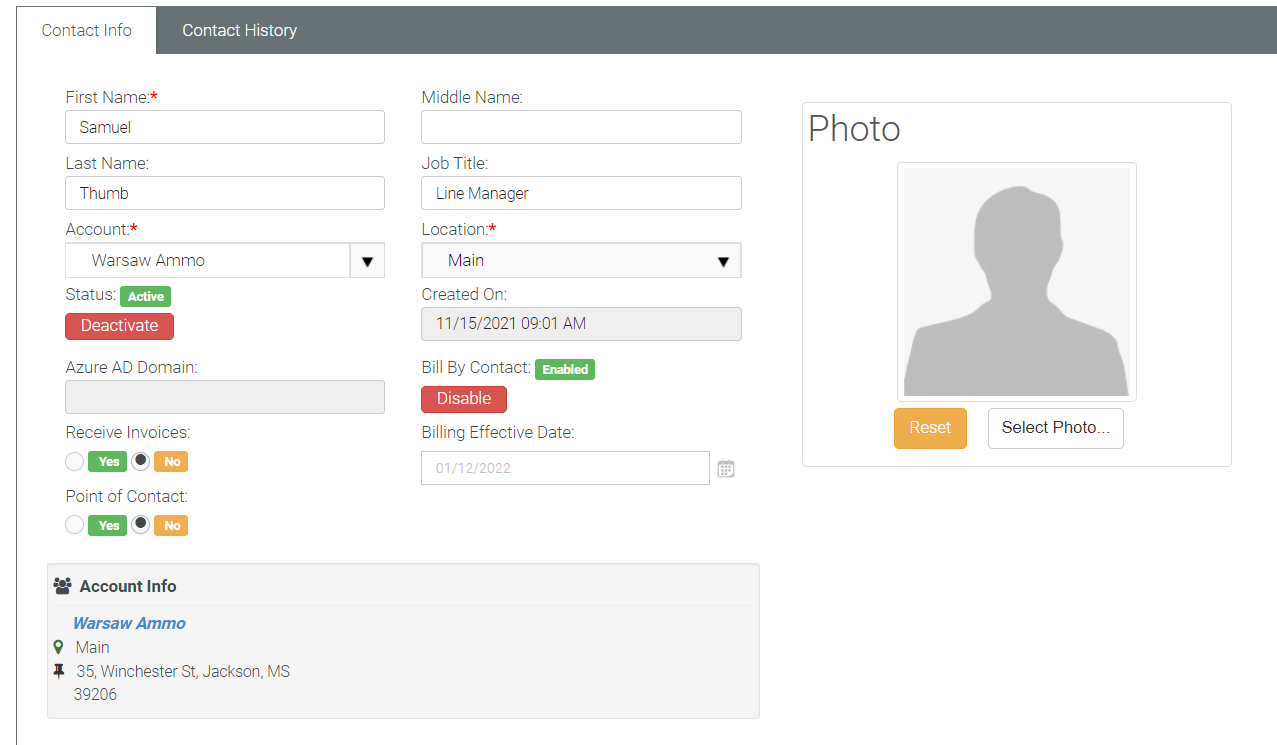
- The Contact History tab gives you the history of events associated with that contact.
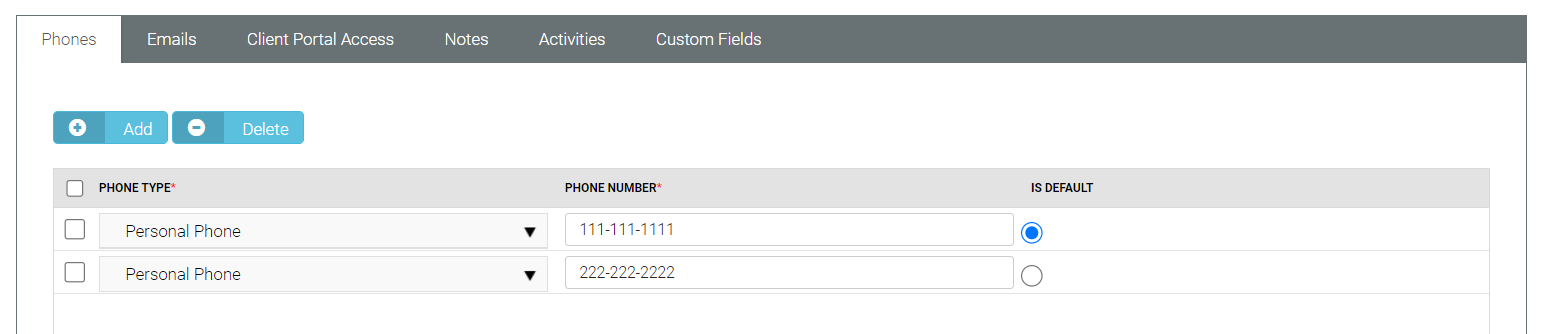
- The bottom pane displays the Phones tab by default. In the Phones tab, do the following:
- Select the appropriate phone type from the dropdown.
- Ener the phone number.
- The Is Default radio button is automatically selected for the first entry.
- Repeat the process to add multiple numbers. If your contact has multiple numbers, select the Is Default button for the appropriate phone number.
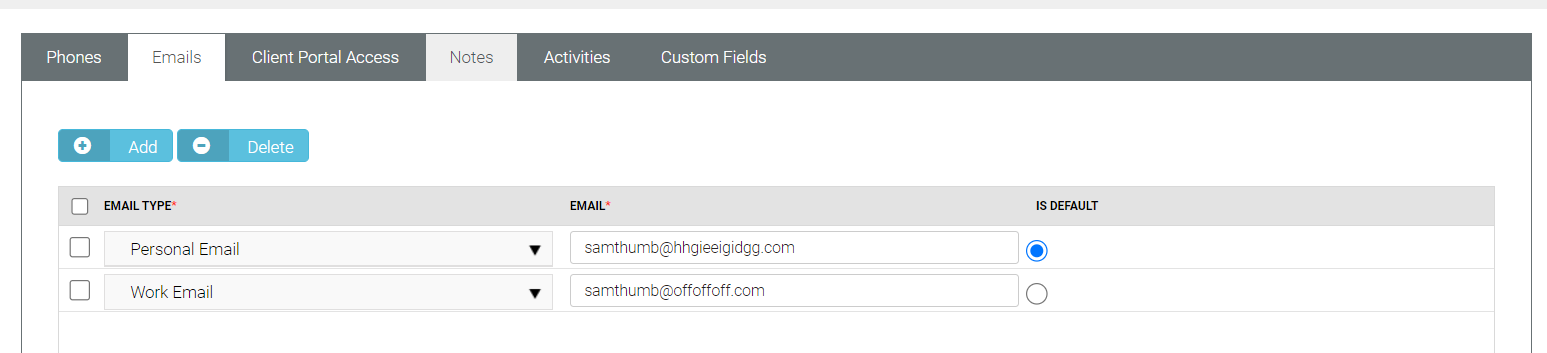
- In the Emails tab, do the following:
- Select the appropriate email type from the dropdown.
- Ener the email ID.
- The Is Default radio button is automatically selected for the first entry.
- Repeat the process to add multiple email IDs. If your contact has multiple email IDs, select the Is Default button for the appropriate email ID.
- If you are using the Service Desk module, you can turn on Client Portal for all contacts in your accounts that are clients. The client portal is a secure place for your customers to submit and track help tickets. There is also a Message center that allows the user to send messages directly to their service provider, making it easier to follow up with any tickets and questions that may not be support related. Security roles are provided that makes it easy to turn on the portal and give the right permission levels to your clients. In the Client Portal Access tab, do the following:
- Has Client Portal Access: By default, this is selected as No. To give the contact access to client portal, select Yes. For more information, see Working with Client Portal access.
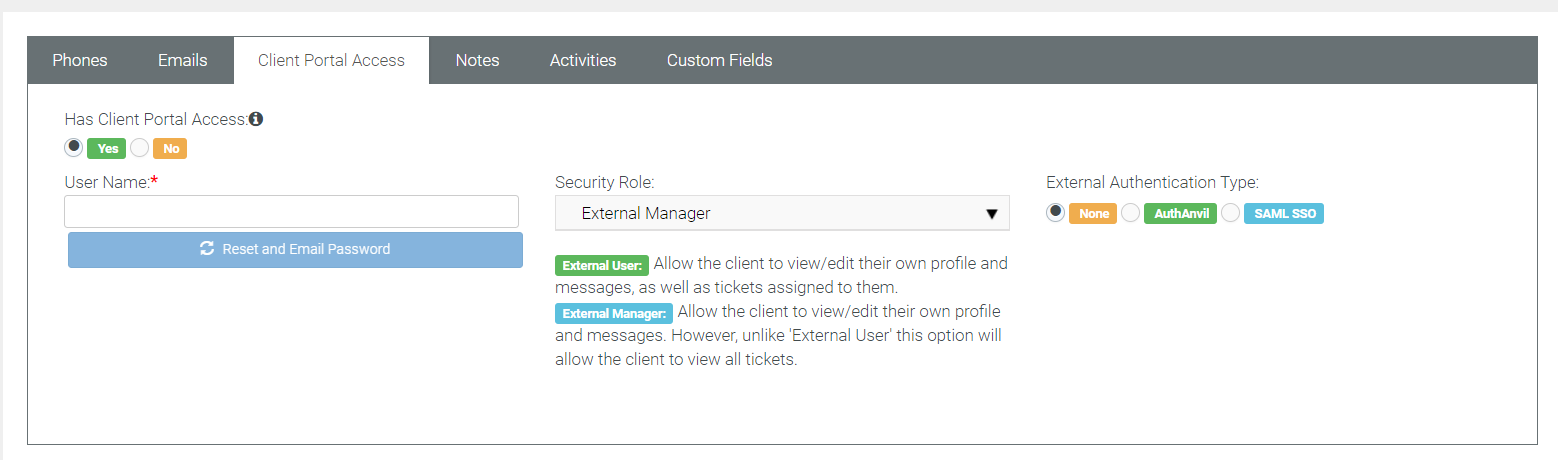
- Has Client Portal Access: By default, this is selected as No. To give the contact access to client portal, select Yes. For more information, see Working with Client Portal access.
- In the Notes tab, do the following:
- Click Add. The Add/Edit window appears.
- Enter relevant notes.
- Click Save.
- Activities are a history of the interactions between your company and the contacts for an account. Many activities may need to be tracked to support converting an opportunity into a sale. In the Activities tab, do the following:
- Click Add Activity. The Add/Edit window opens.
- Subject: Enter appropriate subject.
- Status: Select the appropriate status from the dropdown.
- Type: Select the appropriate type from the dropdown.
- Due Date: Select the due date from the calendar.
- Reminder: Set a reminder for the appropriate duration.
- Start Time: Select a start time from the time picker.
- Assigned To: This is by default the logged in user's name. However, this can be changed to any other person appearing in the dropdown.
- Phone: The phone number appears automatically if you have entered the phone number earlier under the Phones tab.
- End Time: Select an end time from the time picker.
- Assigned By: The logged in user's name appears here.
- Notes: Enter appropriate notes here.
- Click Save.
- Click the Custom Fields tab.
- Enter values in the custom fields, as appropriate for this record. Custom fields are maintained using the Admin > My Company > Custom Fields page.
- Click Save. This saves the contact details.
Activities
CRM > Activities
The Activities page is actually an extension of the Activities tab of Contacts page that maintains a history of interactions between your company and an account. However, this Activities page has three fields extra - Project, Opportunity and Ticket. The Activities listed in the Activities tab of the Contact page are displayed here with the above extra fields. Many activities may need to be tracked to support converting an opportunity into a sale. The page:
- Does not require you to enter an account or contact with an activity.
- Enables you to link an activity to a project, opportunity or ticket.

Searching for activities
You can search for contacts by one or more of the following search criteria:
- Subject
- Type
- Due Date: From ___, To ___
- Opportunity
- Status
- Contact Name
- Assigned To
- Account
Adding an activity
- Follow substeps (until Assigned By) mentioned under step 8 in Adding a New Contact.
- Project: Click + to select a project from the Search and Select window.
- Click to select the radio button of the appropriate project from the list below.
- Click OK.

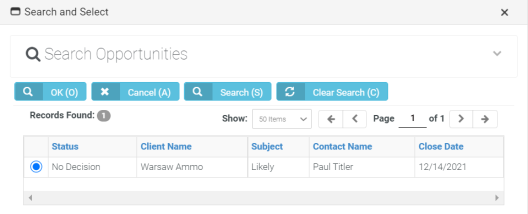
- Opportunity: Click + to select an opportunity from the Search and Select window.
- Click to select the radio button of the appropriate opportunity from the list below.
- Click OK.
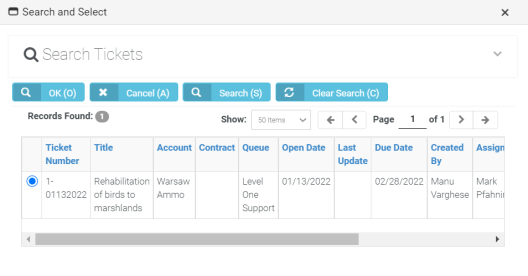
- Ticket: Click + to select a ticket from the Search and Select window.
- Click to select the radio button of the appropriate ticket from the list below.
- Click OK.
- Notes: Enter appropriate notes here.
- Click Save.
- Go to Custom Fields tab.
- Enter appropriate information in the custom fields if there are any.
- Click Save.
Opportunities
CRM > Opportunities
The Opportunities page maintains opportunities across all accounts. Creating opportunities helps the sales team track and manage the sale pipeline. The Opportunities page is an extension of the Opportunities tab in the Accounts page.
Leads vs Opportunities
Lead
- A qualified prospect that proactively wants to learn more about your products and services.
- A type of prospect who has a problem we can solve and we can sell to.
- The prospect is proactively looking: requested a white paper, a demonstration. They have questions.
- A list of names to cold call is not a lead. It's a prospect list.
Opportunity
- When the conversation turns into near-term purchase possibility.
- They have a defined time-line to make a purchase.
- You are talking with the decision maker(s) and they are actively seeking to solve problem/issue.
- Budget has been discussed and is available.
- The buyer has agreed upon next steps, which may or may not be to purchase from you.
- If you've converted a lead into an opportunity, you have an expected close date.
Searching for opportunities
You can search for opportunities by the following search criteria:
- Subject
- Status
- Account
- Contact
- Close Date
- Age
- Sales Rep
- Base Status
Adding an opportunity
- The Opportunity page is an extended version of the Opportunity tab that you find in CRM > Accounts > Opportunities.
- Go to CRM > Opportunities.
- Click New.
- In the Opportunities tab, do the following:
- Subject: Enter a short subject name.
- Next Step: This field is not editable. This field will become editable when you are editing an opportunity.
- Account: The account name appears automatically.
- Type: Select the appropriate type from the dropdown.
- Status: Select the appropriate status from the dropdown.
- Location: Select the appropriate location from the dropdown.
- Probability: Enter the percentage of probability.
- Rating: Select the appropriate rating from the dropdown.
- Contact: Select the appropriate contact from the dropdown
- Sales Representative: Select the appropriate sales representative from the dropdown.
- Customer PO#: Enter the customer PO number.
- Phone: The phone number appears automatically.
- Close Date: Select a close date from the calendar.
- Lead Source: Select the appropriate lead source from the dropdown.
- Amount: Enter the amount.
- Probability Adjusted Revenue: This is automatically calculated according to the percentage entered in the Probability field.
- Created on: This is the date on which the opportunity is created. The created date is displayed in the Creation form, Columns view, and listing.
- Description: Enter a short description.
- Click Save.
- You will now see Activities, Quotations, Notes, Custom Fields, and Attachments.
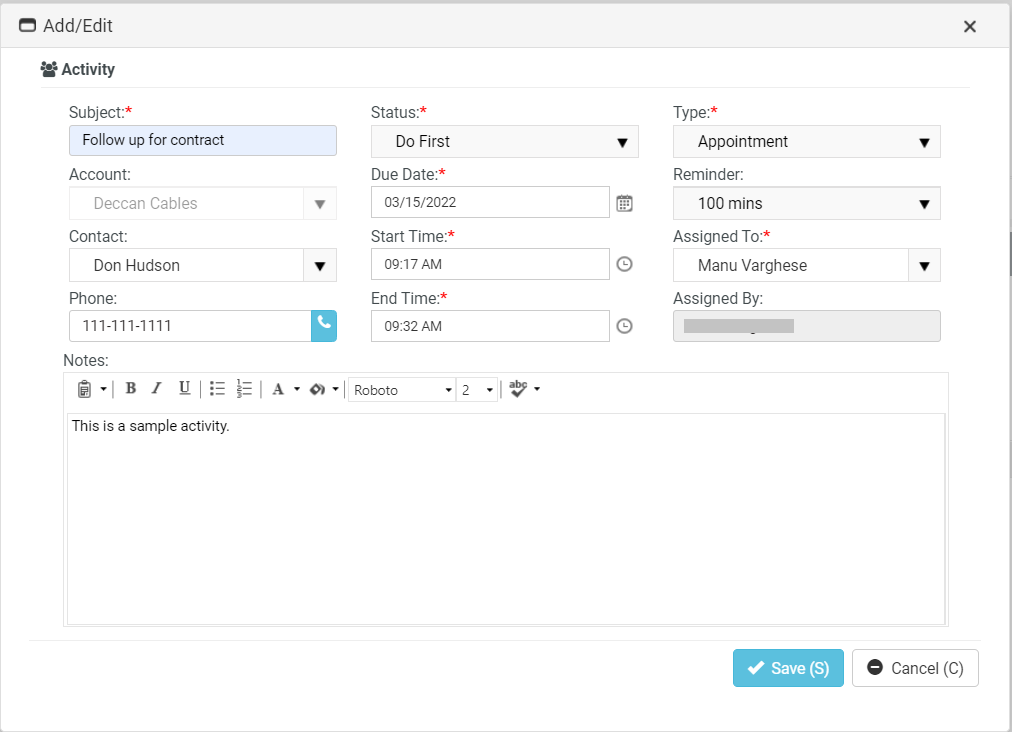
- In the Activity tab, do the following:
- Click Add. Do the following:
- Subject: Enter an appropriate subject.
- Status: Select an appropriate status from the dropdown.
- Type: Select an appropriate type from the dropdown.
- Account: This is already selected and is a non-editable field.
- Due Date: Select a due date from the dropdown.
- Reminder: Select a duration from the dropdown.
- Contact: Select the appropriate contact from the dropdown.
- Start Time: Select a start time from the dropdown.
- Assigned To: Select an employee from the dropdown. By default, this is the person who is logged in.
- Phone: The phone number automatically appears here.
- End Time: End time is usually one hour from start time.
- Assigned By: This is the person who is logged in. This field is a non-editable field.
- Notes: Enter relevant notes.
- Click Save. This will save the info related to the activity.
- For information on the Quotations tab, see Working with CRM > Quotations > Quotes.
- In the Notes tab, do the following:
- Click Add.
- Type or paste text into the Note Text edit box.
- Click Save.

- The Custom Fields tab maintains data entered in custom fields for account profiles. Data types for custom fields can be Free Text, Date or Data List. Custom fields can be set to required. Custom fields are created using the Admin module > My Company > Custom Fields page.
- Use the Attachments tab to upload files to an account profile.
- Click Save.
Editing an opportunity
- Go to CRM > Opportunity.
- Click the Open/Edit icon of the opportunity that you want to edit.
- In the Opportunity tab, make changes wherever necessary. Please remember that Probability Adjusted Revenue and Created on fields are uneditable.
- Similarly, make changes wherever necessary in Activities, Quotations, Notes, Custom Fields, and Attachments.
- Click Save.
Quotes
CRM > Quotations > Quotes
See Working with CRM > Quotations > Quotes.
Bundles
CRM > Quotations > Bundles
Sales Orders
CRM > Sales Orders
See Working with CRM > Sales orders.
Sites
CRM > Sites
The site refers to a specific place where work is undertaken for a specific purpose.
Searching for sites
You can search for sites by the following search criteria:
- Owner
- Site ID
- Name
- Site Number
- Market
Adding a new site
- Go to Site > New.
- In the Site Info tab, do the following:
- Site ID: Provide an ID for the site.
- Site Name: Enter the name of the site.
- Owner: Select the owner's name from the dropdown. The owner name is actually the account name.
- Site Number: Enter the number associated with the site.
- Market Type: Select the appropriate market type from the dropdown.
- Gate Combination: Enter the gate combination if you have one.
- Door Combination: Enter the door combination if you have one.
- Notes: Enter relevant notes.
- Direction: Specify directions to the site.
- In the Address tab below, do the following:
- Address 1: Enter the building number or building name.
- Address 2: Enter the name of the road.
- City: Enter the name of the city.
- State: Enter the name of the state.
- Zip Code: Enter the zip code of the area.
- Country: Select the country from the dropdown.
- Latitude: Enter the latitude of the address if you know.
- Longitude: Enter the longitude of the address if you know.
- Click theCustom Fieldstab.
- Enter values in the custom fields, as appropriate for this record.
- Custom fields are maintained using the Admin > My Company > Custom Fields page.
- Click the Attachments tab.
- You can upload and delete selected files here.
- Click Save.

Editing a site
- Go to CRM > Site.
- Click the Open/Edit icon of the site that you want to edit
- Make changes as necessary.
- Click Save.
Exporting
You can export the current page or all pages (i.e. the list of jobs in the grid below) to an Excel worksheet.
Click Export and then click Current Page or All Pages. The list of jobs will be available in the downloaded Excel worksheet.
Integrations
Admin > CRM > Tech Data
See Tech Data integration
Admin > CRM > Ingram Micro


