BMS-VSA integration
Introduction
RMM integrations with VSA and BMS allow you to sync your organizations and machines to BMS. This integration provides the ability to push tickets, create client portal users from VSA contacts, use LiveConnect on synced assets, and run agent procedures via workflows in BMS. Integration prerequisites such as server details can be found here.
NOTE We have a new authentication method, and this method uses access tokens instead of password. This method is more secure. We suggest that you move the integration to this new method. For detailed information, please see Use VSA Access Token: BMS | VSA Integration.
Integration has three steps and involves configuration on both BMS and VSA:
Steps for BMS-RMM integration
- Navigate to Admin > Service Desk > RMM Integration Settings.
- Click New.
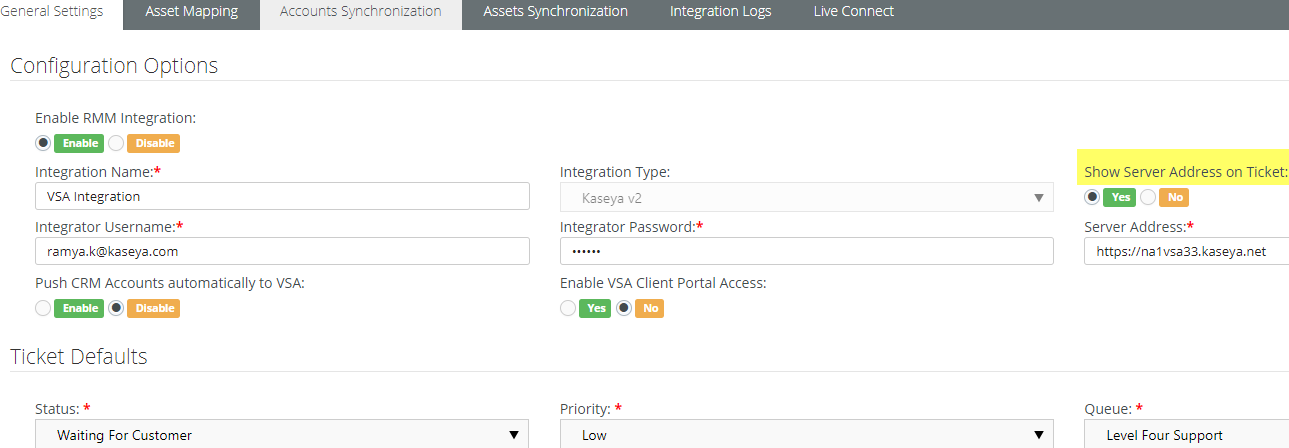
- Enter the integrator user name and password created in VSA.
- Server Address: Enter FQDN or the IP address of your VSA.
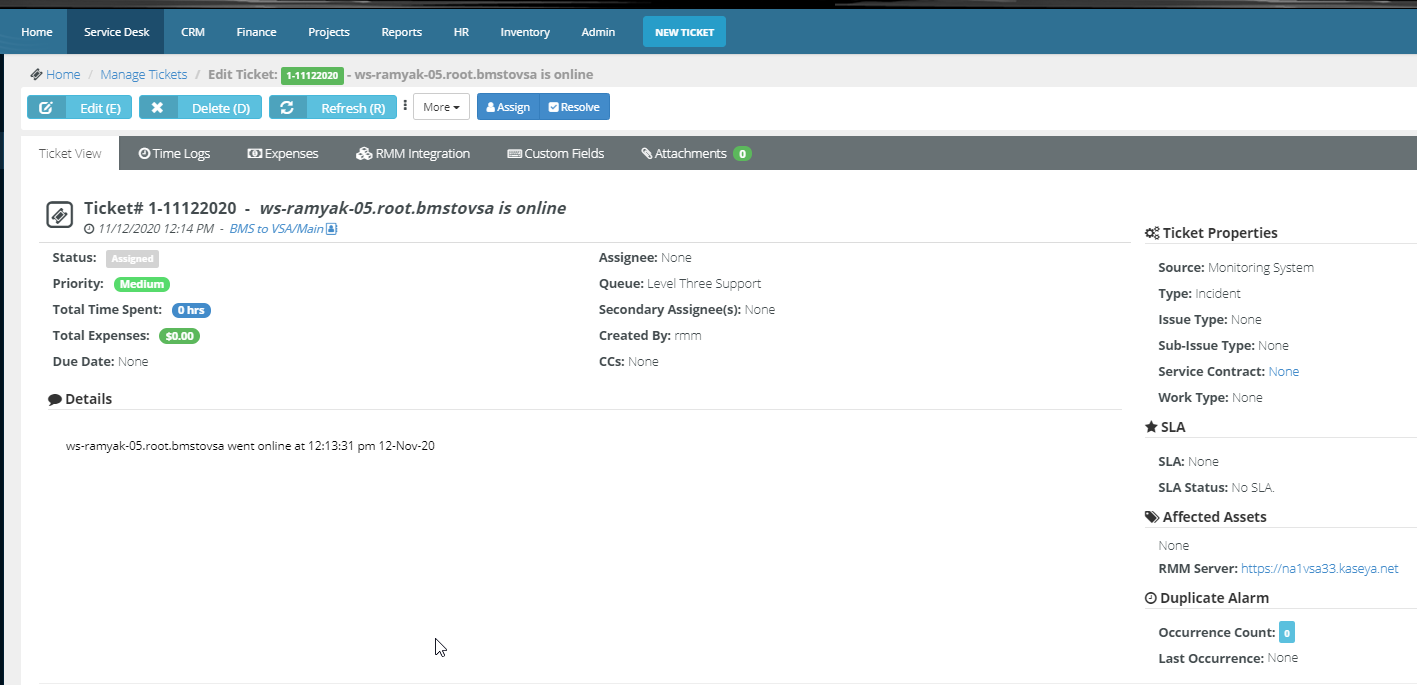
- Show Server Address: Your selection determines whether the VSA server details will be shown on tickets under Affected Assets > RMM Server.
- When a ticket is created in BMS based on a ticket in VSA, those tickets need default values for required fields. Set those defaults in the Ticket Defaults section.
- Click Save.
- Click Test Connection to confirm the integration.
VSA sync configuration
- Navigate to System > BMS Integration > Sync Configuration.
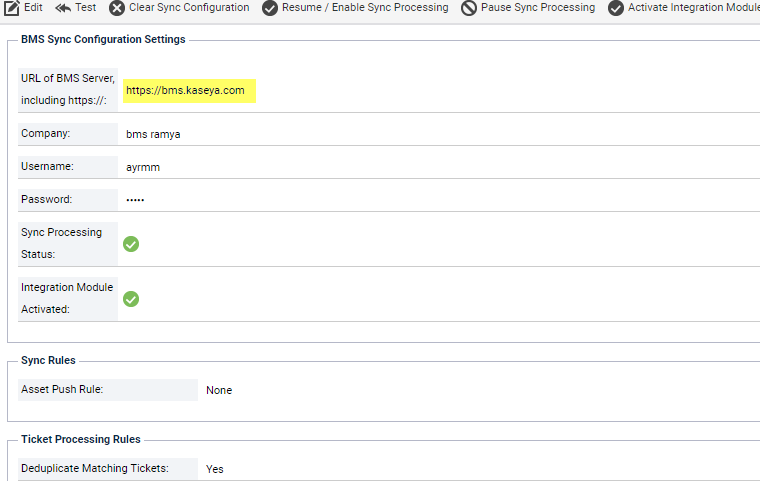
- Click Edit.
- Fill in the server details of your BMS.
- Choose Asset Push and configure the ticket processing rules as required.
- Click Save.
- Activate the Integration module.
- Click Test to confirm the integration.
The Sync Processing and Integration modules are now activated and will display a green checkmark to confirm the successful setup.
Tip! If you use an on-prem VSA which is not accessible publicly, we advise you to add our BMS server IPs to your VSA server whitelist. Refer to this article for IPs.
Live Connect
If you are using Live Connect and want to enable access between VSA and BMS, ensure that you have the latest version of the Live Connect app installed from VSA first.
Configure VSA
- Navigate to VSA > System > OAuth Clients.
- Click Register Client.
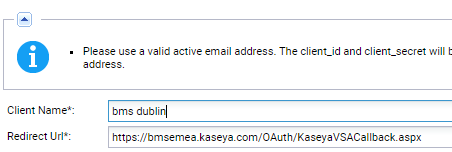
- Client Name - Enter your tenant name.
- Redirect URL - Enter your BMS server URL (https://<bms-domain-name>/OAuth/KaseyaVSACallback.aspx).
- Email - Enter a valid email address. The client secret code will be sent to this address.
Configure BMS
- Navigate to Admin > Service Desk > RMM Integration Settings.
- Click the Live Connect tab and then add the Client ID and Secret.
- Click Save.
- Navigate to My Settings > Integrations.
- Click Connect. If you are already logged into VSA, this will auto-authenticate. If you are not logged in, you will need to provide the correct credentials.
NOTE BMS has an Auto Remediation feature which enables you to associate a VSA agent procedure with a BMS workflow, and automatically execute the procedure when the workflow is triggered.
Introduction
Access tokens were introduced in VSA to replace the basic password authentication for API connections. Password authentication is deprecated. Refer to the VSA Rest API guide for more details. To support this change BMS has implemented access tokens in the RMM setup page.
Setup
Setup Access Token in VSA
Token Authentication in VSA
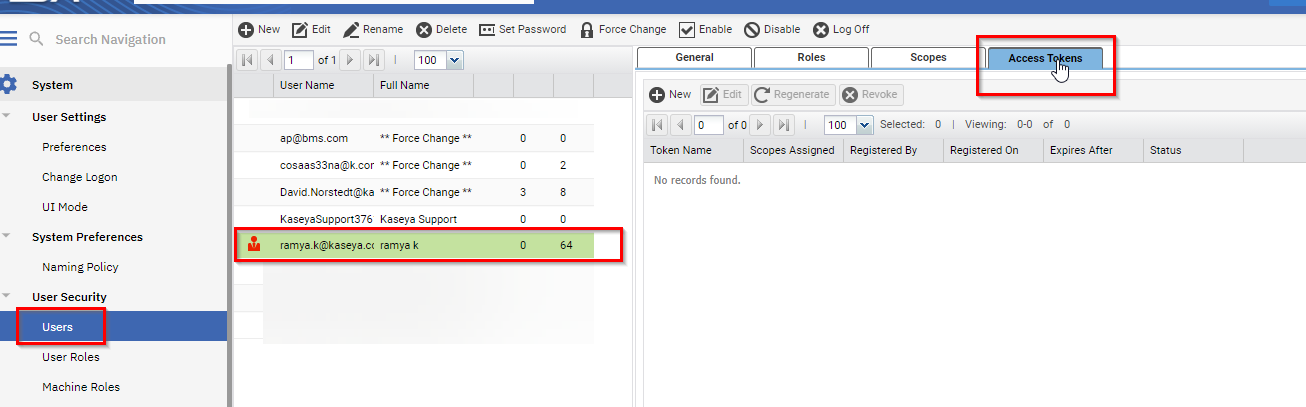
- In VSA, navigate to System > User Security > Users > User > Access Tokens.
NOTE Make sure you select the user who is integrated with BMS and not the user who is logged into VSA.
- Click New and create a token for your account.
- In the Scopes Assigned section, from the two options at the bottom, click to select REST API (Read, Write).
Data Warehouse API: This option will let you execute API calls to data warehouses endpoints using the generated token. This is not applicable to BMS-VSA integration.
REST API: This option will let you have access to the REST APIs using the generated token.IMPORTANT Do not select either the first option (Data Warehouse API) or both the options together. If you select either one of these two in this order, the integration will fail and an error message to that effect will be displayed in BMS.
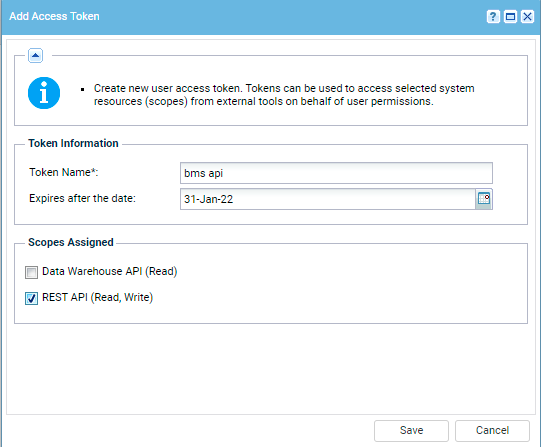
- Click Save.
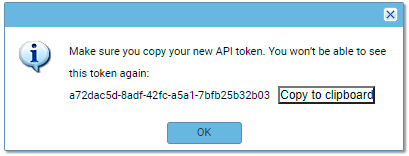
- Copy the generated token.
- The expiration period is the parameter that the user sets during token creation.
- Access to data is controlled by the scope assigned to this user.
Use VSA access token in BMS
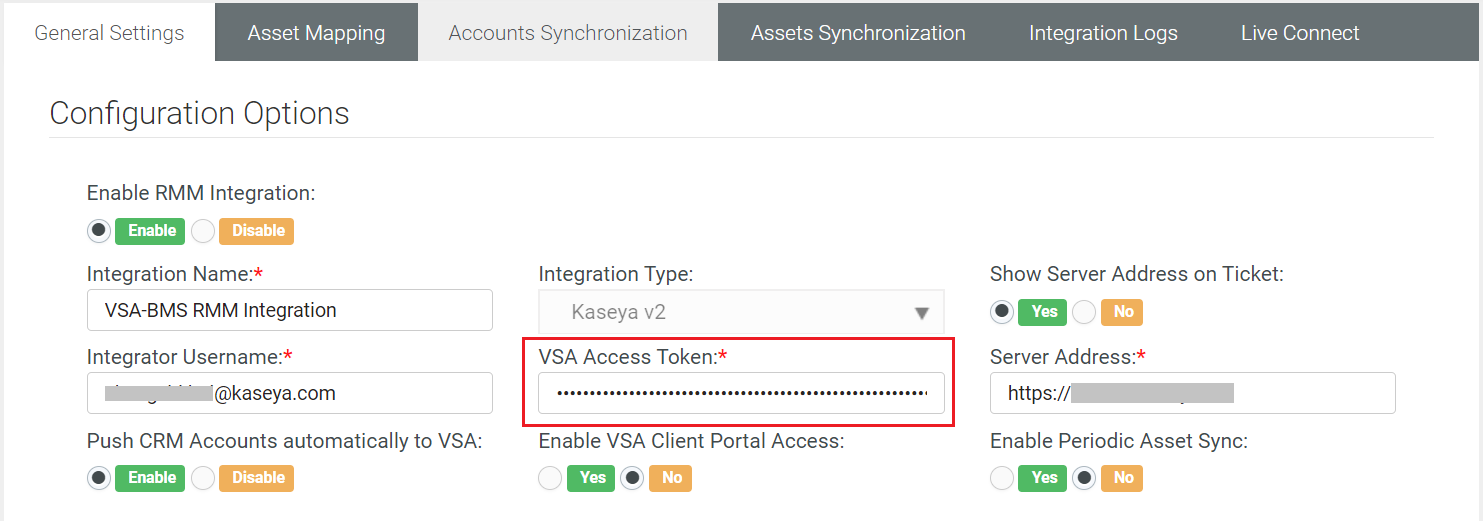
- Navigate to Admin > Service Desk > RMM Integration.
- Open your existing setup or create a new one.
- VSA Access Token: Paste the token you saved previously from VSA.
- Test the connection and save your settings.
Introduction
PSA facilitates synchronization between organizations of VSA and accounts in CRM. Organizations created in VSA can be imported in bulk to create corresponding client accounts. Mapping rules can be established between the imported accounts to facilitate importing assets and mapping them to the correct CRM account. PSA also supports the export of existing CRM customer accounts to create corresponding organizations in the VSA.
Prerequisite
An active RMM integration between PSA and VSA.
Features
- A new CRM account is created automatically when it is referenced by a new ticket or a new asset from VSA.
- By default, the mapping is based on the organization name in VSA.
- Organizations can be imported one at a time or in bulk under Admin > Service Desk > RMM Integration Settings > Accounts Synchronization > Import Accounts.
- When new accounts are created in PSA they can be set to automatically create corresponding organization in VSA under Admin > Service Desk > RMM Integration Settings > General Settings > Push CRM accounts automatically to VSA.
- Accounts in PSA can be exported to VSA and can be mapped to the corresponding organization under Admin > Service Desk > RMM Integration Settings > Accounts Synchronization > Export Accounts.
- Imported accounts are mapped to corresponding PSA accounts to facilitate sync of future assets to correct accounts.
- Mappings for existing organizations can also be set up under CRM > Accounts > RMM Integration.
IMPORTANT For CRM accounts, ensure the RMM integration mapping is done correctly with its corresponding VSA organization. Dependent items like contracts and tickets will not show correct data if the matching is not right.
Importing accounts
- Navigate to Admin > Service Desk > RMM Integration Settings > Accounts Synchronization.
- Click Load Accounts to retrieve the latest data from VSA.
- Choose one or all assets listed on the page. Bulk sync supports the import of 100 records in one go.
- Indicates that accounts and organizations have a mapping link.
- Gives you options to edit the mapping and choose a different account or location.
- Delete the mapping established.
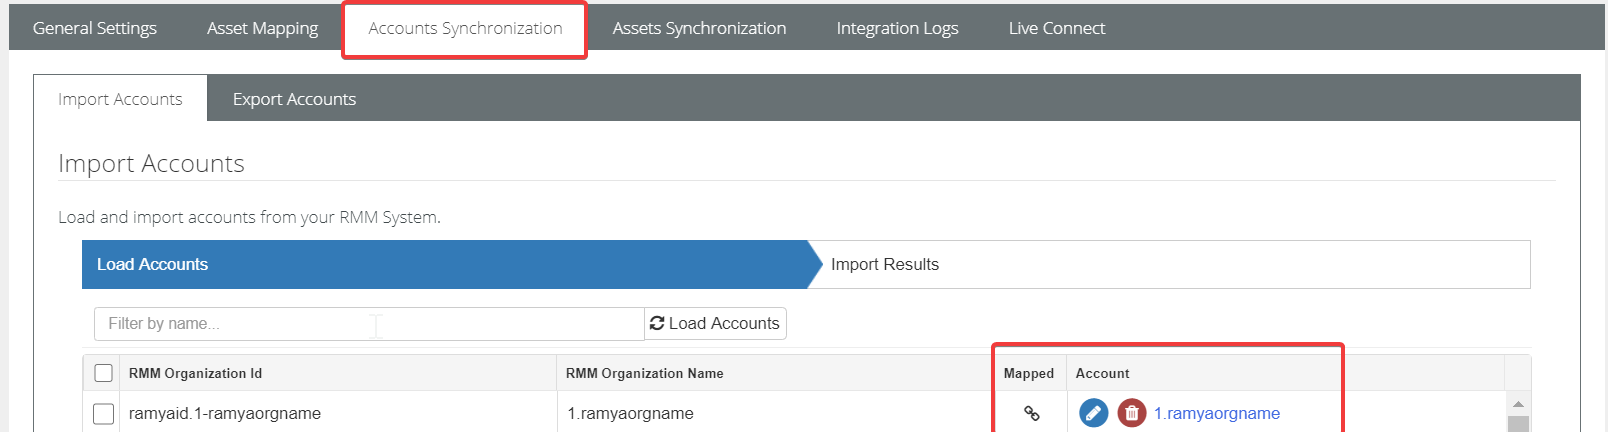
- Filter organization name to import or modify a particular account.
Mappings

Create mappings
Mappings can be established from RMM settings and also from CRM.
- From the Account Synchronization tab.
- Ability to create new CRM accounts to map with the imported RMM Organization Name.

- Ability to create new CRM accounts to map with the imported RMM Organization Name.
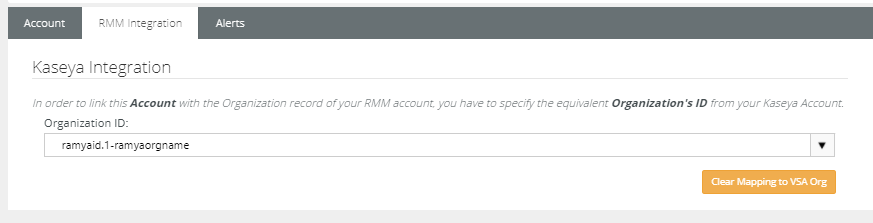
- From CRM > Accounts > (selected account) > RMM Integration tab, associate existing CRM accounts and VSA organization manually.
- CRM account will be mapped to the selected RMM organization ID.
- Assets created for this VSA organization will be following the mapping rules corresponding to it.
Edit mappings
- From the Account Synchronization tab.
- When you click on the pencil icon to edit the mapping link, you will see a dropdown with the list of accounts that are currently unmapped. You will be linking to an existing CRM account in PSA.
- Mapping from CRM
- From CRM > Accounts > (selected account) > RMM Integration tab, the dropdown will the list VSA organization that does not have any mapping in BMS.
- Assets belonging to the edited account will follow the new mapping rule.
Delete mappings
- From the Account Synchronization tab.
- You can click on the delete icon to delete the mapping link between VSA and CRM records.
- When a mapping is cleared, to save new link settings the account has to be loaded or imported again.
- Mapping can also be cleared from CRM > Accounts > (selected account) > RMM Integration tab> Clear Mapping to VSA Org.
Asset location mapping
The location field for assets is derived from linked accounts. When an asset is imported without any mapping for the account, it will, by default, take the location as Main. Once mappings are established the asset locations can be further classified based on locations and departments.
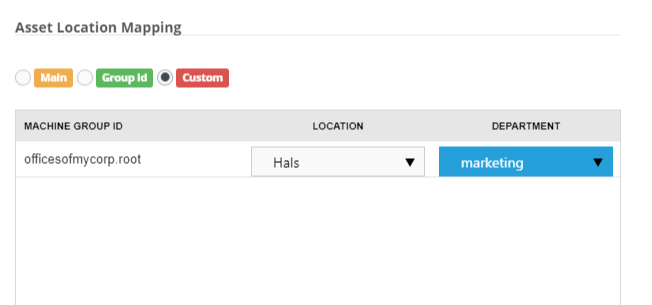
In the Account Synchronization tab of RMM settings, the Edit mapping link options provide users with options to map the assets part of the account to desired locations. Available location mapping options are Main, Group Id, and Custom.
|
Mapping options |
Corresponding asset location |
|---|---|
|
Default |
Main (Account > Main location) |
|
Group ID |
Default machine group name of the organization in VSA |
|
Custom |
Choose the custom location and department values |
- Main
- Under CRM > Accounts > Account Name > Locations, the selected main location will be seen as the location for all imported assets.
- Any account location can be updated to be the main location. Edit the location and choose Convert to Main.
- Group ID
- If this is selected, the asset location will take the machine group name of the VSA organization.
- Group ID will be added as a location under CRM > Locations list.
- If you make any manual modifications to this imported location in CRM, on the next sync. the group ID will be re-added to the list of locations.

- Custom
- Custom gives you the ability to choose locations and departments for assets belonging to an account.
- Ability to map multiple machine groups that are part of the VSA organization.
- Location and departments active in CRM will be available in this dropdown. The Department field is not mandatory for an asset.
- Location and Department chosen in the Custom option will be filled in the imported assets.
- Departments:
- Department fields are created in CRM > Account > Departments. They help users to easily identify the department that an asset belongs to.
- Departments belong to the account and can be used to indicate a team an asset belongs to. For example Engineering, Marketing, or for offices, buildings, for any kind of division you would like.
- Departments are part of the asset listing page.
- Departments can be used independently of the Custom mapping option. They can be manually associated with an asset belonging to the same CRM account.
- Departments are informational. Any manual data for the department will be overwritten if the mapping option selected is Custom.

- Existing assets will show the updated data after a re-sync.
- Sync button available on the asset under Service Desk > Assets Management > Hardware Assets will do real-time sync for an asset.
Introduction
Asset information from VSA is synchronized to BMS daily with Periodic Asset Sync. BMS runs a scheduled nightly job to get the latest asset information from VSA. With nightly sync, asset information is updated from VSA to BMS. Any new asset or updates on the assets will be matched and pushed to the asset data in BMS. All imported assets from VSA can be reviewed on the Hardware Assets page in the Service Desk module.
Prerequisite
An active RMM integration between BMS and VSA.
Features
- Asset sync is based on database object asset ID of the assets in VSA. BMS matches the data to the asset IDs and performs necessary actions.
- Actions performed on VSA will be actioned as below.
|
In VSA |
API Action |
In BMS |
|---|---|---|
|
Using Discovery a device is promoted to an Asset |
Create |
Matching asset is created. |
|
Using Discovery an agent is deployed to an asset |
Update |
Matching asset data is updated to include agent details like LiveConnect, login information, etc. |
|
Agent is installed using the Agent module |
Create |
Matching asset is created. |
|
Asset is deleted |
Update |
Matched asset is marked inactive. |
|
Agent is uninstalled. |
Update |
Matched asset is marked inactive. |
|
Asset is demoted to a device |
Update |
Matched asset is marked inactive. |
|
Asset/Agent data is updated |
Update |
Matched asset data is updated. |
- Any update made to the VSA-matched asset in BMS is always overwritten on the next sync.
- When you modify a matched asset in the UI, the asset will have reverted the changes. The asset will match the data present in VSA on the next sync.
- When a matched asset is deleted in BMS but is still present in VSA, the asset is re-imported on the next sync.
- A manual import from the Assets Synchronization page allows 100 records per sync.
- The Sync all Assets button in the Assets Synchronization page can be used to bulk import from VSA.
- An individual asset can be synced in real-time by using the Sync button available on the asset under Service Desk > Assets Management > Hardware Assets.


Setup
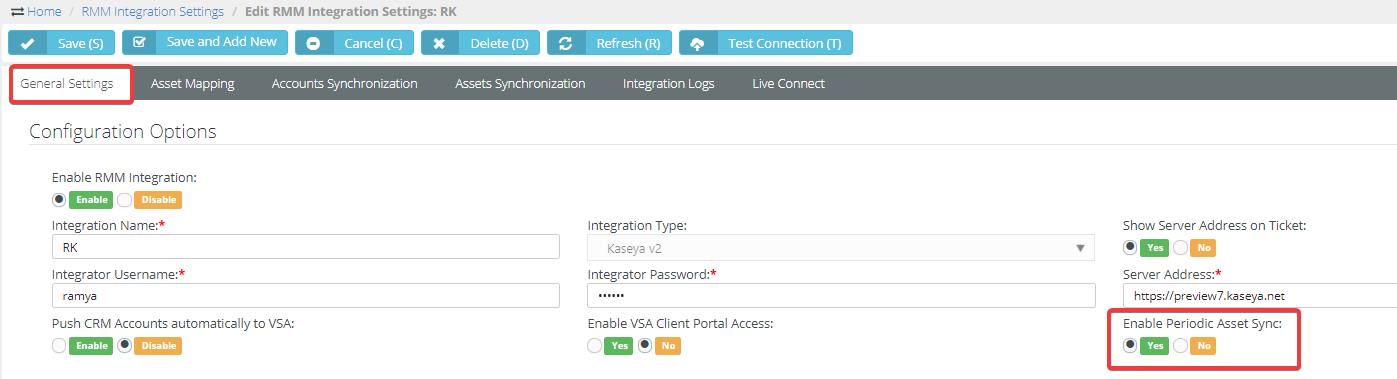
- Navigate to Admin > Service Desk > RMM Integration Settings > General Settings.
- In the Enable Periodic Asset Sync section, select the Yes option.
Logs
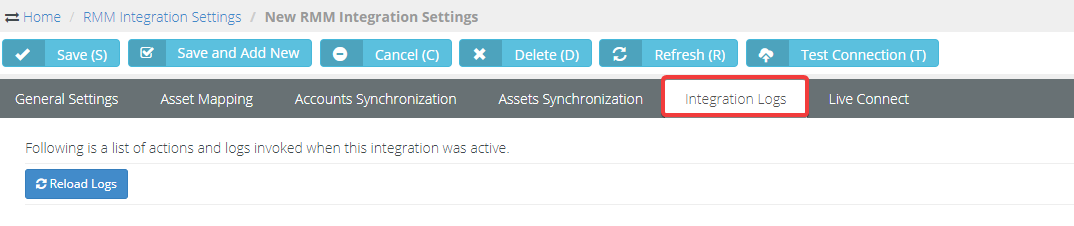
When Sync All Assets and Periodic Asset sync occurs, logs are generated. This can be reviewed under Admin > Service Desk > RMM Integration Settings > Integration Logs. The sync pushes RMM data and all the assets are updated.
Periodic sync schedules
Nightly sync happens after midnight based on the server your BMS tenant is on.
| US servers, bms.kaseya.com, and vorexlogin.com | EST hours |
| EMEA servers, bmsemea.kaseya.com | London hours |
| APAC servers, bmsapac.kaseya.com | Sydney hours |
Tips
If an asset is deleted from VSA and the record is not marked inactive in BMS, check VSA API Logs. VSA is responsible for deactivating an asset when deleted. VSA should publish Deactivate API Call to BMS.
Related topics
Introduction
Client Portal setup gives the ability to launch PSA portal to submit ticket requests from VSA Agents menu. Opening tickets this way will directly link the ticket in PSA to the user's machine where the agent is installed and to the user himself/herself. This functionality can be achieved by clicking theVSA Agent menu (system tray icon) and clicking the Contact Support menu item. The account associated with the agent will be the account that is linked to the computer regardless of who logs in.
Prerequisites
- Active RMM Integration between PSA and VSA
- VSA agent installed on the end-user machine
- Active assets synced in PSA.
Setup
Enable access to Client Portal in PSA
- Navigate to Admin > Service Desk > RMM Integration Settings.
- Enable VSA Client Portal Access to Yes.
VSA agent configuration
Update the VSA Agent menu to redirect to the PSA Client Portal.
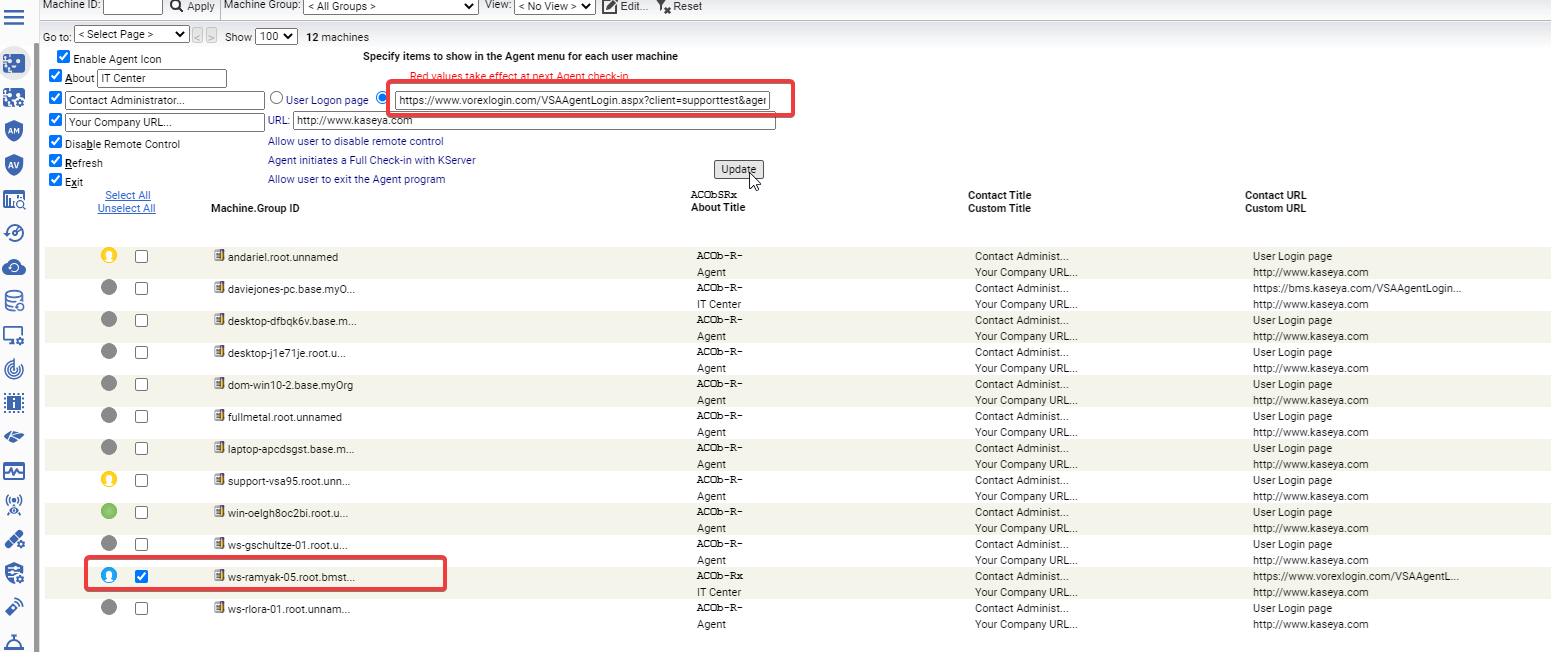
- In the agent menu configuration section in VSA, set up a dynamic link to PSA where the ticket details will be provided.
- Navigate to VSA > Agent > Agent menu.
- Select the machine, and paste the URL in the User Logon page.
- The VSA agent will be configured to invoke the PSA portal via a URL formatted like this:
https://<Server_name>/VSAAgentLogin.aspx?client={tenant}&agentguid=<guid>&machineid=<mid>&groupid=<gid>
- Server: https://<yourpsaserver>, (Find server details)
- Tenant: <Your tenant name>, (Find tenant name)
- A sample URL would be as below :
- https://www.vorexlogin.com/VSAAgentLogin.aspx?client=supporttest&agentguid=<guid>&machineid=<mid>&groupid=<gid>
- https://bms.kaseya.com/VSAAgentLogin.aspx?client=hammoud+comp&agentguid=<guid>&machineid=<mid>&groupid=<gid>
NOTE '+ 'sign is used to denote spaces. In the above example, hammoud & co is the tenant with a space between these words.
- With this URL, users will be granted access to the PSA’s Client Portal without prompting for the credentials and create tickets directly from the portal.
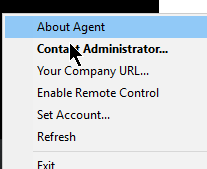
- Once the setup is completed, the Contact Administrator option in the VSA agent menu will direct the workstation end-user to the PSA Client Portal.
Registering users
Self-Registration (End-User)
- Access the VSA agent menu.
- On your workstation, right-click the Kaseya icon in the system tray.
- Click Contact Administrator.
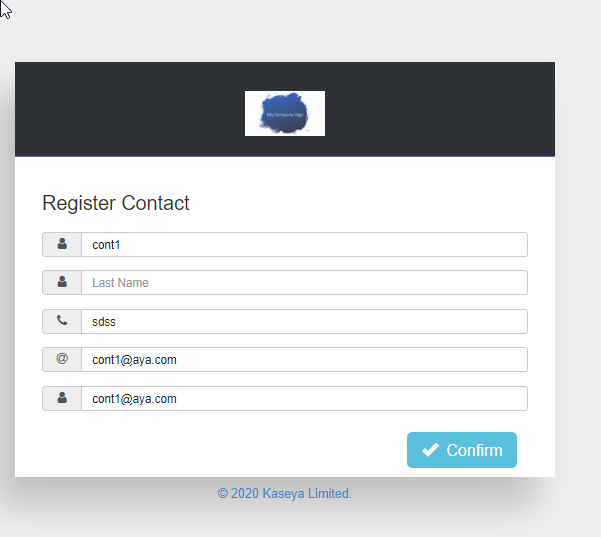
- Complete the registration form.
- Click Submit.
- A Client Portal user will be created for your username and email address. The page will auto log you into the new ticket page.
- If the agent has any details filled in the Agent > Edit profile of VSA, this will be auto-filled in the registration form. Contacts in the VSA are associated with: Agent > Configure Agents > Edit Profile. When the end-user clicks the Contact Administratorfrom the agent icon, the data will be automatically pulled.

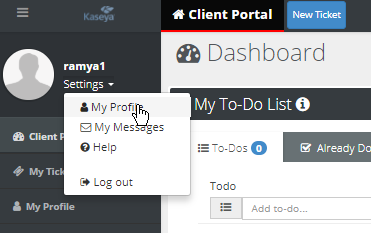
- Additionally, if the user account was created in PSA and it needs any edits, the end-user can do it under Settings > My Profile:
- End-user access rights are controlled by the admins.
Admin Setup
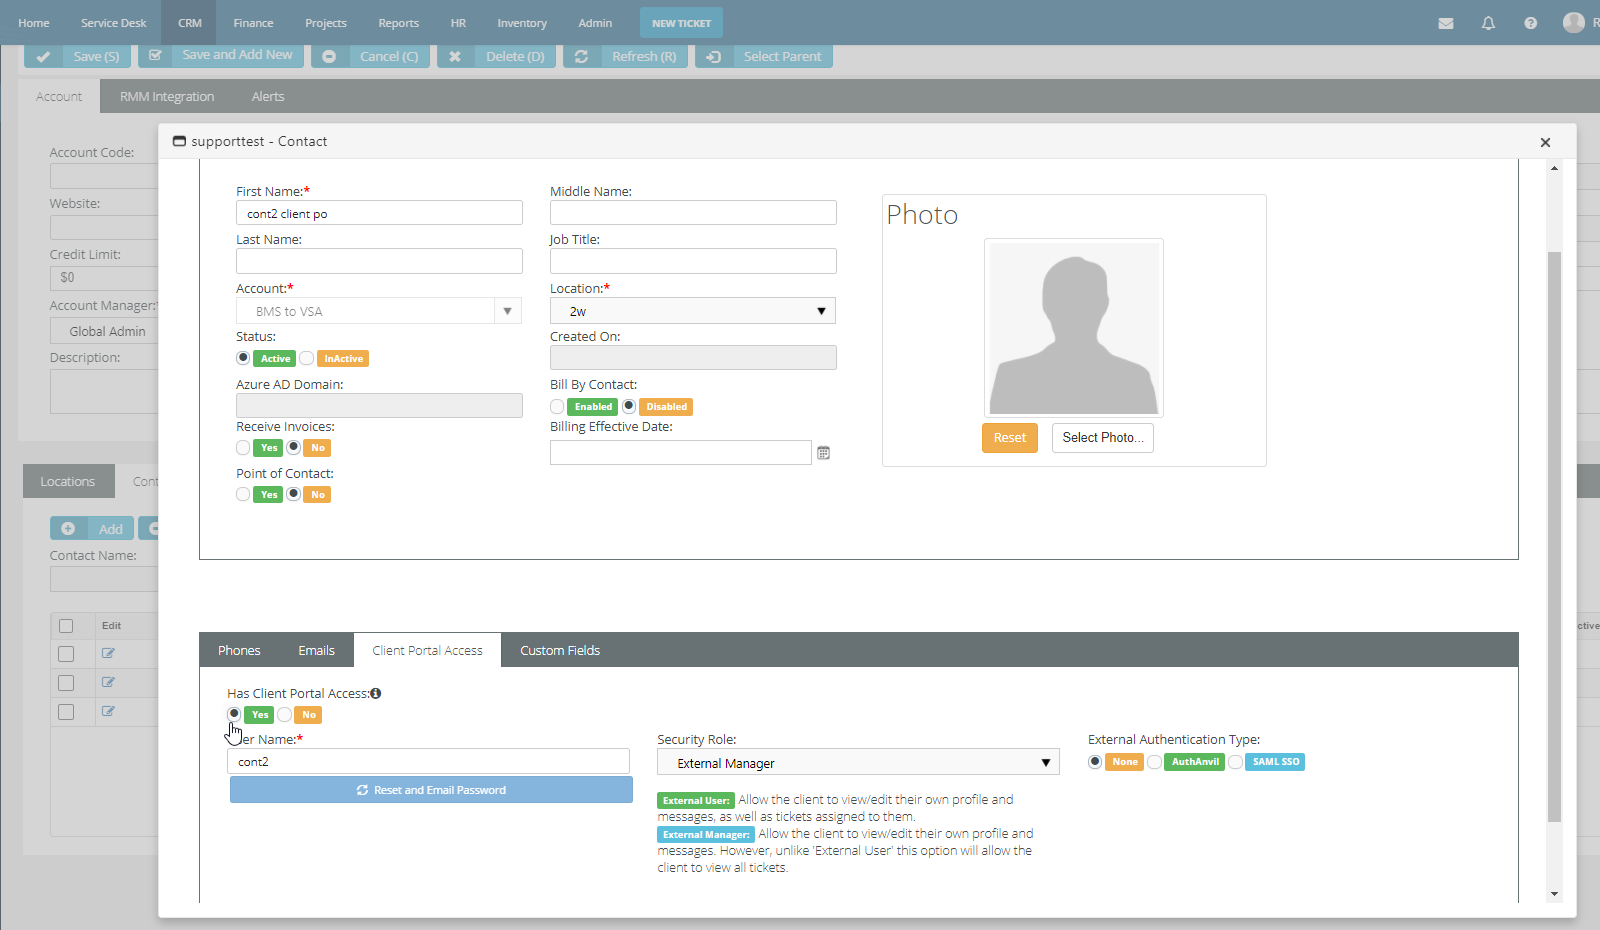
- Admins can instruct supported end-users to self-register for Client Portal access or create contacts in PSA and use batch actions to convert them to Client Portal users.
- These users will have to be associated with their respective assets in Service Desk > Hardware Assets to enable end-users to auto-login into the portal.
- The asset should be linked to the account and contact of the end-user. Account and Locationneed to be the same in CRM and asset.
- When the end-users click the contact administrator, the form will be auto-filled with the contact details from PSA.
- After clicking Submit the contact will be converted to Client Portal user, and the user will be auto-logged into the portal.
- Admins can create Client Portal contacts in PSA and associated this contact with the related assets. End users will auto-login to their portal.
NOTE Refer to this guide to understand the roles, access, and ticketing with Client Portal access.
Tips
-
Ticket creation through Agent icon fails only for specific contacts. In such a case, the agent loads the BMS login page instead of the Client Portal form. Then the user will not be able to create tickets from the VSA agent icon.
-
If the contact attached to the agent has MFA enabled, the Agent menu will force the user to enter password and MFA code.
-
In case of the above scenario, disable the MFA of the user.
-
- If the contact email is present in PSA and the end-user is registering using the onboarding form, a new additional entry for this email will be created and marked as Client Portal user.
- If the contact email is present in PSA and is marked as Client Portal user, the registration form will throw a duplicate email found error. Admins will have to manually register or associate the contact to the correct asset for portal setup.
- End users will auto-login to the portal's Edit ticket page.
- You can create ticket templates (Home > My Templates) to ease the process of manual ticket creations.
- CRM > Contacts listing has a column that can be used to view contacts that have Client Portal enabled.
Introduction
With RMM integrations set up with PSA and VSA, any ticket creation in the VSA will be auto-pushed to PSA's Service Desk. Follow this RMM setup guide to set up your RMM VSA integration.
Prerequisites
- RMM integration setup in PSA
- Identify or create a new dedicated VSA user account used by PSA to access the VSA.
- Example: BMS_service. The VSA user account should have access to all organizations.
- Identify the root user in PSA.
- The root user is the topmost employee in the HR > Organizational Chart page. It is recommended to use this user for RMM integration to ensure all PSA > CRM customer accounts and PSA > Service Desk tickets can be accessed.
Features
-
With the activation of RMM VSA integration, modules will no longer create tickets in VSA. The email readers for Service Desk and ticketing will no longer be polled.
-
NOTE Existing tickets are not processed from VSA to PSA
-
If the sync processing is paused, the ticket generation will also be paused. If the integration gets disabled, the ticket generation will continue to occur in VSA ticketing.
-
Once the integration is configured, you can test it by triggering a system-generated ticket in the VSA and then viewing the corresponding ticket in PSA. Closing the BMS ticket also closes the alarm in VSA that was created by the same alert. This feature requires the System > Configure > Enable auto close of alarms and tickets checkbox to be checked in VSA.
Ticket integration
- Service Desk > Tickets > (selected ticket) > Edit > RMM Integration.
- Disable the VSA > Ticketing email server by checking the Disable email reader checkbox in VSA > Ticketing > Email Reader page.
- If the Service Desk module is installed in the VSA:
- Click Disable in VSA > Service Desk > Incoming Email and Alarm Settings
page. - Uncheck the Activate Service Desk checkbox on the VSA > Service Desk > Global Settings page
- Click Disable in VSA > Service Desk > Incoming Email and Alarm Settings
Triggers
- In VSA, use a monitoring event to create a ticket for an agent in an integrated organization and machine group.
- In PSA, navigate to Service Desk > Tickets page.
- Select the PSA ticket created for the VSA monitoring event.
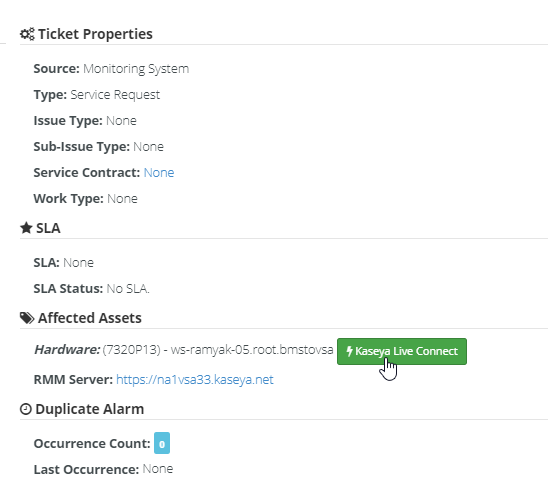
- The Ticket View > Affected Assets section identifies the machine, group, and organization of
the agent account in VSA. Click LiveConnect to start a session on this machine. A separate LiveConnect window opens. - Select the RMM Integration tab.
- The Ticket Reference identifies the value shown in the Record Reference column in the Sync Transaction Log page in VSA.
- The Status column in the Sync Transaction Log displays the PSA ticket number created.
- Occurrence Count: For duplicate alarms, the number is incremented as an indication of re-occurring alarms
- The ticket title is derived from the description of the VSA alarm.
Background process
VSA hits a BMS API to resolve tickets when related alerts are closed in VSA. The flow can be described as follows:
- VSA alert is opened.
- VSA calls BMS API to create equivalent ticket in BMS.
- BMS creates ticket.
- VSA checks status using status API to get BMS ticket ID for the related alert.
- VSA alert is closed automatically or manually.
- VSA calls BMS API to resolve related alerts.
- In VSA, the BMS API Log page displays a log of REST API requests related to the integration between VSA and BMS.
Related topics
Introduction
BMS-VSA integration facilitates the push of assets from VSA to BMS. Based on the audit data from VSA, updated information is synced with BMS.
Asset creation in BMS
Assets created in VSA using any one of the below methods notify BMS to create a matched record in BMS.
- When an agent is deployed/installed on a device.
- When a device is promoted to an asset in the Discovery module.
Asset deletion in BMS
Assets deleted in VSA using any one of the below methods notify BMS to deactivate the record in BMS.
- When an agent is uninstalled and its asset data is deleted from VSA
- When an asset is demoted to a device in the Discovery module.
BMS field mappings
Mapped fields between VSA and BMS synced assets are shown in the table below:
|
VSA fields |
BMS UI |
|---|---|
|
VSAOrgName |
Account |
|
AssetName |
Name |
|
AssetType |
Category |
|
MachineGroupId |
Machine Group ID |
|
Description |
Description |
|
SerialNumber |
Serial |
|
OsType |
OS Type |
|
CurrentUser |
Current User |
|
MaxMemorySize |
Max Memory Size |
|
MaxMemorySlots |
Max Memory Slots |
|
IpAddress |
IP Address |
|
SubnetMask |
Subnet Mask |
|
DefaultGateway |
Default Gateway |
|
MacAddress |
Mac Address |
|
DNSServers |
DNS Server(s) |
|
MotherboardManufacturer |
Motherboard Manufacturer |
|
DHCPServer |
DHCP |
|
MotherboardProductCode |
Motherboard Product Code |
|
MotherboardVersion |
Motherboard Version |
|
MotherboardSerialNumber |
Motherboard Serial Number |
|
BusSpeed |
Bus Speed |
|
ChassisSerialNumber |
Chassis Serial Number |
|
ChassisVersion |
Chassis Version |
|
ChassisAssetTag |
Chassis Asset Tag |
|
ChassisType |
Chassis Type |
|
AcquisitionDate |
Acquisition Date |
|
WarrantyExpDate |
Warranty Expiration Date |
|
FirstCheckIn |
First Check In |
|
LastCheckIn |
Last Check In |
|
LastReboot |
Last Reboot |
- The Product Name, Manufacturer, and Chassis Manufacturer fields are seen empty in the BMS asset details based on the values returned by VSA API.
- The following fields found in Additional Info of the Hardware Asset will not be updated by this sync as they are part of BMS UI.
| Acquisition Date |
| Expiration Date |
| BarCode |
| Model Number |
| Contact |
| Purchase Cost |
| Vendor |
| Asset Tag |

- The Contact field is not updated using this sync.
Related topics
This is our current mapping between VSA and BMS fields. The tables are in a specific order. So, we follow the same order and iterate through them starting with Table 1, Table 2 and finishing with Table 3. As you can see, there are some fields that are common among the tables, the last value will always prevail. For example, Product Name will have the value from Table 3 if there is a value there. If there is no value in Table 3, then it will have the value from Table 1.
| From the Asset Endpoint - Table 1 | |
| BMS | VSA |
| Asset Name | AssetName.MachineGroup |
| Machine Group Id | MachineGroup |
| Description | DeviceName |
| Asset Type | AssetType (Based on the AssetTypeId) |
| Product Name | DeviceInfo.HostName |
| Asset Manufacturer | DeviceInfo.Manufacturer |
| Machine Version | DeviceInfo.Version |
| SerialNumber | DeviceInfo.SerialNumber |
| OS Type | DeviceInfo.OSType |
| OSInfo | DeviceInfo.OSInfo |
| Motherboard Manufacturer | DeviceMotherboard.MotherboardManufacturer |
| Motherboard Version | DeviceMotherboard.MotherboardVersion |
| Motherboard Serial Number | DeviceMotherboard.MotherboardSerialNum |
| Motherboard Product Code | DeviceMotherboard.MotherboardProductName |
| IP Address | DeviceIP.IPAddress |
| SubnetMask | DeviceIP.SubnetMask |
| DHCP Enabled | DeviceIP.DHCPEnabled |
| MacAddress | DeviceIP.MACAddress |
| MaxMemorySlots | DeviceMemories |
| MaxMemorySize | DeviceMemories.MemorySize |
| From the Agent Endpoint - Table 2 | |
| BMS | VSA |
| OS Info | OSInfo |
| Major Version | OSVersion |
| Last Loginname | LastLoggeedInUser |
| Last Reboot | LastRebootTime |
| Last CheckIn | LastCheckInTime |
| Current User | CurrentUser |
| Max Memory Size | RamMBytes |
| Default Gateway | DetaultGateway |
| DNS Servers | DNSServer1 | DNSServer2 |
| DHCP Server | DHCPServer |
| Primary Wins Server | PrimaryWINS |
| Secondary Wins Server | SecondaryWINS |
| Connection Gateway Ip | ConnectionGatewayIp |
| First CheckIn | FirstCheckIn |
| From the Agent Audit Summary Endpoint - Table 3 | |
| BMS | VSA |
| Product Name | SystemInfo.ProductName |
| Machine Version | SystemInfo.Version |
| Serial Number | SystemInfo.SysSerialNumber |
| Wins Enabled | NetworkInfo.WINsEnabled |
| PrimaryWinsServer | NetworkInfo.PrimaryWINS |
| SecondaryWinsServer | NetworkInfo.SecondaryWINS |
| ConnectionGatewayIp | NetworkInfo.ConnectionGatewayIp |
| IpAddress | NetworkInfo.IpAddress |
| SubnetMask | NetworkInfo.SubnetMask |
| DefaultGateway | NetworkInfo.DefaultGateway |
| MacAddress | NetworkInfo.MacAddr |
| DHCPEnabled | NetworkInfo.DhcpEnabled |
| DHCPServer | NetworkInfo.DhcpServer |
| DNSServers | NetworkInfo.DnsServer |
| LastCheckIn | TimeInfo.LastCheckin |
| LastReboot | TimeInfo.LastReboot |
| FirstCheckIn | TimeInfo.FirstCheckin |
| ChassisManufacturer | Chassis.ChassisManufacturer |
| ChassisType | Chassis.ChassisType |
| ChassisVersion | Chassis.ChassisVersion |
| ChassisSerialNumber | Chassis.ChassisSerialNumber |
| ChassisAssetTag | Chassis.ChassisAssetTag |
| MotherboardManufacturer | Motherboard.MotherboardManufacturer |
| MotherboardProductCode | Motherboard.MotherboardProduct |
| MotherboardVersion | Motherboard.MotherboardVersion |
| MotherboardSerialNumber | Motherboard.MotherboardSerialNumber |
| BusSpeed | Motherboard.ExternalBusSpeed |
| MaxMemorySize | CPURAM.MaxMemorySize |
| MaxMemorySlots | CPURAM.MemorySlots |
Introduction
Asset Category mapping option allows you to decide what the asset category will be for the hardware asset when its synced from VSA. The assignment options are available for an asset with agent machine and assets without an agent.
Prerequisite
An active RMM integration between BMS and VSA.
Setup
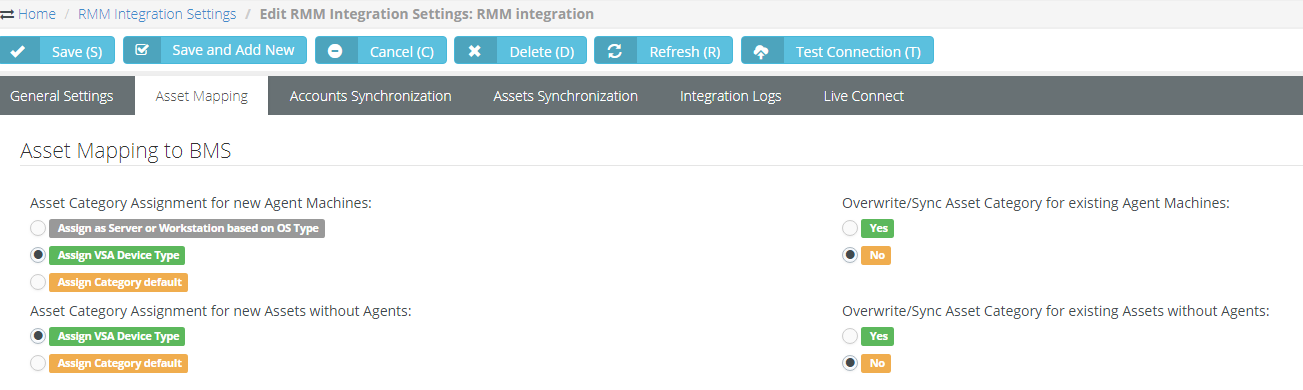
Navigate to Admin > Service Desk > RMM Integration Settings > Asset Mapping.
Asset Category Mapping: Assignment
- Assign as Server or Workstation based on OS Type
- When this is selected, the category of the new BMS asset will be the same as the "OS Type" of the VSA asset.
- If OS type contains the word "server," the category will be set to "server", If not it will be "workstation".
- Assign VSA Device Type
- When this is selected, the category of the new BMS asset will be the same as the "Device Type" of the VSA asset.
- Assign Category default.
- When this is selected, the category of the new BMS asset will be the default item that is defined in your BMS lists.
- Lists are found under Admin > My Company > Lists > Asset Hardware Category.
Overwrite/Sync Asset Category: Yes
- An asset category is modified in Service Desk > Assets.
- Upon the next sync, the category will be overwritten based on the setting specified for assignment.
Overwrite/Sync Asset Category: No
- An asset category is modified in Service Desk > Assets.
- The Category field will be the same as modified for the asset and will not be updated during the re-sync of the asset.

IMPORTANT The Mapping and Overwrite settings will be invalidated if the assets are synced over manually after the change was applied. The data will revert to what is set in the VSA.
Related topics
Introduction
This topic provides a solution for the BMS nightly jobs failure between on-prem VSA and BMS.
Applies to:
- VSA on-prem users
- Active RMM integration with BMS and VSA
NOTE This article has been updated with additional static IPs. IP addresses listed in the table below will have to be added to your whitelist.
Explanation
We schedule nightly jobs to update data fromVSA to BMS. Manual syncs are real-time. BMS servers directly communicate with VSA. Jobs like periodic asset sync, sync all assets, get units automatically in contracts are scheduled as nightly jobs. These jobs are scheduled on servers that are hosted separately on the AWS Cloud Services.
After our recent internal security update, communications between the nightly job servers and VSA were indicated to be blocked. To work around this, we advise all our on-prem VSA customers to whitelist the following IPs:
|
Server |
URL |
IP |
|---|---|---|
|
US/Vorex |
35.85.198.101 34.220.45.225 |
|
|
APAC |
3.24.222.66 13.210.44.220 |
|
|
EMEA |
3.125.67.39 18.184.219.227 |
Related topics
Bill by agent allows you to charge your customers based on the number of assets being managed in your RMM. Costs will be prorated based on the asset count.
Prerequisites
- Active RMM Kaseya V2 integration.
- BMS accounts must be linked with the organization record of your RMM account.
- MFA should be disabled for the integrator user.
Features
- BMS runs a nightly job on VSA to sync the asset counts and update the contracts accordingly.
- Billing units will be incremented and decremented based on agent/asset addition or deletion to associated RMM groups. Correspondingly a new pro-ration period will be created.
- Billing units are based on RMM organizations/groups/machines in VSA.
- Billing can be further filtered on your contracts based on your views present in RMM.
- Billing automation job will post whatever is available at the time of execution which includes the normal and pro-rated periods.
- Refer to this article to see an example of a price to asset billing job.
Billing and proration
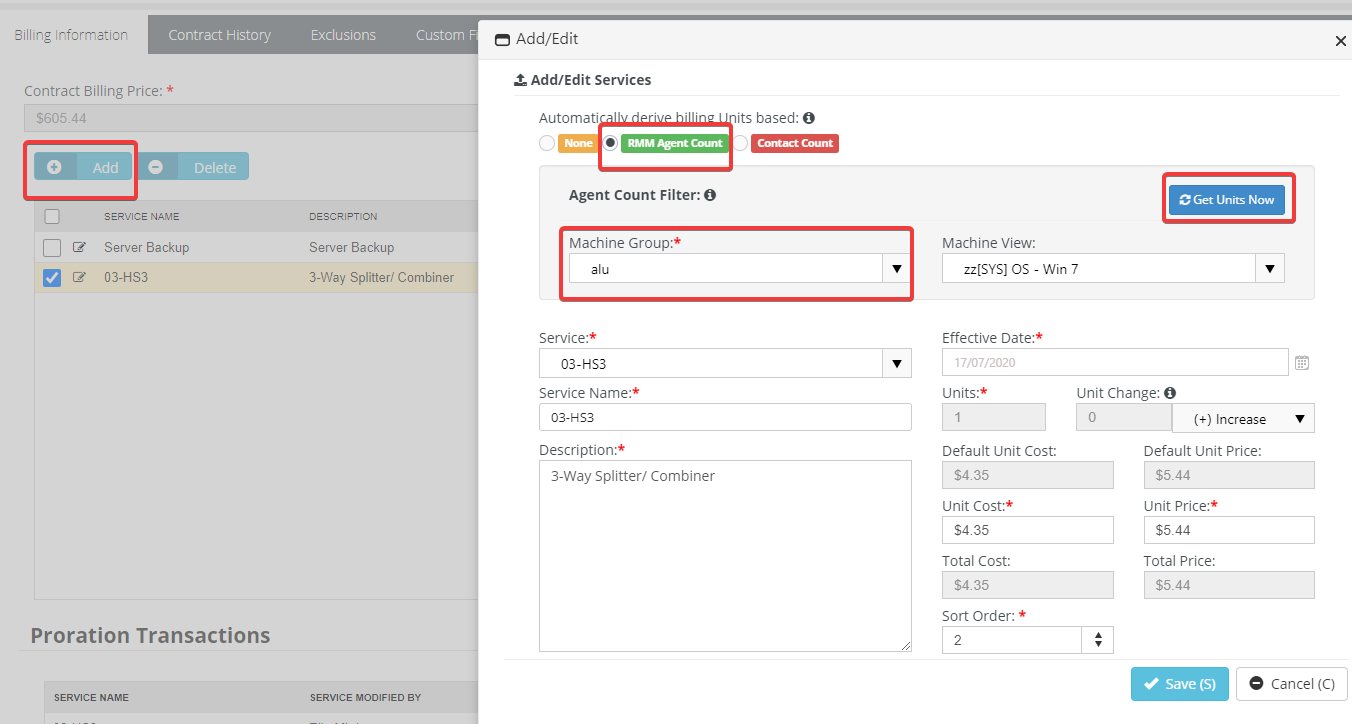
- Create or update your service item on a recurring service contract.
- Choose to Bill by RMM Agent Count.
- Choose the associated machine group for your account. Additional Machine View filter can be used if needed to further filter the agent count.
- Get the agent count by clicking Get Units Now.
- Units field will be auto-populated with the agents/assets matching with your RMM.
- These units can be billed in Billing Review/Automation.
- Once units are posted and invoiced, units can still be incremented or decremented for the posted month.
- Incremental or decremental amount will be added as new line items and will be updated for the following months.
- Units count will be updated if the agent/asset was moved to a different group or deleted in your RMM.
- Effective date during unit updates will be the date when the units are updated and proration will be calculated from.
- Prorated transactions in the contract are displayed when a change has happened in the Unit, with the effective date the change was detected.
- The system will also notify you when this has happened if the Notifications in the contract are defined.
- To prevent proration errors, users cannot change the way units get derived after a service is saved. Recurring Services Contract > Services > Add/Edit Services > Automatically Derive Billing Units options will get disabled.
Introduction
BMS allows seamless integration between VSA and IT Glue. All three products communicate with each other to help you manage your assets and accounts, allowing you to automate your tasks.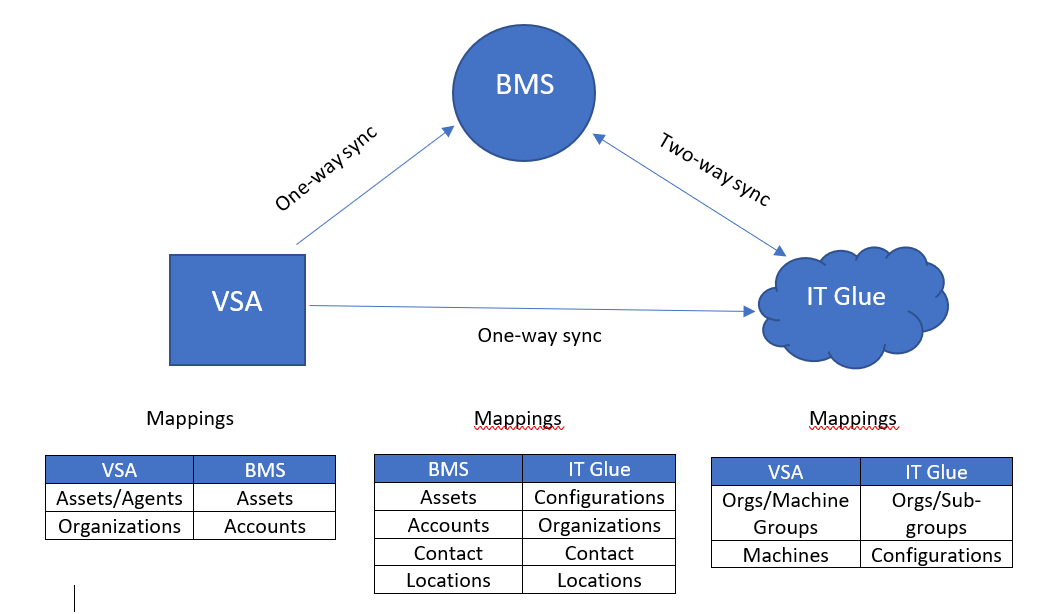
If you are configuring all three products for the first time, you will need to set up the connections. Then, data created will start to sync over.
If you already have data in one or more of the above products, set up the integrations, and perform manual sync for the existing data to be synced over for the first time.
Prerequisites
User accounts:
- In BMS, you must have a dedicated user account with API access.
- In VSA, you must have a dedicated user account with either a Master or System role and scope. The scope of the integrator user controls the visibility and access of organizations from VSA. A forbidden message will appear in BMS if there is an access issue.
- In IT Glue, you must have an administrator or a manager-level role. A manager role will only be able to see RMM matched/unmatched data for organizations that they have explicit access to.
IMPORTANT The above user accounts should not have any MFA enabled.
A valid SSL certificate applicable for on-premise VSA.
Tenant details:
- For BMS, you will need the Server URL/Fully Qualified Domain Name (FDQN) and Company/Tenant name.
- Navigate to My Profile: Click on your name on the right of the top navigation bar. Gateway URL is the server URL of your tenant, eg: https://bmsemea.kaseya.com/ and Company/Tenant name will be listed here.
- For VSA, you will need the logon URL.
- For IT Glue, you will need your IT Glue subdomain.
- Each IT Glue account has its own unique URL that is generally in the format of https://mycompany.itglue.com or https://mycompany.eu.itglue.com. The first part of the URL (mycompany) is called the subdomain.
Ensure that you have noted down these details before you begin the integrations.
Instructions
Please refer to the guides linked below to get started on each of the integration processes. We strongly recommend you follow the below order for the setup.
Introduction
With RMM integration with PSA and VSA, you will also be able to utilize the features to launch LiveConnect for an asset from PSA. This guide details the setup and configuration for the LiveConnect for an active RMM VSA PSA integration.
Prerequisites
- Active RMM Integration between PSA and VSA.
- The latest version of the Kaseya LiveConnect application.
- Allow popups for all sites on the browser you are using during configuration.
Configuration
Register your PSA instance in the target VSA
- See the VSA > System > OAuth Clients help topic for instructions.
- Client Name: You can use your tenant name or an easy name that makes sense.
- Navigate to My Settings: Click your name on the right of the top navigation bar
Gateway URL is the server URL of your tenant, eg: https://bmsemea.kaseya.com/, and Company/Tenant name will be listed here.
- Navigate to My Settings: Click your name on the right of the top navigation bar
- Provide a Redirect URL. The format should be: https://<yourpsaserver>/OAuth/KaseyaVSACallback.aspx
- Server: https://<yourpsaserver>, (Find server details)
- Provide an email address that will send you a Client ID and Client Secret.
Set up LiveConnect in PSA
- Navigate to Admin > Service Desk > RMM Integration Settings > LiveConnect.
- Enter the Client ID and Client Secret from the mail into the Live Connect tab in PSA.
- Save the RMM Integration Settings record with the new Client ID and Client Secret values entered.
- Save your changes to this RMM Integration Settings record.

Launching LiveConnect
LiveConnect for an asset can be accessed from these pages. LiveConnect authentication can be done from these pages or from the My Settings page.
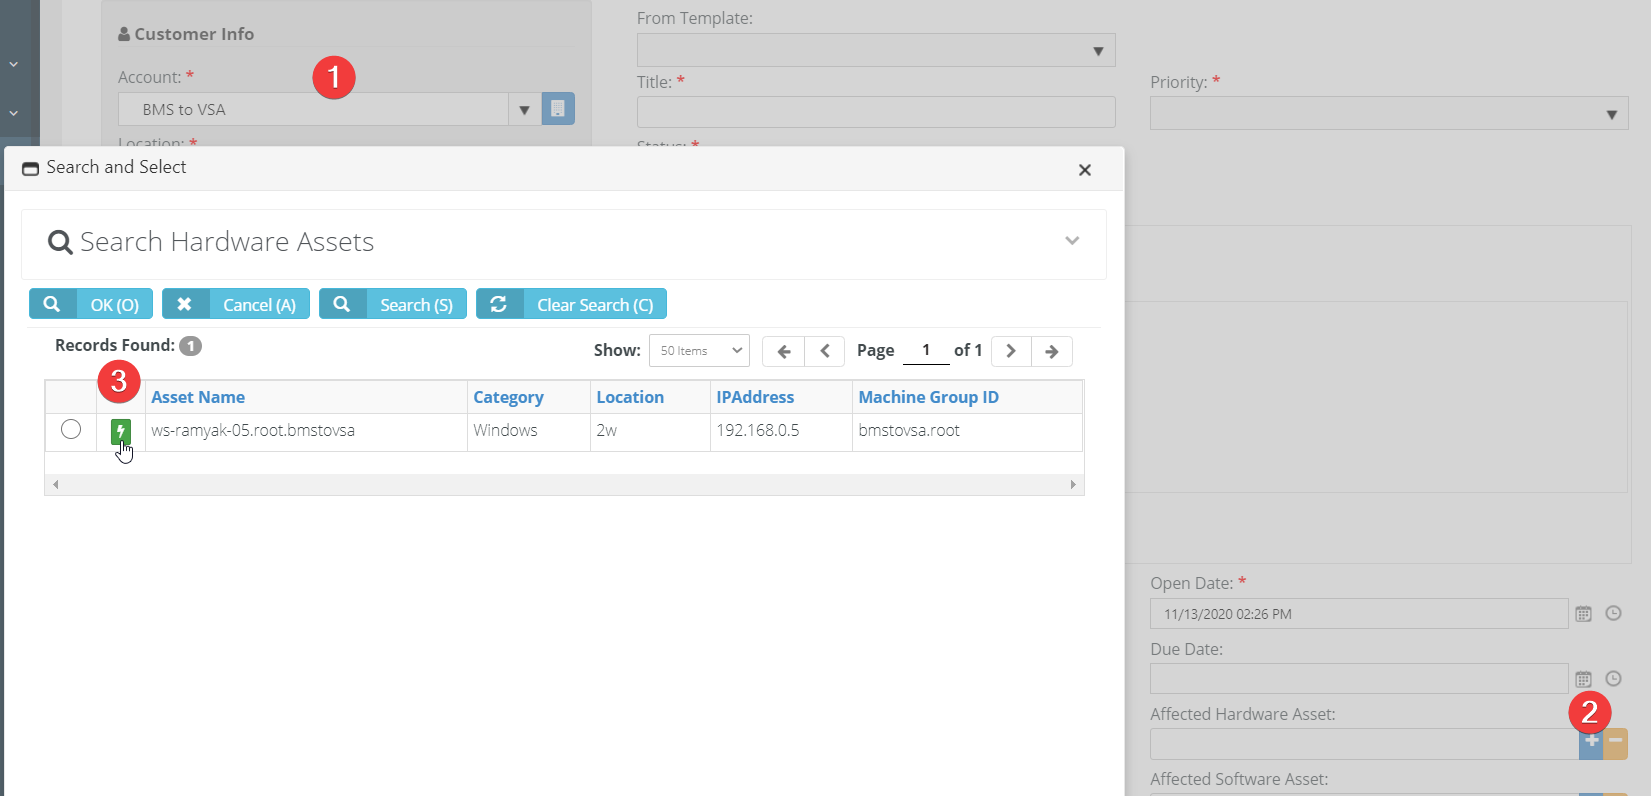
- Navigate to Service Desk > Asset Management > Hardware Assets page
- The View Ticket tab of an open ticket.
- Use the Search Hardware Assets dialog to select a hardware asset and link it to a ticket.
My Settings: Navigate to Home > My Settings > Integrations > LiveConnect Integration > Connect.
- Once you click to authenticate, PSA will direct you to log into VSA. If you are already logged in, it should ask you to allow the auth.
- After you are successfully logged in, the icon would no longer show amber in color.


Providing LiveConnect access to your techs
- Navigate to the VSA > Admin > Security Roles page.
- Edit the security roles used by your Service Desk technicians.
- For each security role that applies, ensure the Kaseya LiveConnect special feature is checked in the Service Desk section of the Permissions tab.
- For each user that will be using the LiveConnect feature, download and install the VSALiveConnect app on the local computer.
Introduction
This section takes you through the steps that are required to access a hardware asset through the remote control feature. The remote control feature enables you to access a hardware asset of an account through remote access and troubleshoot the asset provided you have a VSA10-BMS integration in place.
Prerequisite
VSA 10-BMS integration
Steps
-
Make sure your VSA 10-BMS integration is in place. For more information, see VSA 10-BMS integration.
-
Open the particular ticket from the Tickets page.
-
Go to the Affected Hardware tab.
-
Click Add Asset.
-
Select the asset from the list of assets. The list of assets that appear is related to the particular account. If you change the account, the list of assets changes as well.
-
Click Save. The details appear under the tab. You will now see four tabs under this tab - View Asset, Change Asset, Remove Asset and Remote Control. You can open a remote control from the asset itself. The Remote Control button shows only if you have an active VSA 10-BMS integration in place.
-
Click Remote Control. The connection will show a list of active sessions.
-
Click an active session. The connection will prompt for two-factor authentication.
-
Use your mobile phone and enter the time-based one-time passcode.
-
Click OK. Once the connection is successful, you will find a small VSA 10 screen showing your active session.


