Getting started: Overview
Introduction
This topic will help you get started with your registered BMS company. This is designed for the administrators responsible for setting up and managing the BMS software solution. Depending on the size of your organization, you may want to limit the number of global administrators (the highest level of permissions) in your system.
Modules
Before creating tickets and projects, assigning to-dos, generating invoices, and running reports, you'll want to add some basic data specific for your company in the Admin module.
|
Admin |
Setting up Your Company
|
|
Human Resources - HR |
Adding/Managing the Employees
|
|
Finance |
Set up the Contracts/Billing
|
|
Projects |
Create Projects and Assign Tasks
|
|
Service Desk |
Create and manage Support Tickets
|
|
CRM |
Store and Manage all the Accounts
|
|
Reports |
Create Reports
|
System requirements
BMS cloud-based solution runs on our servers, which means that the only requirements to run our application are:
- Any device with a web browser (Internet Explorer, Chrome, Firefox, Safari.)
- Internet connection
BMS server details
BMS is hosted on four different servers based on your region and your product subscription.
- US server: https://bms.kaseya.com
- UK server: https://bmsemea.kaseya.com
- APAC server: https://bmsapac.kaseya.com
- Vorex: https://www.vorexlogin.com
https://<yourpsaserver> will be used to reference your BMS server login page in our guides.
Login
Typically a new user receives a welcome email similar to the sample below. Mail is sent to the email address registered by sales when creating your company. 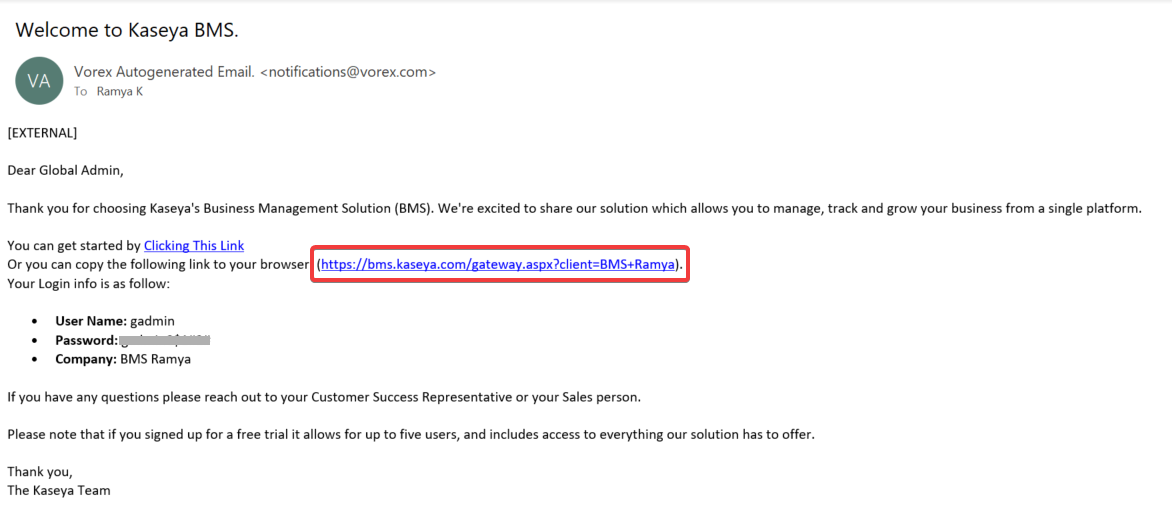
Accessing BMS
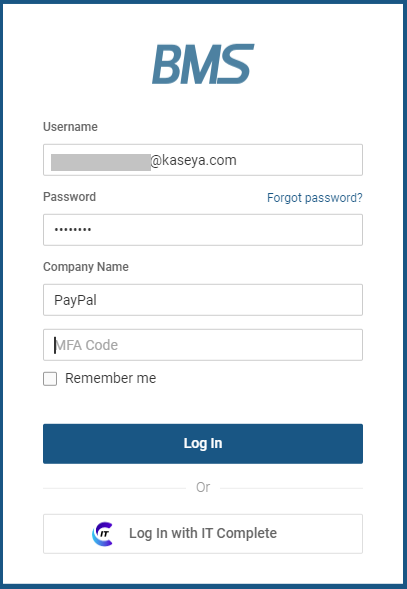
- Use a browser to log into https://<yourpsaserver>, for example https://bms.kaseya.com
- Enter your credentials:
- Username: This is usually your official email or a constricted form of your name.
- Password: This is a password of your choice.
- Company Name: This is the tenant name.
- MFA Code: This is the MFA code which you would get from your connected authenticator app. You have to scan the QR code and set up MFA for the first time. This is a one-time process. From the next login, you just have to enter the MFA code from your authenticator app on your mobile. For setting up MFA, see the KB Enabling multifactor authentication.
If you forgot your password, click the Forgot Password link and the following screen appears.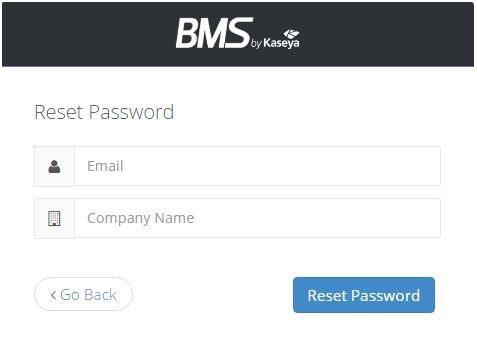
- Enter your email address and company name.
- When you hit Reset Password, it will send you an email with a new password.
Caveat
Text enclosed in angular brackets < and > is not generally supported for security reasons. Try to use parenthesis ( or ) instead as this is a security consideration.
How to navigate the software
Global navigation bar
When you log in to your company, a horizontal navigation bar runs along the top with menu items such as Service Desk, CRM, Finance, and Projects. This bar is called the global navigation bar and each of menu item represents a BMS module.
When you click on a module, such as the Service Desk module, the tab gets highlighted. 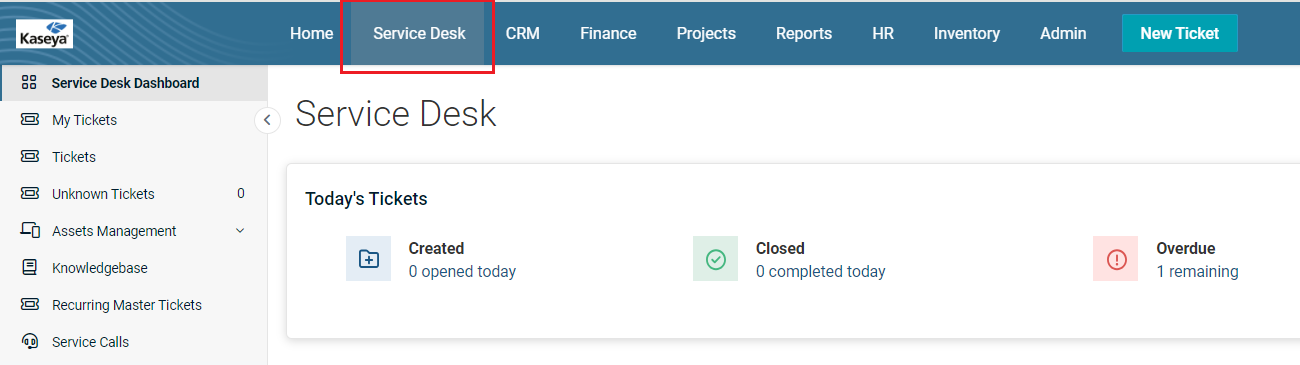
Icons on the global navigation bar
Bell Icon: This icon opens a dropdown to show new notifications in the form of alerts and messages.
Question Mark (Help) Icon: This icon opens a dropdown to show the following user help resources and information.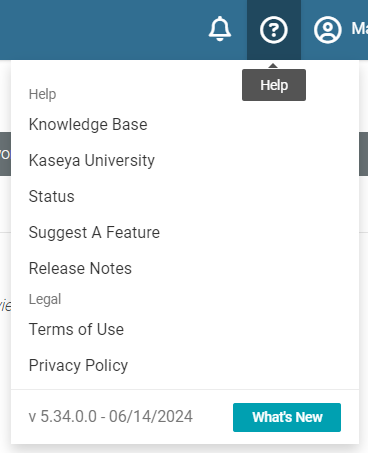
- Knowledge Base: This takes you to the BMS/Vorex online Help
- Kaseya University: This takes you to Kaseya University login page for more training and information
- Status: This shows planned maintenance activities and current statuses of different products.
- Suggest a Feature: You can submit a feature request here.
- Release Notes: This takes you to the latest release notes.
- Terms of Use: You can read the Kaseya website Terms of Use here.
- Privacy Policy: You can read the Kaseya Privacy Statement here.
- What's New: You can read about new features here.
- Version Number and Release Date: You can view the version number and release date next to the What's New button.
Profile Name: This button opens a dropdown to show the name of the user followed by username, My Settings, and Logout. See image under My Settings section.
Local navigation bar
On the left side of the screen, a vertical navigation bar shows a list of options you can select.
This is called the local navigation bar. Selecting one of these options takes you further into the module.
For example, if you click the menu item Service Desk, you will see a list of menu items (or folders as sometimes they are called) in the local navigation bar. For example, if you click Tickets menu item in the local navigation bar, you will see the Tickets page. 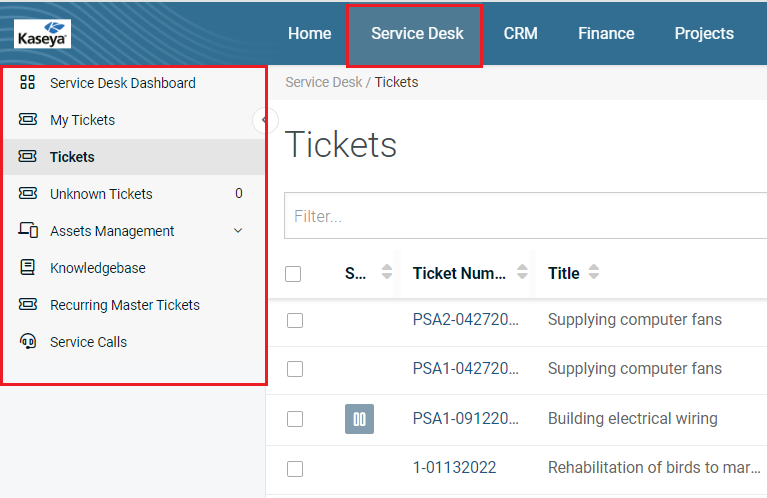
My Settings
Click your name on the right of the global navigation bar.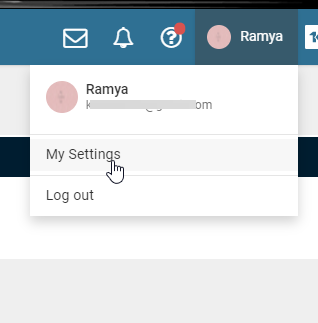
The My Settings section enables you to personalize your BMS user experience.
- Picture Section: Set your BMS photo. The width and the height of the image should be equal. Acceptable image formats are jpg, jpeg, png, and gif. The system auto-scales after the upload. This section also displays company name and gateway URL.
- Personal Information: Enter your personal information and enable multi-factor authentication (MFA).
- Contact Information: Enter the main contact's address and contact information.
- Change Password: Change your password here.
- Preferences: Set your default landing page, default tickets listing click behavior, Service Desk module experience view (New View or Legacy View), and theme when you log in.
- Integrations: This tab shows current user-level integrations.
Make sure you click Save after making changes.
Edit access by URL
BMS supports edit access by URL for the following types of records:
- Tickets by Ticket ID
- Example: https://BMS.kaseya.com/MSP/TicketEdit.aspx?ID=15551
- Projects by Project ID
- Example: https://BMS.kaseya.com/Projects/ProjectEdit.aspx?ID=2560
- Tasks by Task ID
- Example: https://BMS.kaseya.com/Projects/TasksEdit.aspx?ID=22182
ID is the database identified for a certain record. To identify the ID of a ticket, project, or task, create an Ad Hoc Report that includes the Ticket ID, or Project ID, or Task ID columns, along with additional columns to help identify the corresponding ID.
NOTE Help for Ad Hoc Reports can be found here.


