Service Desk quick start guide
Introduction
This guide is intended for new companies evaluating BMS as well as companies needing assistance with the initial setup for the Service Desk module and Time and Material billing. It is designed to help you navigate through the most common activities in the application. Following these steps will allow you to quickly manage your Service Desk operations. Other advanced features are available in separate Help topics in this Help system.
Setting up Locations
- Go to Admin Module > My Company > Locations > Edit Main Location.

- Update the Location Data tab.
- Set Time zone to your main location’s Time Zone. Default is Central Time zone.
- Select Date format desired
- Select Time format desired
- Click the Save button.
- Click Address Tab.
- Update Shipping Contact Address Details.
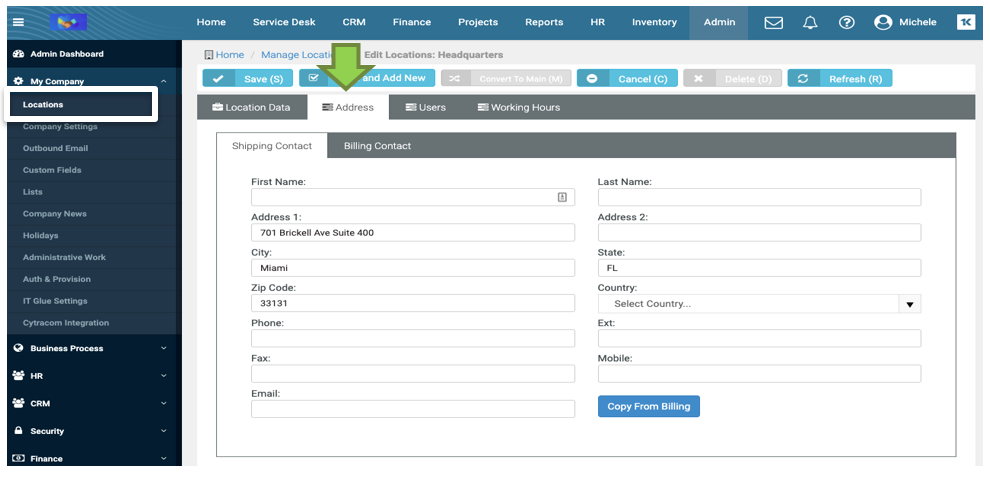
- Update Shipping Contact Address Details.
- Click Billing Contact Tab.
- Click on Copy from Shipping (if address the same). Address will auto-populate from shipping tab. If address different, fill out address information.
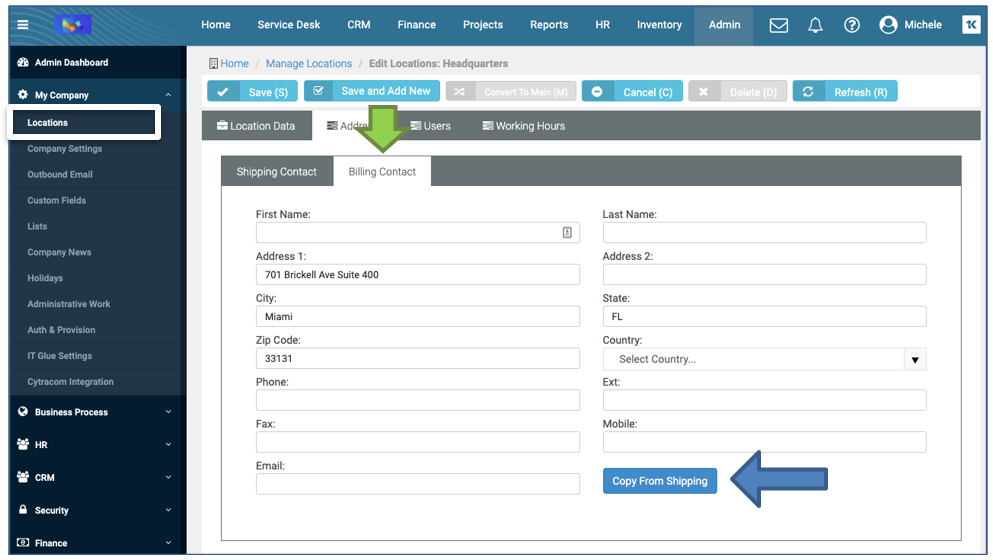
- Click on Copy from Shipping (if address the same). Address will auto-populate from shipping tab. If address different, fill out address information.
- Click Working Hours Tab.
- Update your Main locations working hours. (These are used in SLA Business Hours calculations.)

- Update your Main locations working hours. (These are used in SLA Business Hours calculations.)
- Click the Save button.
- If you have additional locations, click New button to add those additional locations following the same steps as above.
Updating Company Settings
- Go to Admin Module > My Company > Company Settings > General tab.
- Upload your Business Logo in the Header, Report and Log In Dialog Logo.
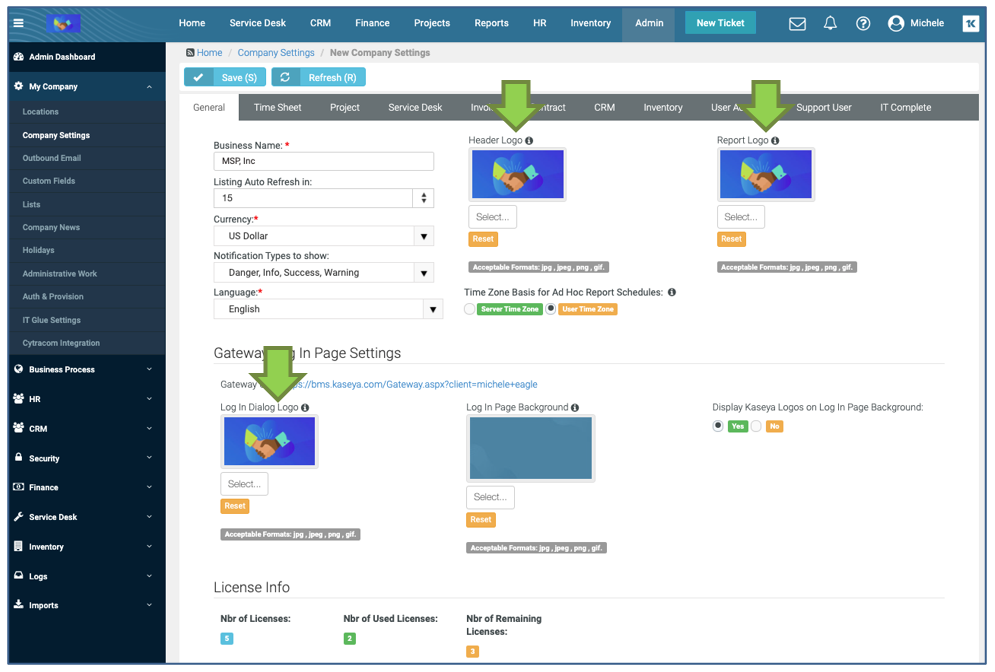
- Upload your Business Logo in the Header, Report and Log In Dialog Logo.
- Click the Save button.
- Click Time Sheet tab.
- Update the Round Time Logs. This is used in billing to round your time entry logs up/down/round for billing purposes.
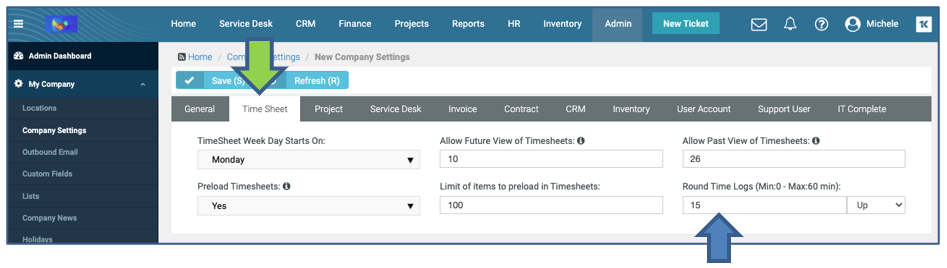
- Update the Round Time Logs. This is used in billing to round your time entry logs up/down/round for billing purposes.
- Navigate to Admin > Service Desk > Ticket Configuration page.
- Select the appropriate Ticket Number Format from the dropdown. There are four options to choose from.
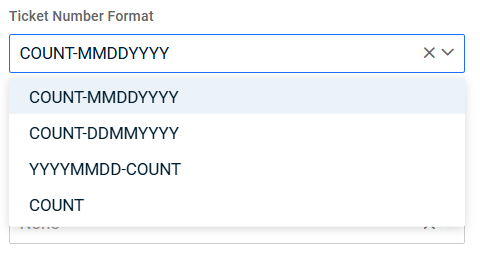
COUNTMMDDYYYY – Each day the ticket count starts over incrementing by 1 adding the US date format at the end.
COUNTDDMMYYYY – Each day the ticket count starts over incrementing by 1 adding the non-US date format at the end.
YYYYMMDD-COUNT – Each day the ticket count starts over incrementing by 1, with the date as the primary sort with this method.
COUNT – Numbers only, starting with the number you choose (Ticket Starting Number)
There are many other options in the Ticket Configuration page that can be selected that is not part of this guide. This guide focuses only on the required items to get up and running quickly. For more information, see Ticket Configuration.
- Click the Save button.
Updating Outbound Email
- Go to Admin Module > My Company > Outbound Email.
- Update the outgoing Business Email.
- Most common practice is to use your service desk email address that your customers use.
- If you have more than one outbound email address (customers email you via different support email addresses), use the main service desk email address here. For the custom email addresses for unique customers you set that up in email templates.
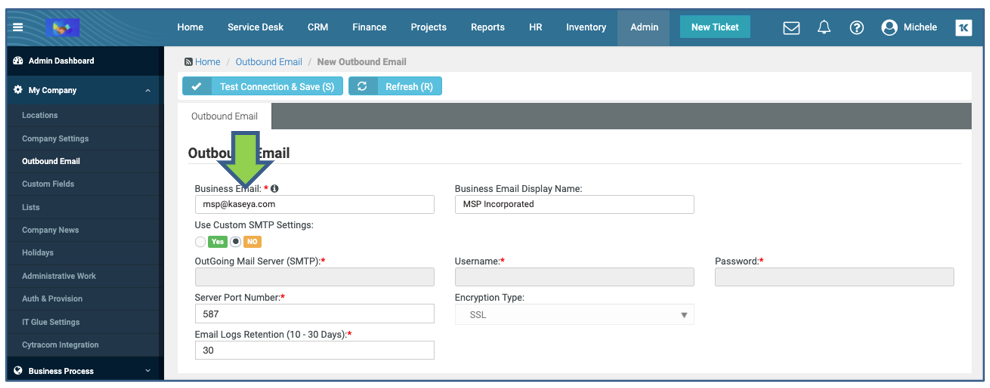
- Leave Custom SMTP Settings as No. This will use Kaseya’s email relay to send and receive the emails with BMS. IP Addresses: BMS/Vorex IP Addresses
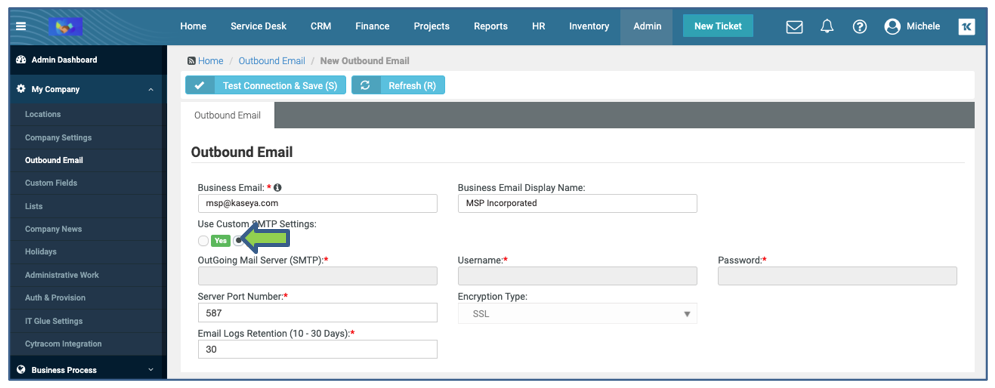
- If you would like to use Customer SMTP Settings, follow the steps outlined in this KB article: Custom SMTP Setup.
Adding time entry roles for employees
- Go to Admin Module > Finance > Roles.
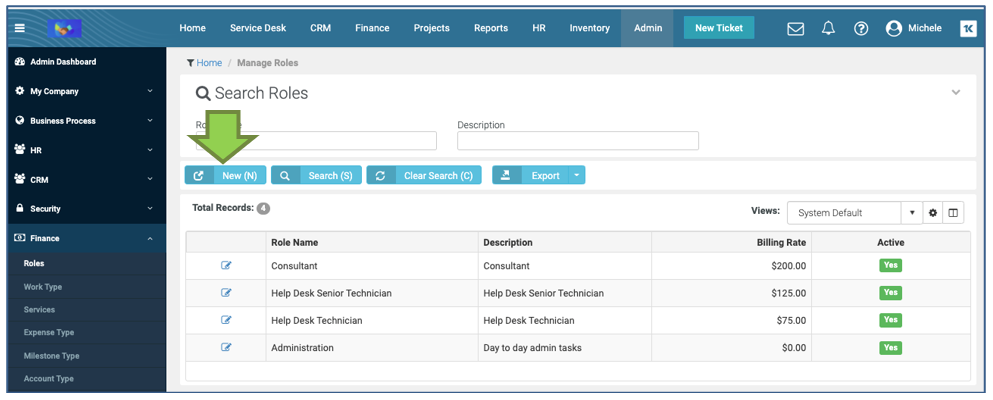
- Click New.
- Fill in, and select from dropdown menus, information in all required fields indicated by *. The Billing rate is your retail rate for that role. Customers would have different rates based upon their contracts.

- Click the Save button. Create all your roles needed for service desk time entry.
Adding an employee
- Go to Admin Module > HR > Employees > New.

- Fill in and select from drop-down menus. Information in all required fields are indicated by *.
- Job Title, Department and Security Roles will use the default provided values. For service desk technicians, use Service Desk Manager.
- User Type = Employee
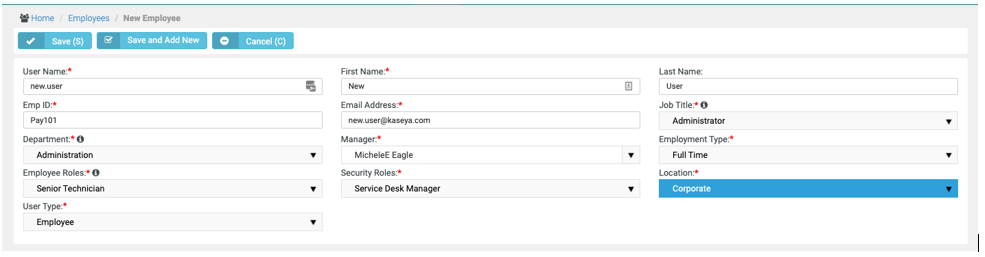
- Click the Save button. BMS will automatically send an email with login credentials to the new user.
Adding employee roles to an employee
- Go to Admin > HR > Employees (Open an employee record).
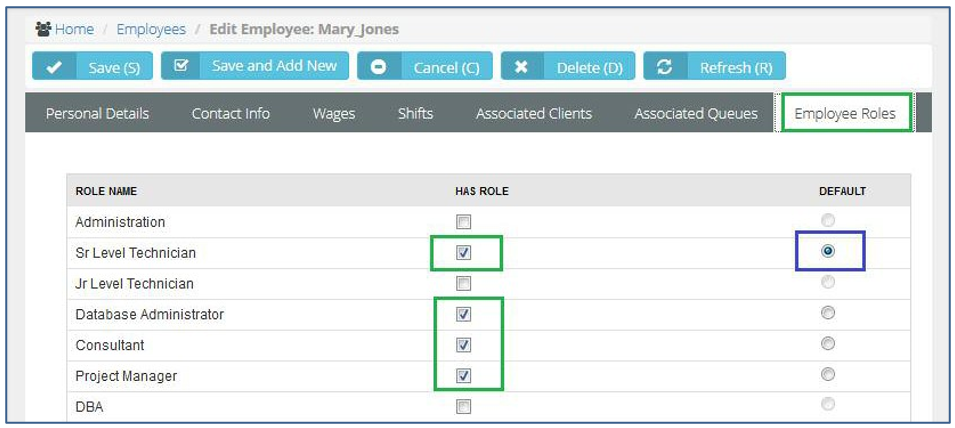
- Check the Role(s) this employee will utilize.
- Set the Default Role. (This role will default when the employee enters time on Ticket or Task.)
NOTE You can change role rate if you need to charge another client a different rate for Time and Material work. You create a NEW Time and Material Contract in the Finance Module. No need to create too many roles.
- Click the Save button.
Updating Email Templates
- Go to Admin > Business Process > Email Templates.
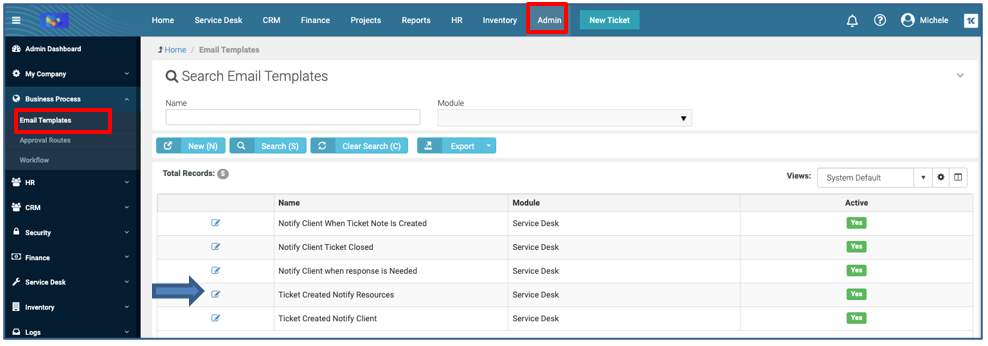
- Edit each email template (click paper and pencil icon). Update FROM email address to the same email address configured in Updating Outbound Email.

- Click the Save button. Update each email template with the same email address. These email templates are used in workflow.
Updating Service Desk workflows
(If automation is desired)
- Go to Admin > Business Process > Workflow.

- Edit the following three workflows to make them active following step 3 & 4.
- Notify Client When new Note is Added
- Notify Client Ticket Closed
- Ticket Created Notify Client
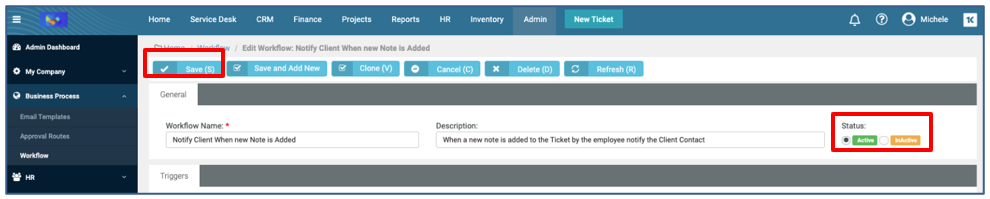
- Click Active under Status.
- Click the Save button.
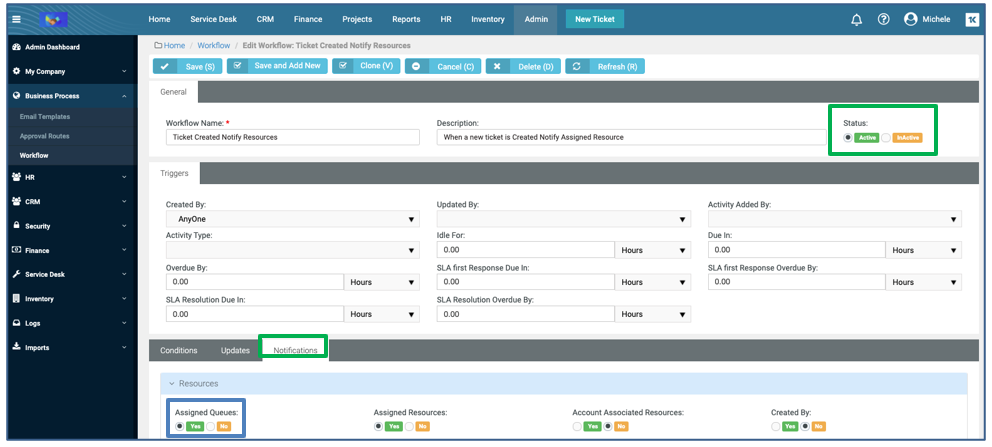
- Edit the Ticket Created Notify Resources Workflow.

- Update the Notifications tab.
- Resources -- Assigned Queues = Yes
- Resources -- Assigned Queues = Yes
- Update the Status to Active.
- Click the Save button. Once these four workflows are turned on, you will have automated emails for service desk.
Configuring a Service Desk email parser
(Incoming Emails)
- Go to Admin > Service Desk > Email Parser.
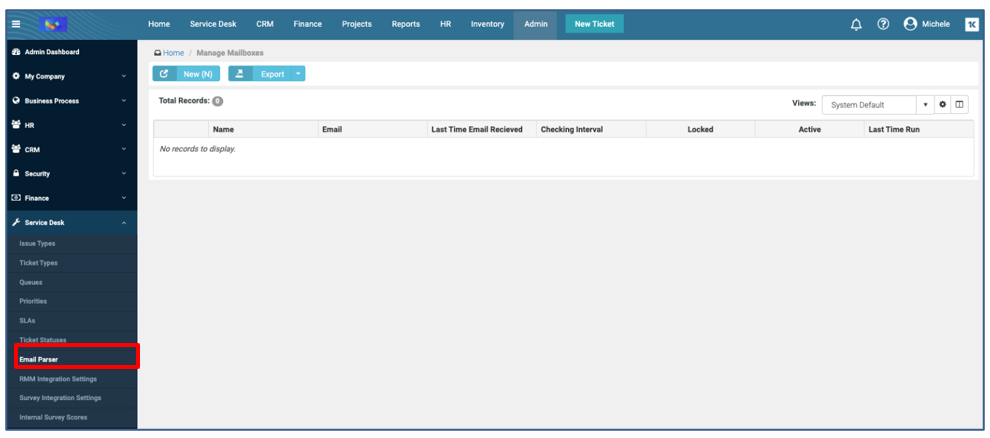
- Click New.
- Fill in, and select from drop-down menus. Information in all required fields are indicated by * for header and Details tab.
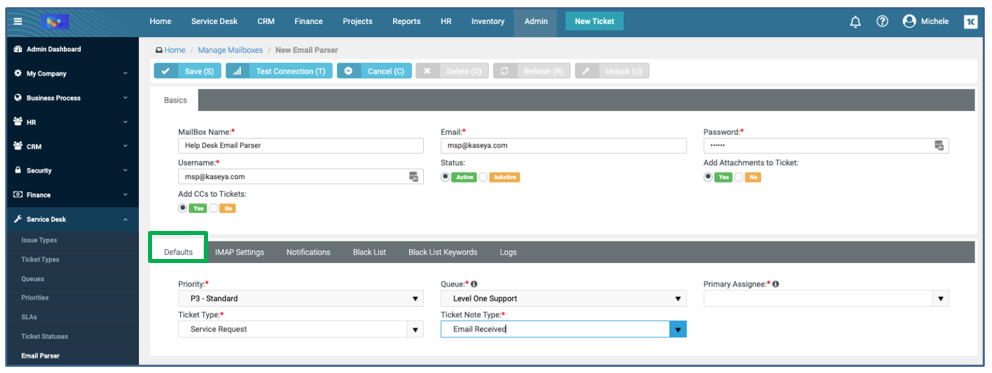
- Click IMAP Settings tab. Fill in, and select from drop-down menus, information in all required fields are indicated by *.

Additional information can be found here for Office 365, Gmail and Google: Incoming Email Parser Guide. - Click the Save button.
NOTE Once you click save, the system will test the connection. When successfully connected emails will be read into your service desk and create tickets from this email address. Nothing else is required at this point.
- If additional configuration is desired, click on this link for the additional tabs Incoming Email Parser Guide.
Creating an account in the CRM module
In order to create contracts and open support tickets and manage projects for our customers you need to enter those customers into the CRM Module.
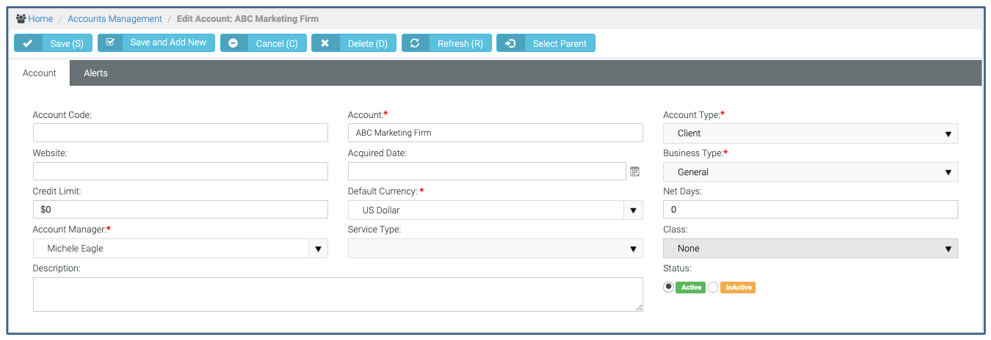
- Go to CRM > Accounts. Click the New button.
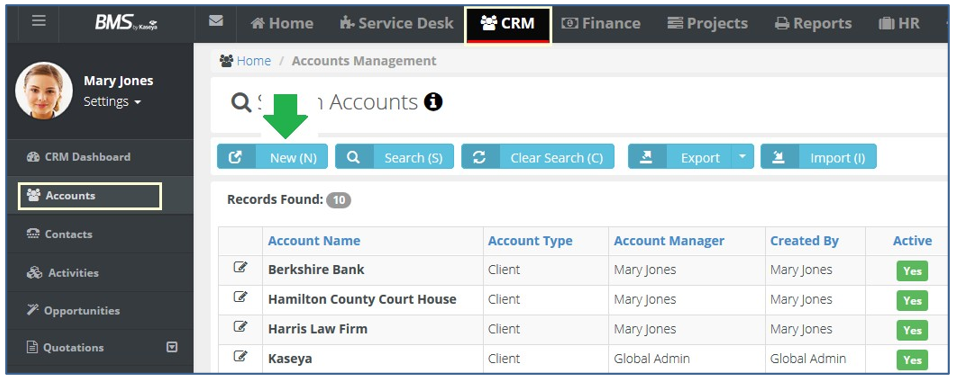
- Fill in, and select from drop-down menus. Information in all required fields are indicated by *.
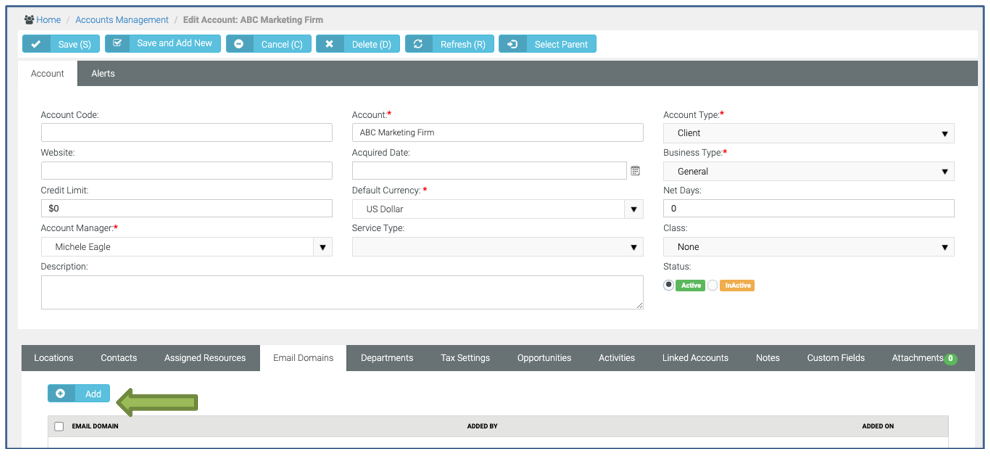
- Click the Email Domains tab. Click Add.
- Update Email Domain in Add/Edit Account Email Domains dialog box.
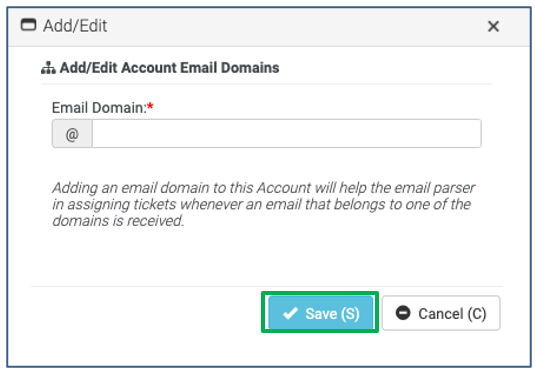
- Save the account. Click the Save button.
NOTE You can add the address information at any time, but for quick start purposes, you have enough information now to use this account.
Adding a contact in the CRM module
Now that we have created an account, let’s add a contact to this client record.
- You open tickets for Contacts when they call looking for support.
- Contacts send emails to support@yourcompany.com.
- Email notifications are auto sent to Contacts (example – close a ticket).
- Quotes and Invoices are sent to Contacts.
- Go to CRM > Accounts. Open the account you just created. (Example here is ABC Marketing.)

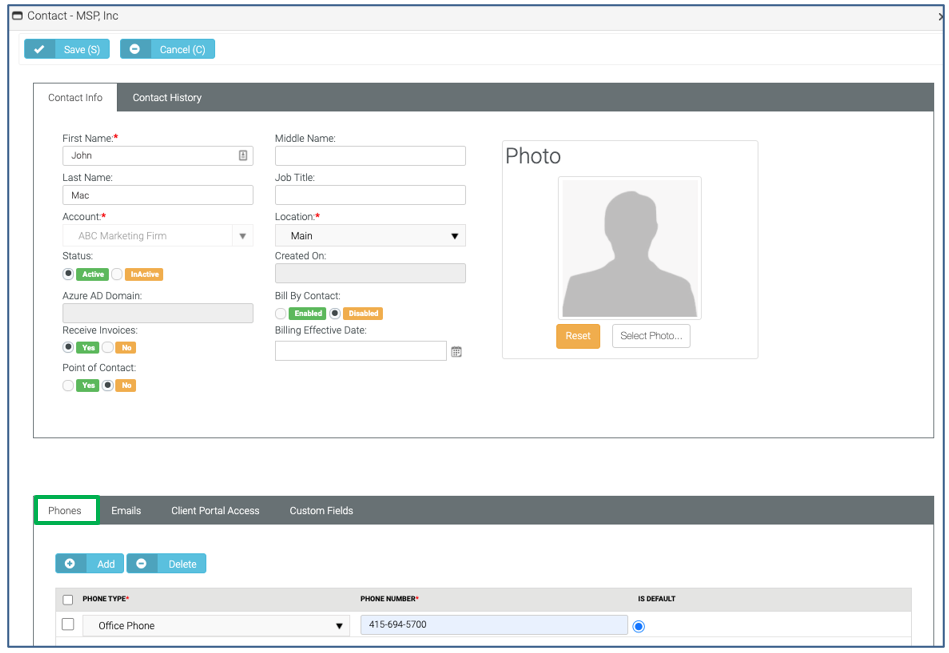
- Look at the lower section of Account. Click Account Contacts. Click the Add button.

- Fill in, and select from drop-down menus. Information in all required fields are indicated by *.
- A primary phone and primary email are required fields.

- A primary phone and primary email are required fields.
- Click the Save button. Now that you have your accounts in the system, you are able to start creating tickets and managing your service desk operations.
Creating a new ticket in the Service Desk module
Tickets are used to capture a Customer issue and assign to the appropriate employee(s) to work and resolve that issue.
The BMS solution allows you to create service tickets in a number of ways:
- Alerts from an RMM like VSA → create tickets
- Emails sent to Support@yourcompany.com → create tickets
- Client Portal Submissions → create tickets
- Clicking the NEW ticket if you take a support call
To Set the Service Desk Tickets to New View
- Click on your name in the upper right hand side of screen and select My Settings.

- Click on the Preferences tab.
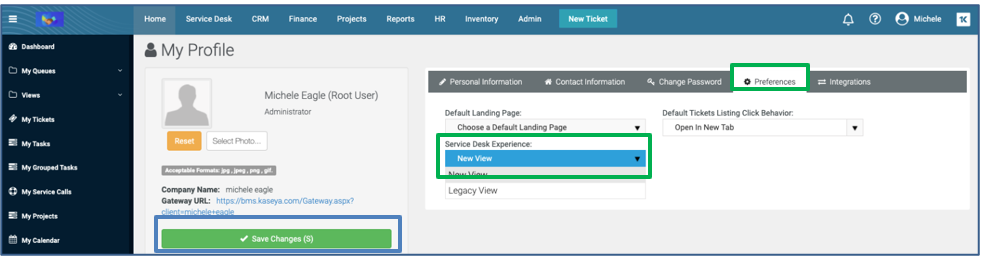
- Click drop down for Service Desk Preference and select New View.
- Click on Save Changes.
Creating a new ticket using the New View
- Go to Service Desk > Tickets > New. You can also click the Blue New Ticket button along the top.

- Fill in, and select from drop-down menus. Information in all required fields are indicated by *.
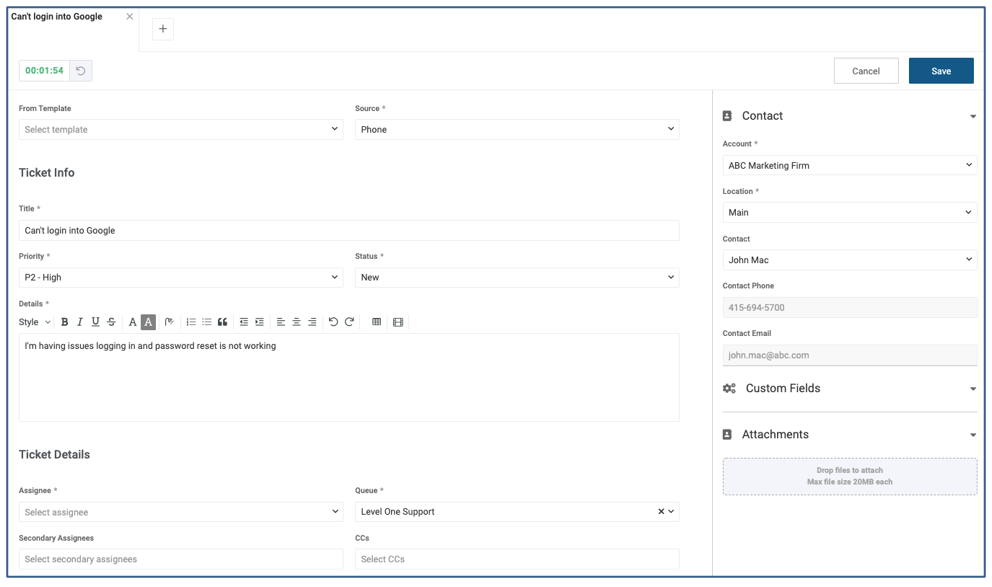
- Click the Save button. Ticket is numbered and in system for updates.

Accessing tickets and entering time and notes
When tickets are created in the BMS, a Service Desk Manager will see and have access to ALL tickets in the Service Desk Module via:
- Service Desk Dashboard
- Tickets Folder
- Recurring Master Tickets (when configured)
- Service Calls
Your employees will find tickets assigned to them in their Home module.
- Go to Home > My Tickets. Click Ticket Number to open ticket.

- When ticket is open, look at the bottom tabs (Activities), click the New dropdown, and select Add Time.
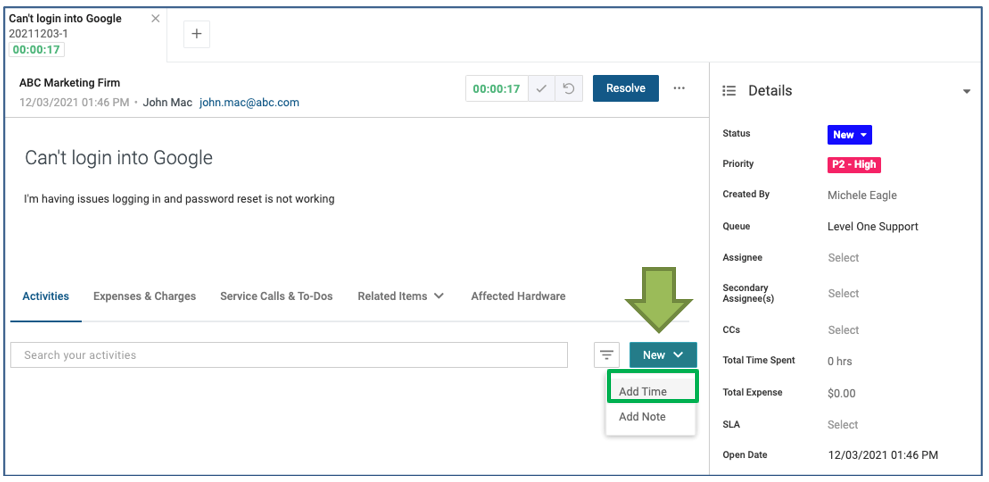
- After you click the Add Time button, the following screen will appear. Fill in, and select from drop-down menus. Information in all required fields are indicated by *.
NOTE Notes are public facing. Will be sent in workflow. Internal Notes are seen by employees and not clients.

-
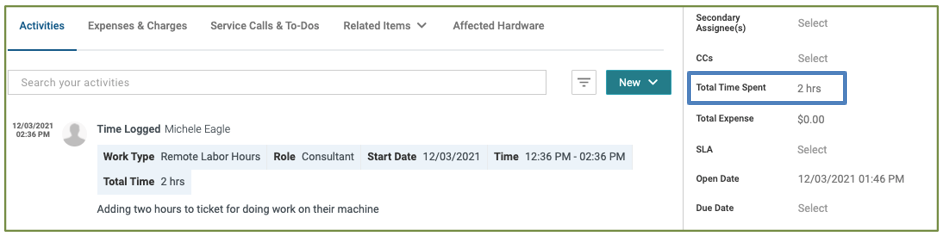
Click the Save button. This Time entry has updated many forms including:
-
Time will now be captured on the Ticket
-
The employee’s time sheet will be updated.
-
You can review the Labor Entry in the Finance module to create an Invoice.
-
-
Time entry will be added under Activities and Total Time Spent updated on the ticket.
Running Service Desk reports
BMS comes with reports for each module.
- Go to Reports > Service Desk. Click the module you want to run a report for. (Service Desk is selected in this example.)
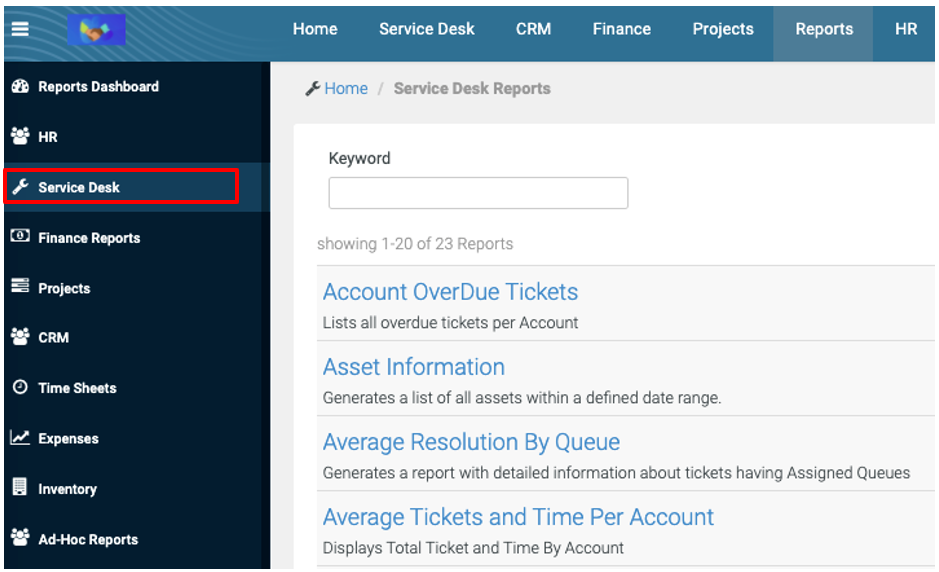
- Click the name of the report you want to generate. In our case, we are running Average Tickets and Time Per Account.
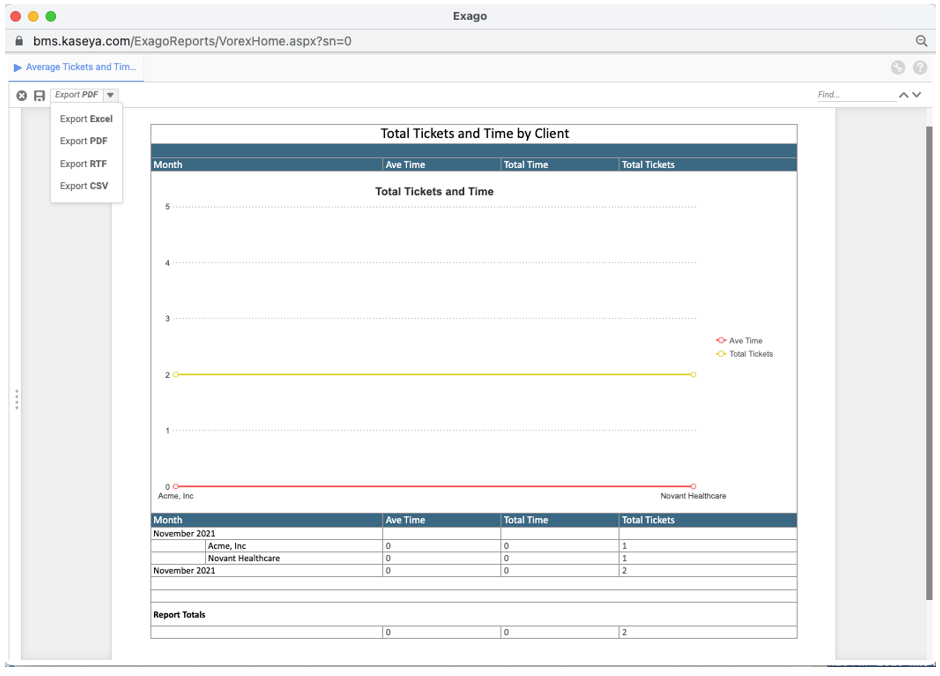
- If a report has a filter, the filter will pop-up. Modify parameters (if needed) and click OK to run.

- The report will run. Select which export options are desired and export report.
Billing Process: approve and post process (step 1 - Billing Review) – Finance module
The Time entered on our Tickets are now sitting in the Finance Module ready to go through the Approve and Post Process. The three steps outlined below can be automated via the Billing Automation process found in this KB Article: Billing Automation.
- Go to Finance > Billing Review > Labor Hours. You can use the Search Grid to filter the data. We are going to search by date range.
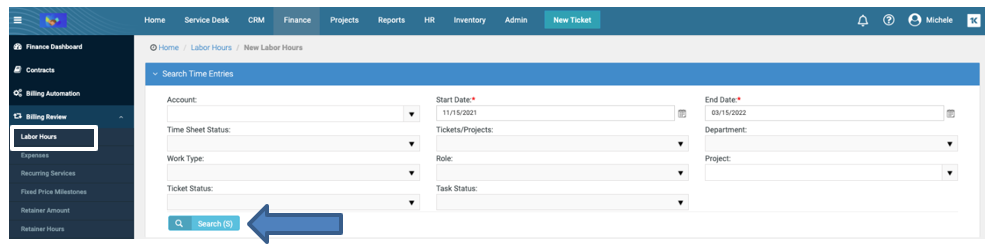
- Click on the Search button and you will see the results below.

In this example, we see two time entries made by employees:
- The first line record is time posted against Ticket 1 (2 hours @ $200)
- The second line record is time we posted against Ticket 2 (2.75 hours @ $175.00).
You can adjust the Hours to Bill and Billing Rate as needed. - To approve and post, check the boxes next to the entry and click on the Post button.
Billing Process (step 2 - billing)
After reviewing Labor Hours and approving the time entries, these items have moved into the Billing Folder
Here you can combine these Labor Hours with other items you may wish to invoice:
- Expenses added to a ticket or project
- Recurring Service Contracts
- Fixed Price Contract Milestones (ex – Deposit or Final Project Payment)
- Retainer Hour Contracts (some call them Block Hours)
- Go to Finance > Billing Review > Billing. You can use the Search Grid up top to filter the data.

- Click on the Search button and you will see the results below.
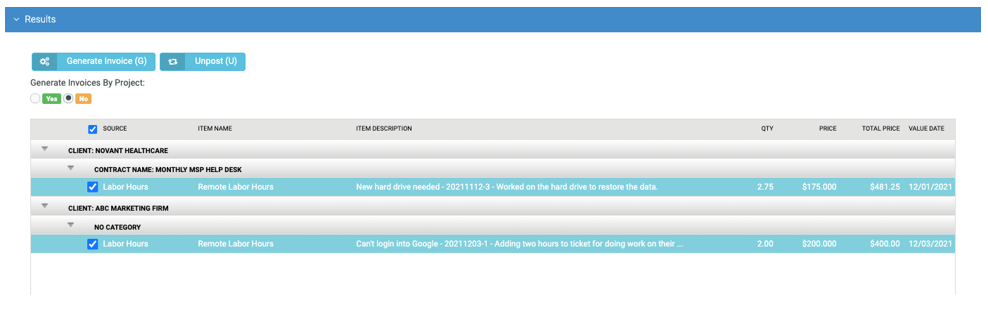
The customers are listed in the gray bar. We have two different customers listed and all posted hours are shown below for those customers. - Check the boxes next to the entry to be billed and click on the Generate Invoice button.
NOTE You can UNPOST these records if you see an error. It will place them back in the Billing Review folder where you can make adjustments and walk through process again.
Billing Process (step 3 – invoices)
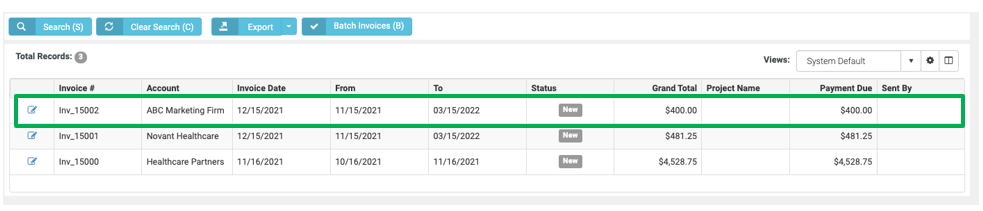
All the items that have been Reviewed, Approved and Generated are now sitting in the Invoice folder with the status of NEW.
When we moved the items from Billing to the Invoice folder, it assigned the next invoice number in line (example INV_15002).
You can now make adjustments before creating the final Invoice and sending it to your client or transferring it to QuickBooks:
- Add additional information to Line items or a Note on Invoice
- Adjust Quantity or Unit Price
- Apply a Discount – a dollar or percentage amount
- Attach Receipts (that flowed through system to final invoice)
- Add any additional attachments
- Go to Finance > Invoices. Click Invoice Number or the edit icon.
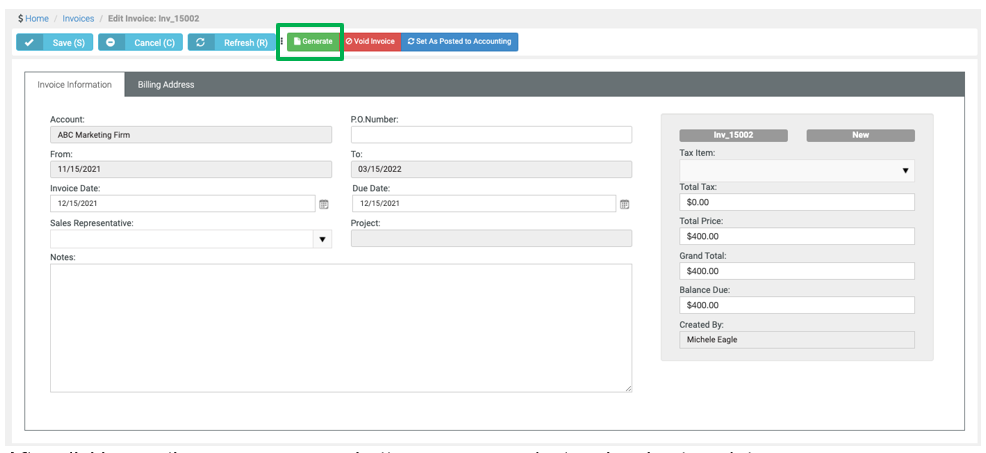
- After you open Invoice, click the green Generate button along the top.
- After clicking on the green Generate button, you can select an invoice template.
Template Type = Classic
Using the standard Classic Invoice Templates, select the template. (In our example, we have selected the Detailed Invoice.) Click the Generate button.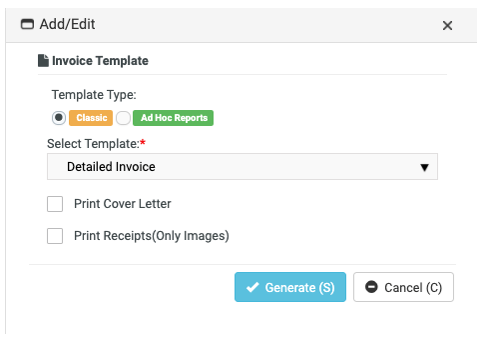
Your invoice buttons along the top will now include more options.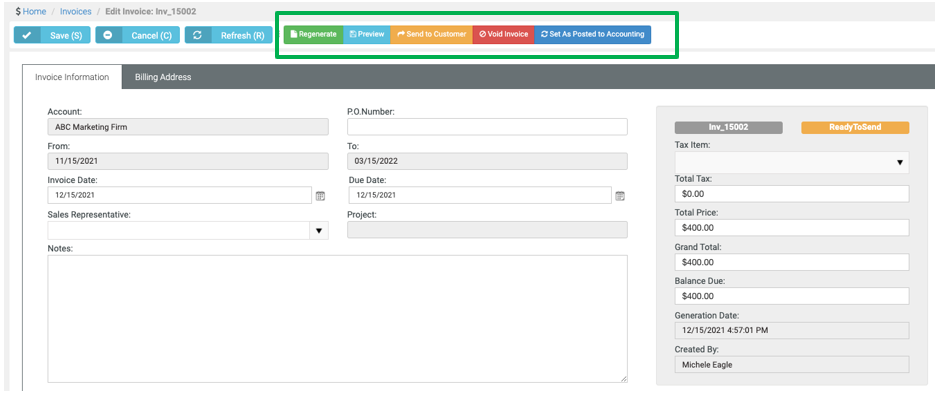
The status of your Invoice is now READY TO SEND.
- You can Regenerate the Invoice and use a different template.
- You can Preview your Invoice.
- You can send it to your customer.
- You can Void the Invoice if necessary which places items back into Billing Review to reapprove and repost.
NOTE All invoices with Ready to Send or Sent statuses are available to be exported into QuickBooks Online or Desktop (if configured).


