BMS-VSA-IT Glue Integration: Overview
Introduction
BMS allows seamless integration between VSA and IT Glue. All three products communicate with each other to help you manage your assets and accounts, allowing you to automate your tasks.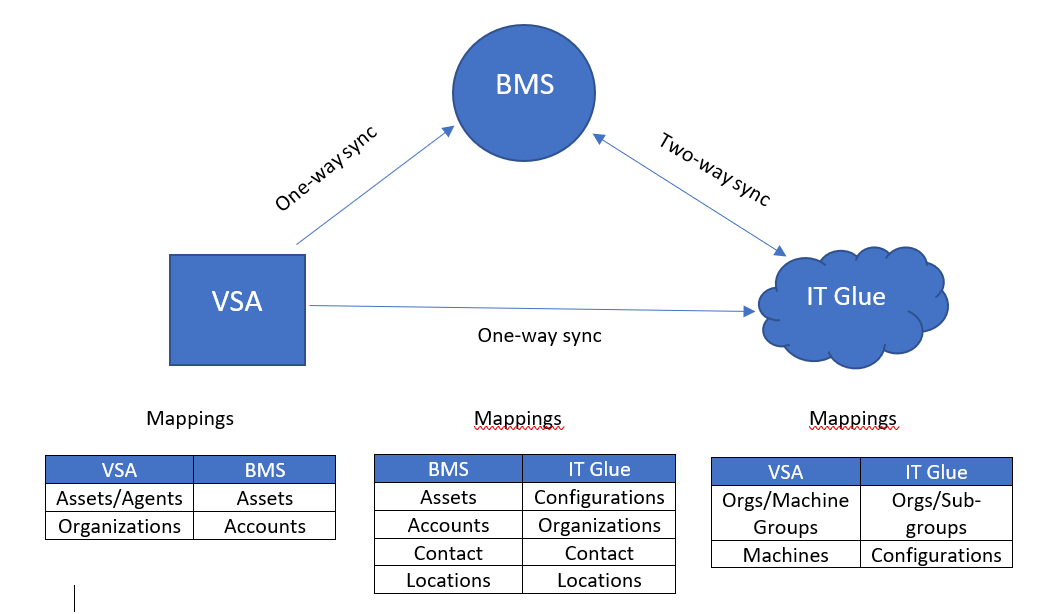
If you are configuring all three products for the first time, you will need to set up the connections. Then, data created will start to sync over.
If you already have data in one or more of the above products, set up the integrations, and perform manual sync for the existing data to be synced over for the first time.
Prerequisites
User accounts:
- In BMS, you must have a dedicated user account with API access.
- In VSA, you must have a dedicated user account with either a Master or System role and scope. The scope of the integrator user controls the visibility and access of organizations from VSA. A forbidden message will appear in BMS if there is an access issue.
- IT Glue, you must have an Administrator or Manager-level role. Note that a Manager role will only be able to see RMM matched/unmatched data for organizations that they have explicit access to.
IMPORTANT The above user accounts should not have any MFA enabled.
A valid SSL certificate applicable for on-premise VSA.
Tenant details:
- For BMS, you will need the Server URL/Fully Qualified Domain Name (FDQN) and Company/Tenant name.
- Navigate to My Profile: Click on your name on the right of the top navigation bar
Gateway URL is the server URL of your tenant, eg: https://bmsemea.kaseya.com/ and Company/Tenant name will be listed here.
- Navigate to My Profile: Click on your name on the right of the top navigation bar
- For VSA, you will need the Logon URL.
- For IT Glue, you will need your IT Glue subdomain.
- Each IT Glue account has its own unique URL that is generally in the format of https://mycompany.itglue.com or https://mycompany.eu.itglue.com. The first part of the URL (mycompany) is called the subdomain.
Ensure that you have noted down these details before you begin the integrations.
Instructions
Please refer to the guides linked below to get started on each of the integration processes. We strongly recommend you follow the below order for the setup.


