Managing inventory
Introduction
The Inventory section involves ordering products through purchase orders, processing them, delivering them to the suppliers, delivering product charges, and adjusting stock quantity in warehouses.
- Inventory Dashboard
- Manage Products
- Product Availability
- Purchase Orders
- Processing Purchase Orders
- Receiving Purchase Orders
- Deliver Product Charges
- Stock Adjustments
Inventory Dashboard
Inventory > Inventory Dashboard
The Inventory Dashboard provides instant access to inventory activities requiring your attention. Drill into dashlet indicators to view lists of corresponding inventory activities.
Specialized dashlets provided by the Inventory Dashboard include:
- Purchase Order Amount By Status - Today, This Month, This Year, All - Displays a bar chart of purchase order amounts by status.
- Purchase Orders By Status - Today, This Month, This Year, All - Displays a list of purchase order counts by status.
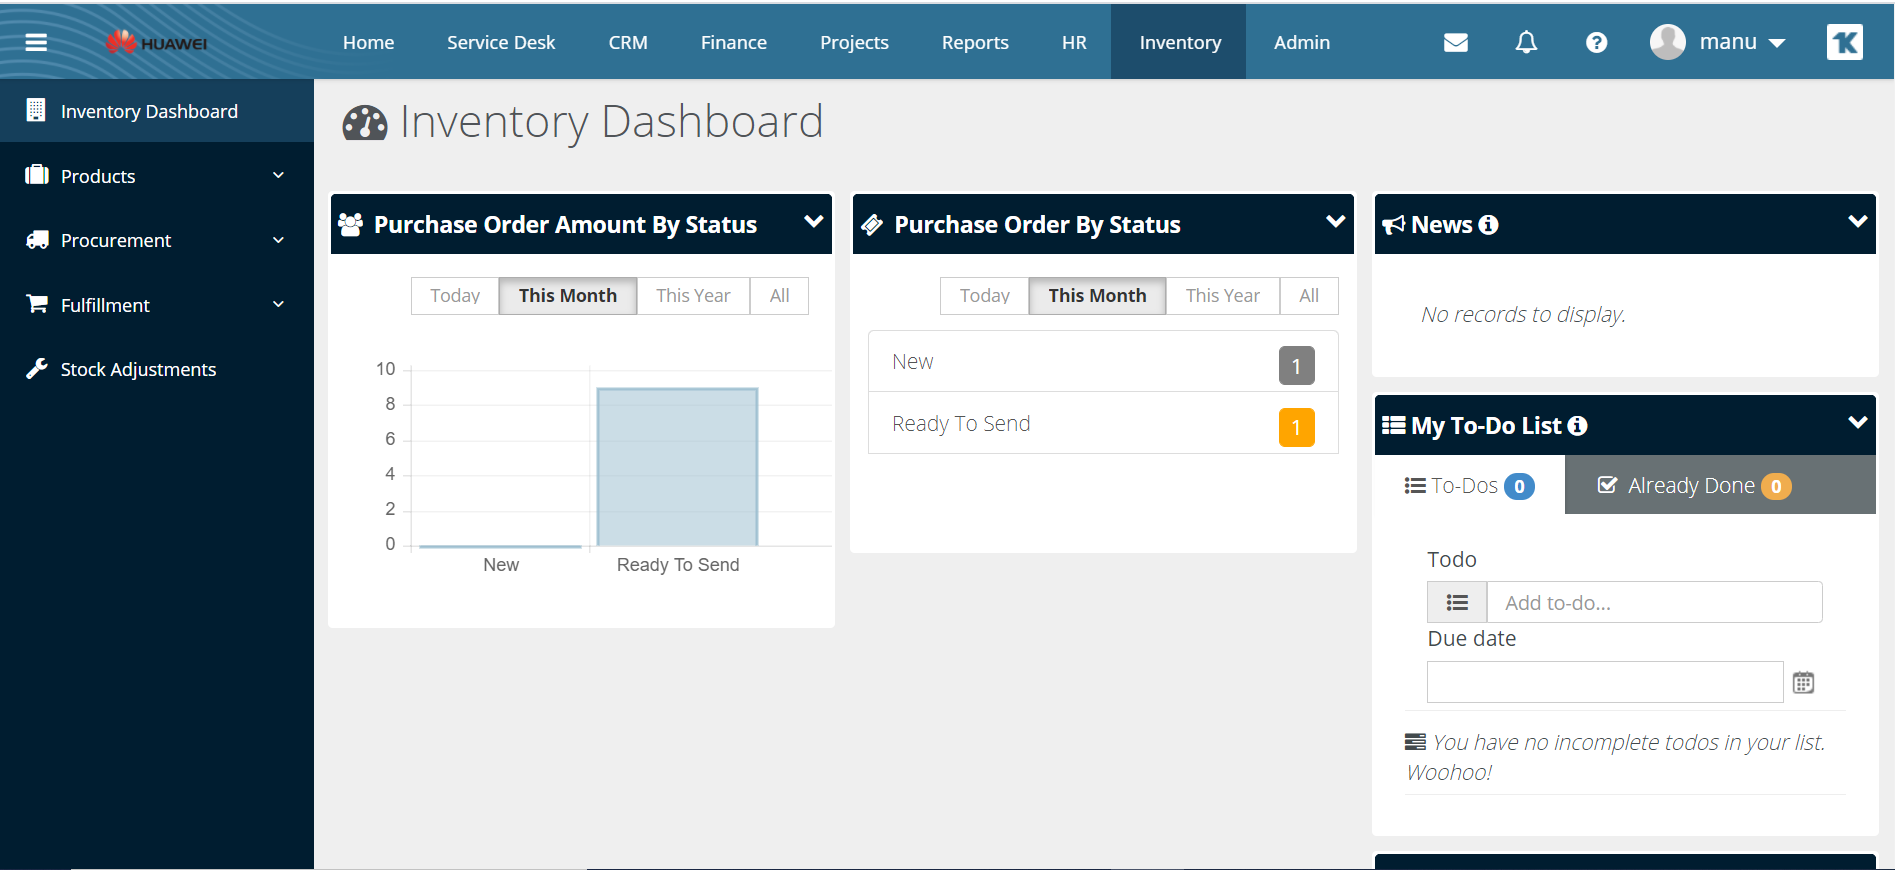
See Dashboard (Home) for a description of general-purpose dashlets that also display on this page.
Manage Products
TheManage Productspage lists all the inventory-managed products in your company. Once a product record is created you can:
- Assign and adjust quantities of products in inventory storage locations.
- Procure products using purchase orders.
- Add products to tickets as charges.
- Add products to sales orders.
Products and UPC Codes
Each product can have multiple UPC codes created for it. EachProductandUPC Coderecord is maintained separately, using the following set of tabs.
- UPC - This field has a limit of 50 characters
- Suppliers- You must add a supplier to a product record before you can create a purchase order for that supplier to deliver that product. The cross-reference includes the default unit cost for the product from that supplier.
- Locations - Additional locations for the warehouse cannot be added. Default is the only option in simple inventory.
- Pricing Levels
- Composition
- Options
- Stock By Location
- Stock By Project - Stock by Project comes up when you choose a project during stock adjustment.
- Notes
- Custom Fields
- Attachments
The parentProduct Infotab is shared by all combinations of products and UPS codes.
Searching for Products
You can search for products by one or more of the search criteria:
- UPC
- Product #
- SKU/Unique ID
- Product Name
- Product Description
- Product Type
- Category
- Brand
- Manufacturer
- Color
- Discontinued
Creating Product Records
- Select the Inventory > Products >Manage Productspage.
- ClickNew.
- Enter the following on theProduct Infotab.
- Product Name
- Product Number
- Product Type
- Product Category
- Product Sub Category
- Brand
- Manufacturer
- Product Description
- Enter the following on theUPCtab.
- UPC- Click the gear icon to generate a new universal product code.
- You can also click the Add New UPC to add an additional UPC code.
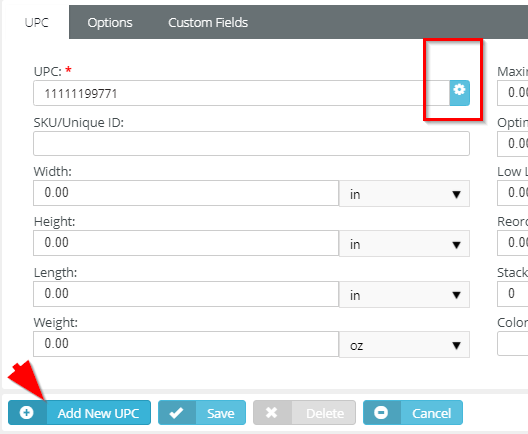
- You can also click the Add New UPC to add an additional UPC code.
- Maximum Level- Informational only, indicates the maximum level of the product.
- Warranty
- SKU/Unique ID
- Optimal Level
- Expense Account
- Width
- Low Level
- Income Account
- Height
- Reorder Level-Not yet implemented.WhenAutogen POis set to Yes on theOptionstab and the stock level for this product drops to equal or below theReorder Level, a purchase order is automatically created to replenish inventory to theMaximum Level.
- Cost Code
- Length
- Stacking
- Pack
- Weight
- Color
- UOM- Units of measure.
- UPC- Click the gear icon to generate a new universal product code.
- ClickSaveto save this product record.
- Additional product tabs display.
- Click theSupplierstab. ClickAdd. For each supplier enter:
- Supplier- You must add a supplier to a product record before you can create a purchase order for that supplier to deliver that product. The cross-reference includes the default unit cost for the product from that supplier.
- Primary Contact
- Product Id/Part No
- Unit Cost
- Reorder Qty
- Tax Rate
- Click the Pricing Levels tab. Click Add. For each pricing level enter:
- Pricing Level
- Price
- Click the Composition tab. Click Add. For each composition enter:
- Material
- Qty
- UOM- Unit of measure.
- Notes
- Click the Options tab.
- Autogen PO-Not yet implemented.When Yes and the stock level for this product drop to equal or below theReorder Level, a purchase order is automatically created to replenish inventory to theMaximum Level.
- Prelabeled- Yes or No
- Requires Procurement- If No, you do not need a purchase order to add quantities to storage locations for this product. Intended for temporary items.
- Use Levels- Yes or No
- Serialized- Yes or No
- Assembly Req'd- Yes or No
- Discontinued- Yes or No
- Hazardous- Yes or No
- Taxable- Yes or No
- Click the Stock by Location tab.
- Review the current quantity stored in each warehouse location list.
- Click the Stock by Project tab.
- Review the current quantity stored in each warehouse location list, allocated to a project.
- Click the Notes tab. Click Add to add a note.
- Click the Custom Fields tab.
- Enter values in the custom fields, as appropriate for this record.
- Custom fields are maintained using the Admin > My Company > Custom Fields page.
- Click the Attachments tab.
- ClickUpload a new fileto upload files to this record.
- Click Save to save this product and UPC code record.
Product Availability
Use theProduct Availabilitypage to search for products and check quantities available for each product and UPC code combination. The Serial Number field is now exposed to the UI.
Searching for Available Products
You can search available products by any one or more of the following search criteria:
- UPC
- Product #
- SKU/Unique ID
- Product Name
- Product Description
- Product Type
- Category
- Brand
- Product Manufacturer
- Warehouse
- Color
- Discontinued
Editing a Product
Click the edit button to edit a product. The product opens in a new page which displays existing product information in the Product Information tab and search options below in two tabs:
- Product by Location- Shows the quantity available at each location for the selected product.
- Product by Project- Shows the quantity available at each location, grouped by project, for the selected product.
The parentProduct Informationtab displays the following:
- Product Number
- Product Name
- UPC
- Product Description
- Product Type
- Category
- Sub Category
- Brand
- Manufacturer
- QTY In Stock
- QTY Available
- QTY Committed- The quantity committed to picking orders.
- QTY On Order
- Low Level
- Re-Order Level
- Max Level
- Optimal Level
"Committed" Status
A new status called "committed" has been introduced to products in inventory. This applies to serialized and non-serialized products. The purpose of the Committed status is to track and to know the quantity of products that are added to tickets, sales order, and projects. Committed here means a certain quantity of the product is reserved for a certain project/ticket, keeping the quantity in stock before being delivered. This means that this product is set aside for a job and that this product is not available to be used somewhere else. Also, this option allows you to invoice products when they are committed, rather than after they are delivered by allocating them directly to a project or a ticket.
When adding a product (either serialized or non serialized) with available quantity in stock (inventory) to a ticket, project, or sales order, the product added is committed and reflected in Inventory > Product > Manage Products > Product Availability. The Committed status is available as a default column in the Product Availability page. You can also choose to remove this column with the help of Column Chooser icon, which is next to the settings icon.
- User can add more than 1 quantity of a non-serialized product, where quantity added is available in stock, to tickets/project/sales order and quantity added will be committed inInventory>Products>Manage Products.
- User can add only 1 quantity of a serialized product to tickets/project/sales order and the serialized product added will be committed inInventory>Products>Manage Products.
- When user adds a serialized product, that is available in stock, to a ticket, project, or sales order, the serialized product added will no longer show in the Search and Select dialogue box and the product will be committed.
- When a product (either serialized or non-serialized) is added to a quotation, the product is not committed.
- When a product (either serialized or non-serialized) is delivered, the product is removed from the stock and will no longer be committed.
- Tickets/Sales Order/Projects:Any update that is done on a non-serialized product such as delete or update quantity will reflect directly in the Committed field.
- If a product (either serialized or non-serialized) is added with stock quantity as 0, then the product is not committed since the stock is 0.
- Products in quotations are only committed when they are converted to projects and sales orders.
The affected areas are:
- Inventory
- Ticket > Product Charges
- Sales Order
- Quotations
- Project > Product Charges
Purchase Orders
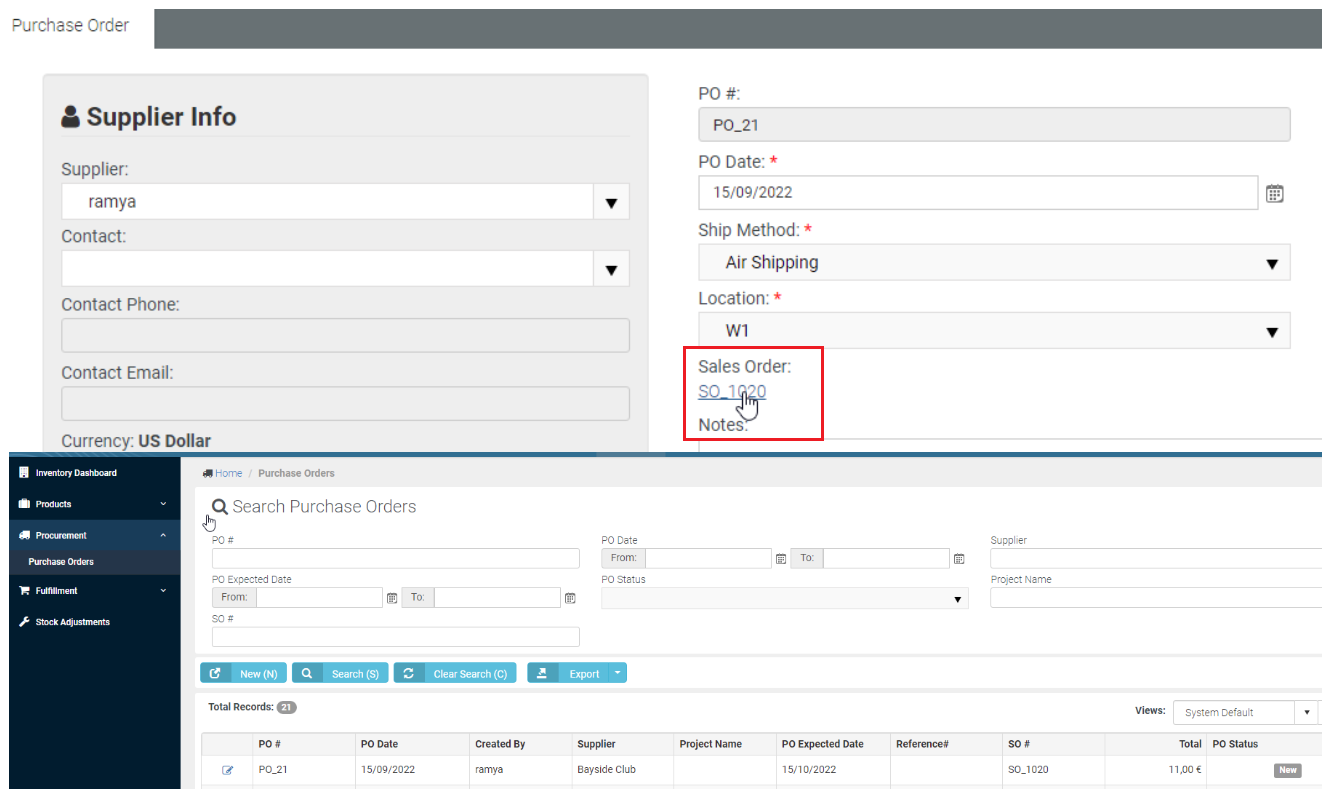
ThePurchase Orderspage creates an order to purchase products from a supplier. The purchase order includes product quantities, an expected delivery date, the delivery location, and prices for each product in the purchase order. On delivery, the inventory storage quantities are incremented. Payment terms usually specify an agreed-to number of days after delivery for payment. The supplier sends an invoice, which is matched against the delivery record, then processed by your company to pay the supplier. When a purchase order is created from a sales order, the sales order link is added to the purchase order. A sales order is added as a column and a filter on the purchase order listing page.
Product/Supplier Cross-Reference
A supplier must be added to the purchase order for that supplier to deliver that product. The cross-reference includes the default unit cost for the product from that supplier.
NOTE For a description of purchase order actions, see Processing Purchase Orders.
Creating New Purchase Orders
- Select Inventory > Procurement >Purchase Orderspage.
- ClickNew.
- Enter the following on theNew Purchase Ordertab. Notice this tab does not yet identify the supplier.
- (PO) Date: The current date appears here. If you want to change the current date, you can.
- Ship Method: Select the appropriate shipping method from the dropdown.
- Payment Term: Select the appropriate payment term from the dropdown.
- Expected Date: This is the date on which delivery is expected. Select an expected date from the calendar.
- Location: This is the location of the warehouse. Select the appropriate warehouse location from the dropdown.
- Default Discount: Enter the percentage of discount that you are willing to offer. For example, 2, 5, 10 etc.
- Reference # - Enter a reference number. The reference number from a purchase order is listed inside the receiving order.
- Project: Select the appropriate account from the dropdown first. Then you can select the appropriate project under that account.
- Notes: Add any relevant notes.
- ClickAddon thePurchase Order Itemtab.
- Select one or moreProducts.
- ClickOK.
- QTY: Enter the quantity for each product to order. You can also specify this later.
- Also, you can select and click Delete if you feel you have added the wrong product.
- ClickContinuein the upper right corner of the page.
- Supplierswho are eligible to deliver the products you added to your purchase order are listed in the upper panel of the page. Suppliers are those accounts which have account type as vendor. When you add a product under the Inventory > Products > Manage Products page, you can link these vendors to the products (by going to Suppliers tab > selecting Add and then adding the appropriate vendors). These vendors then become suppliers who would then appear on your purchase order. It would then mean that these vendors are eligible to supply you with those products.
- If no suppliers are eligible to deliver the products you added on the previous page, that product cannot be included in the creation of purchase orders.
- Click theSelect Lowest Costbutton in the lower panel to list each item and the suppliers who can deliver them. The lower-cost supplier for each product is selected by default.
- Optionally change the selected supplier for each item. For example, you may wish to consolidate the creation of POs by selecting the fewest number of suppliers possible.
- ClickCreate POs.
- The message box lists the newly created purchase order numbers.
- The status of the newly created purchase orders is New.
- Open a purchase order you just created.
- ASupplier Infopanel displays in the header of the purchase order.
- APO #field has been added to the header. It cannot be edited.
- Optionally adjust the editable fields for each item in thePurchase Orders Itemstab. AGrand Totaldisplays at the bottom of this tab.
- Qty
- Unit Cost
- Discount
- Tax
- Click thePurchase Order Chargestab clickAdd.
- Charge
- Currency
- Amount
- Date
- Notes
- ClickSave.
- Click theCustom Fieldstab.
- Enter values in the custom fields, as appropriate for this record.
- Custom fields are maintained using the Admin > My Company > Custom Fields page.
- Click the Attachmentstab.
- ClickUpload a new fileto upload files to this record.
- ClickSave.
Processing Purchase Orders
Inventory > Procurement > Purchase Orders
Note: To create a purchase order, see Purchase Order.
Typically each purchase order progresses through one or more of the following statuses:
Statuses
- New
- Ready to Send
- Sent
- Partially Received
- Received
- Fully Received
- Voided
Actions
Clicking theActionbutton sets the appropriate status for the purchase order and usually displays a dialog or window for you to complete the action or review the results.
- Generate Order- Creates a printable purchase order. Sets purchase order to Ready to Send.
- Void Order- Cancels the order. Partially Received and Received orders cannot be voided or regenerated.
Messages confirm an action has been completed successfully.
Processing Purchase Orders
- Select Inventory > Procurement >Purchase Ordertab.
- Click a purchase order with aStatusof New.
- Click Actions >Generate Order.
- TheStatusis set to Ready to Send.
- Click Actions >Print Order.
- Review the PDF to ensure it is correct.
- If necessary, make changes to the purchase order, regenerate and review the PDF again.
- Click Actions >Email Order.
- Email Template
- Send Email- Separate Recipients or Combined Recipients
- Contacts- Check to include.
- Other Email- Enter email addresses manually.
- Attachments- Optionally check toinclude.
- ClickSend.
- TheStatusis set to Sent.
- ClickSave.
Receiving Purchase Orders
TheReceiving Purchase Orderspage processes receipt of inventory quantities requested by purchase order. Eachreceiving orderis assigned a unique order number. There may be multiple receiving orders created for a single purchase order, one for each separate delivery by the supplier. A purchase order must be Sent to the supplier to display on this page.
Receiving Location
Received inventory is received into a warehouse's default "virtual location". The location is identified by the warehouse prefix and word Default. For example, W105_:Default.
Statuses
Typically each receiving order progresses through one or more of the following statuses:
- Open - No item quantities have been received.
- Partially Received - Some item quantities have been received.
- Fully Received - All item quantities have been received.
- Received - Receiving is finished for this receiving order, regardless of whether it is currently Partially Received or Fully Received. Typically used to prevent further receiving quantities on a partially received order.
Actions
Clicking theActionbutton sets the appropriate status for the receiving order.
- Finish Receiving- The receiving order status is set to Received.
Searching for Receiving Purchase Orders
You can search receiving orders by one or more of the following search criteria:
- RO #
- PO #
- PO Date
- Supplier
- PO Expected Date
- Warehouse
- Project Name
Exporting List of Receiving Purchase Orders
You can export the list of receiving purchase orders that you see in the grid below. Click Export > Current Page or All Pages. The information will be exported to an Excel file.
Creating Receiving Orders
- Select the Inventory > Fulfillment >Receiving Purchase Orderspage.
- Select an existing purchase order with anRO Statusof Open.
- Note the following on theReceiving Ordertab.
- Supplier
- Contact
- Contact Phone
- Contact Email
- Currency
- RO #
- (PO) Order #
- Order Date
- (PO) Order Expected Date
- Notes
- On theReceiving Order Itemstab click a row to record receipt of the item quantity.
- For anon-serial controlledquantity enter the following:
- Qty Received- Enter the quantity received for this item. You can compare the quantity entered with the quantity ordered and quantity already received in the header of this dialog.
- Lot #- The lot number, if item quantities are lot tracked.
- Reference #
- Expiry Date- Enter if the inventory has a shelf life expiration date.
- Notes
- ClickOK.
- For aserial controlledquantity enter the followingfor each item.
- Serial #
- Lot #
- Expiry Date
- Reference
- Notes
- ClickOK.
- For anon-serial controlledquantity enter the following:
- On the Notes tab, click Add to add a note.
- On the Custom Fields tab, enter information in the respective fields.
- On the Attachments tab, attach any relevant document that you may want to attach. You can also delete attached documents.
- ClickSaveto save the receiving order.
Deliver Product Charges
TheDeliver Product Chargespage processes the delivery of product quantities demanded by associated tickets or projects. By default product deliveries consume inventory. You can optionally populate the list of hardware assets or software assets with the product quantities delivered.
Listing Product Charge Deliveries
You must first create product charges in tickets or projects. Then on this page:
- ClickSearch Product Charges.
- ClickSearch.
- Optionally filter the list by entering a string in theResultfield.
- Optionally review the history of previous deliveries for anyone row by clicking the historyicon.
Delivering Product Charges
- For a selected delivery, click the truck icon.
- Enter the following:
- Delivery Method
- Delivered By
- Delivery Date
- QTY In Stock- The stock available in inventory to deliver.
- QTY Delivered- The quantity already delivered.
- QTY To Deliver- Accept or modify the quantity to be delivered.
- Remove From Inventory- Yes, No
- Create Asset- None, Hardware, Software. Deliver charges will Create Asset as Hardware by default for serialized and non-serialized items.
Stock Adjustments
Inventory > Stock Adjustments
The Stock Adjustments page adjusts the quantity of inventory shown by the system to be available in warehouse locations. It's a quick way to:
- Initialize inventory quantities.
- Correct inventory inaccuracies discovered during cycle job counts.
Each stock adjustment references a single warehouse.
Statuses
Stock adjustments progress through the following statuses:
- Open - The stock adjustment is new and unposted.
- Posted - The stock adjustment has been posted.
Actions
Clicking theActionbutton sets the appropriate status for the stock adjustment.
- Post Adjustments- Sets the stock adjustment record to Posted.
Adjusting Inventory Stock Levels
- Select the Inventory >Stock Adjustmentspage.
- ClickNew.
- Enter the following in theAdjustmenttab.
- Adjustment #
- Warehouse
- Created Date
- Posted Date
- Notes
- ClickSaveto save the stock adjustment record.
- ClickAddon theInventory Itemstab.
- Select one or more products.
- ClickOK.
- Enter the following for each item:
- New Qty
- Reason
- ClickSaveto save your stock adjustment record.
- Click the Action >Post Adjustments.
- The stock adjustment is Posted.
- Item quantities are adjusted in the warehouse you specified.


