BMS-Continuum integration
Introduction
PSA facilitates built-in integration with Continuum - a remote monitoring and management (RMM) system. The RMM Integration Settings page maintains configuration settings for this integration. With this integration, you can monitor machines and devices using an integrated RMM and manage their corresponding tickets in PSA. Linked Continuum assets are created in PSA when associated tickets are created.
Features
- A ticket originates in Continuum and gets created in PSA. Linked Continuum assets are created in PSA as the tickets are created. Updates to the status and notes of a PSA ticket are posted back to its corresponding ticket in Continuum.
- If a ticket is manually created newly in PSA, Continuum is only updated if the owner is set to 'NOC.'
- If an account has a default contract, tickets created in PSA from Continuum will use this default contract.
Perform the following procedures to configure and activate the integration.
Sections Integration Summary
- Step 1 - Recommended Settings
- Step 2 - Adding Continuum in PSA
- Step 3 - Ticket Status Mapping
- Step 4 - Account Mapping
- Step 5 - PSA Integration and Activation
NOTE Do not perform Step 5 - PSA Integration and Activation until all other steps are completed. Once you enter the callback URL and click Update, Continuum will start to send alerts into PSA and the ticket creation process will start.
Setup
Step 1 - Recommended Settings
Add the following records in PSA to support data provided by Continuum.
- Ticket Statuses
- Admin > Service Desk > Ticket Statuses
- Add the following two statuses.
- Pending
- NOC Completed
- Priorities
- Admin > Service Desk > Priorities
- Add the following priorities.
- Low
- Emergency
- Queue
- Admin > Service Desk > Queues
- Add the following queue.
- Monitoring Alert Tickets
Step 2 - Adding Continuum in PSA
Add a Continuum integration record in RMM Integration Settings in PSA
- Select Admin > Service Desk > RMM Integration Settings.
- Click New.
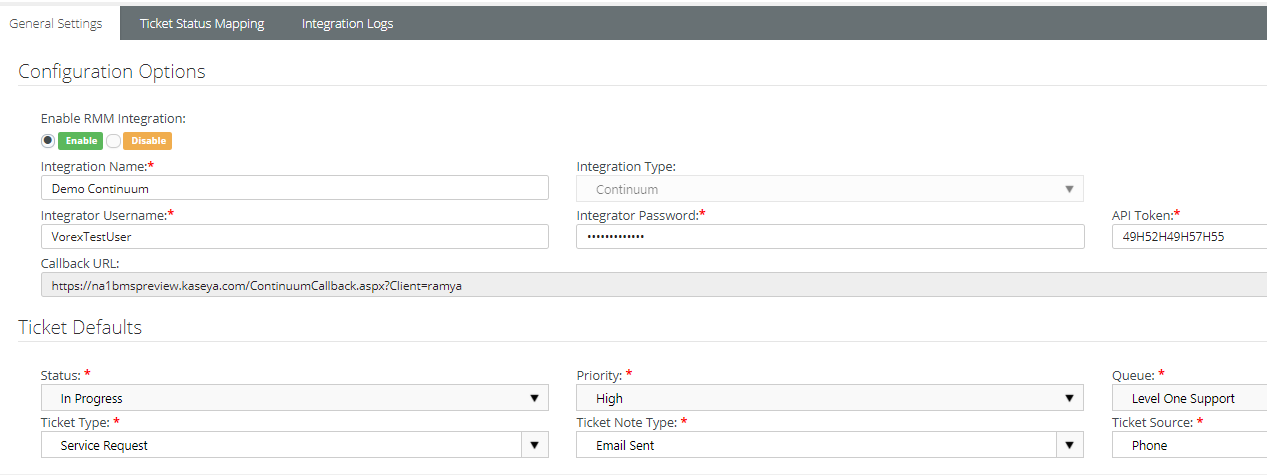
- Enter the following in the General Settings > Configuration Options section.
- Integration Name: Enter a name that is easy to understand. You may want to add other integrations later.
- Integration Type: Select Continuum from the drop-down list.
- Integrator Username: Create an integrator username you will use later to integrate with Continuum.
- Integrator Password: Create an integrator password.
- API Token: Enter the API token provided by Continuum.
- To get the API token, log into Continuum.
- Navigate to the left menu item and click Admin.
- Click the Integration tab on the left of the screen.
- Copy the API token from the PSA Integration page
- In PSA, enter the following in the RMM General Settings > Ticket Defaults section.
- Priority: Select a default priority.
- Queue: Select the queue you want tickets to be created from and Continuum monitoring alerts to be assigned to. For example, Monitoring Alert Tickets, if you created earlier.
- Ticket Type: Select a default ticket type.
- Ticket Note Type: Select a default note type. General Notes is fine.
- Ticket Source: Select a default ticket source. Monitoring System is recommended.
- Click Save.
Step 3 - Ticket Status Mapping
- Navigate to Admin > Service Desk > RMM Integration > Continuum Integration > Ticket Status Mapping.
- Map Continuum ticket statuses to PSA ticket statuses.
- Map PSA ticket statuses to Continuum ticket statuses.

Step 4 - Account Mapping
- In Continuum, select Admin > Sites page.
- Copy the <site_code> value.
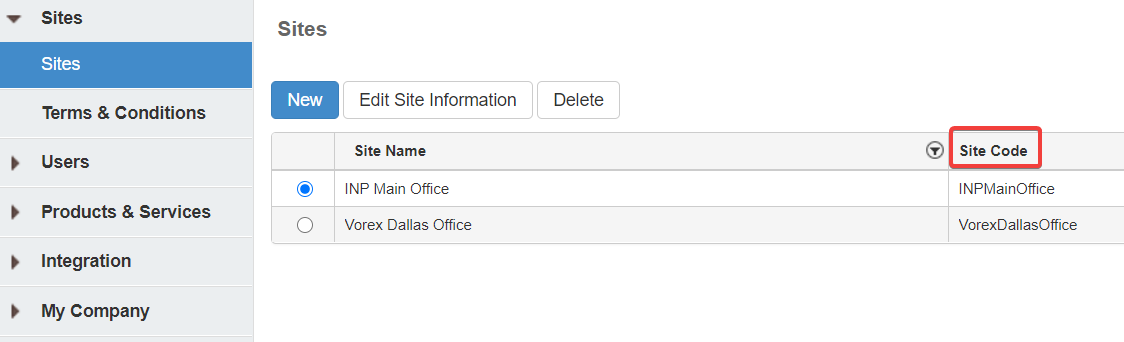
- In Continuum, a site code equals an account in PSA
- In PSA, select the CRM > Accounts page.
- Open an account that matches the <site_code> information.
- Double-click a Location record to edit.
- The location record should correspond to the <site_code> for this account. You may have several locations defined for this account.
- Click the RMM Integration tab.
- Paste the <site_code> into the Continuum Location Code field.
- Click Save.

Step 5 - PSA Integration and Activation
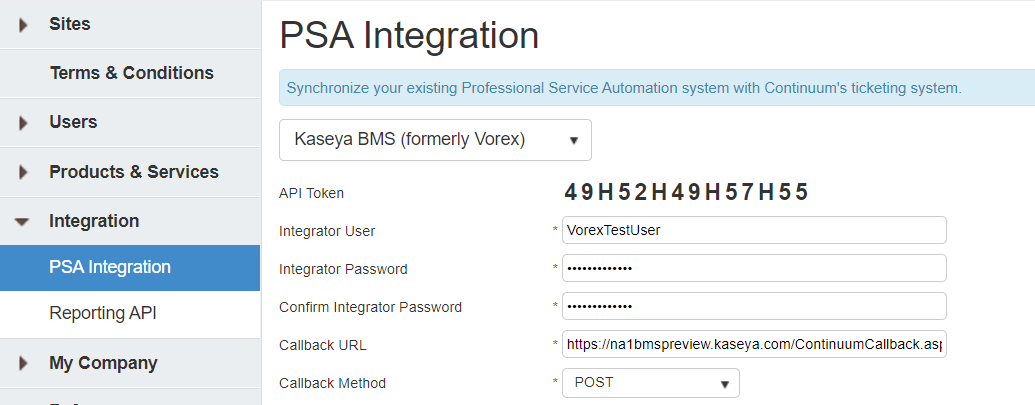
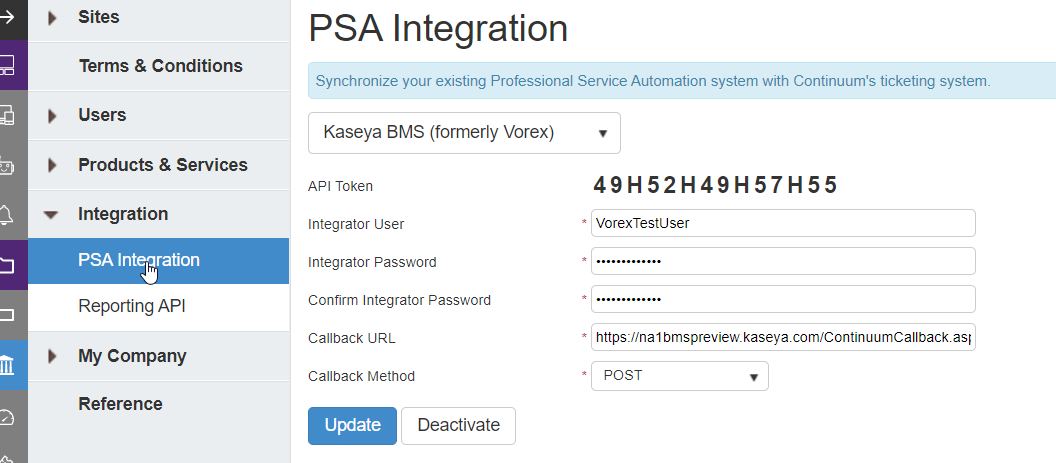
- In Continuum, select the Admin > Integration > PSA Integration page.
- Select the Other certified vendors' option.
- Integrator User: Enter the integrator username.
- Integrator Password: Enter the integrator password.
- Confirm Integrator Password: Re-enter the integrator password.
- Callback URL: Enter a URL similar to the following:
- Callback Method: Select POST from the drop-down list.
- Click Update.