BMS-Datto RMM integration
Introduction
The integration between BMS and Datto RMM is designed to enhance your IT management capabilities, streamline your operations, and improve service delivery. By combining the power of BMS with Datto RMM, you can expect seamless synchronization of organizations and devices, efficient remote management, and a more cohesive IT environment. As we continue to enhance this integration, additional functionalities will be added to provide even greater value.
This section will guide you through the initial setup process to connect BMS with Datto RMM. This involves configuring both systems to communicate effectively and ensuring a secure and reliable connection.
Steps
-
Go to Admin > Integrations > RMM.
-
In the General Settings tab, click Integration Type dropdown and select Datto RMM.
-
Select Enable and enter an integration name.
-
You will need to enter an API Key, API Secret Key, and API URL. You can obtain this information from Datto RMM. For steps on how to generate this information, please see, Datto RMM API. Once you have this information, please enter here.
NOTE You will see options to:
- Enable Periodic Asset Sync: This will automatically sync new devices created in Datto RMM over to BMS on a nightly basis.
- Enable Remote Control: This will enable you to web remote into a device from within BMS. -
Click Save. You will receive a success message when the integration is enabled successfully.
Introduction
This functionality allows you to synchronize and map organizations between BMS and Datto RMM, ensuring consistent and up-to-date data across both platforms.
Steps
-
Go to Admin > Integrations > RMM.
-
In the Accounts Synchronization tab, all current Datto RMM sites have been populated.
-
For unmapped sites, you have a few options.
-
Under BMS Account and Location, you will be automatically offered to have a new account and new location created matching the name of the Datto RMM site. If you would like that option, simply click Next, and these will be mapped under these names.
-
If you would like to map to already created BMS accounts and locations, click the blue Edit icon. You will be prompted with a dialog box to select the account and location you would like to map the site to.
NOTE You can map multiple sites to oneBMS account that has multiple BMS locations, but not multiple sites to one BMS account with one location.
-
-
Once you have mapped all sites successfully and would like to sync/import, either check All or select specific sites. Then, click Next.
-
You will be presented with a Job Completed message. Click Finish. The organizations are now synced successfully.
Introduction
With this feature, you can sync and map devices between BMS and Datto RMM, allowing for efficient device management and monitoring.
Steps
-
Go to Admin > Integrations > RMM.
-
In the Device Synchronization tab, do the following:
-
If you have enabled Periodic Asset Sync, all devices will be available to sync and new devices added in Datto RMM will automatically be brought over to BMS on a nightly basis. For more on enabling Periodic Asset Sync, please see 1. Setting up the integration.
-
To manually bring over devices from Datto RMM, click Sync All Devices.
-
-
Once you would like to sync/import devices, either check All or select specific devices. Then, click Next.
-
You will be presented with a Job Completed message. Click Finish. Devices are now synced successfully.
NOTE There is a Refresh Devices option. This will update any potential changes made within Datto RMM for the current available listing fields - Hostname, Device Type, Operating System, Site, and Last Seen.
Field mappings
NOTE The following fields are present on the Service Desk > Assets Management > Hardware Assets page across different tabs such as Asset Info, Additional Info, Asset Details, Network Details, Motherboard Info, and Chassis Info.
| BMS UI | DRMM UI |
| Name | Hostname |
| Category | Type |
| Account | Site (Depends on mapping done in Account Synchronization) |
| Location | |
| Status | (This becomes active upon syncing and becomes inactive when device is deleted on DRMM site.) |
| Description | Description |
| Serial | Serial Number |
| OS Type | Operating System |
| Current User | Last User |
| Max Memory Size | Memory (Installed) |
| IP Address | Internal IP |
| Mac Address | MAC Address |
| Motherboard Manufacturer | Manufacturer |
| Motherboard Product Code | Motherboard |
| Motherboard Version | BIOS Version |
| Motherboard Serial Number | BIOS Name |
| Chassis Serial Number | Serial Number |
| Chassis Type | Type |
| Acquisition Date | BIOS Released |
| Warranty Expiration Date | Warranty Expiration |
| First Check In | Created |
| Last Check In | Last Seen |
| Last Reboot | Last Reboot |
Introduction
This tab allows you to automatically create tickets from alerts received from Datto RMM. Alerts are always tied to a device. The setup needs to be done from both BMS and Datto RMM side. Step 1 and its substeps are to be done on the BMS side. Step 2 and its substeps are to be done on the Datto RMM side.
Steps
-
Do the following on the BMS side:
-
Navigate to Admin > Integrations > RMM.
-
Select your active Datto RMM integration.
-
In the Alerts Management tab, do the following:
-
Ticket creation from Alerts: Select Enable to enable alerts to come through to BMS.
-
The Alerts Webhook URL and the Tenant Name appear automatically.
NOTE You will need to copy these for the Datto RMM side of the setup.
-
Alert Webhook Secret: Enter any alphanumeric word (including special characters) to create an alert webhook secret.
NOTE You will need to copy this for the Datto RMM side of the setup.
-
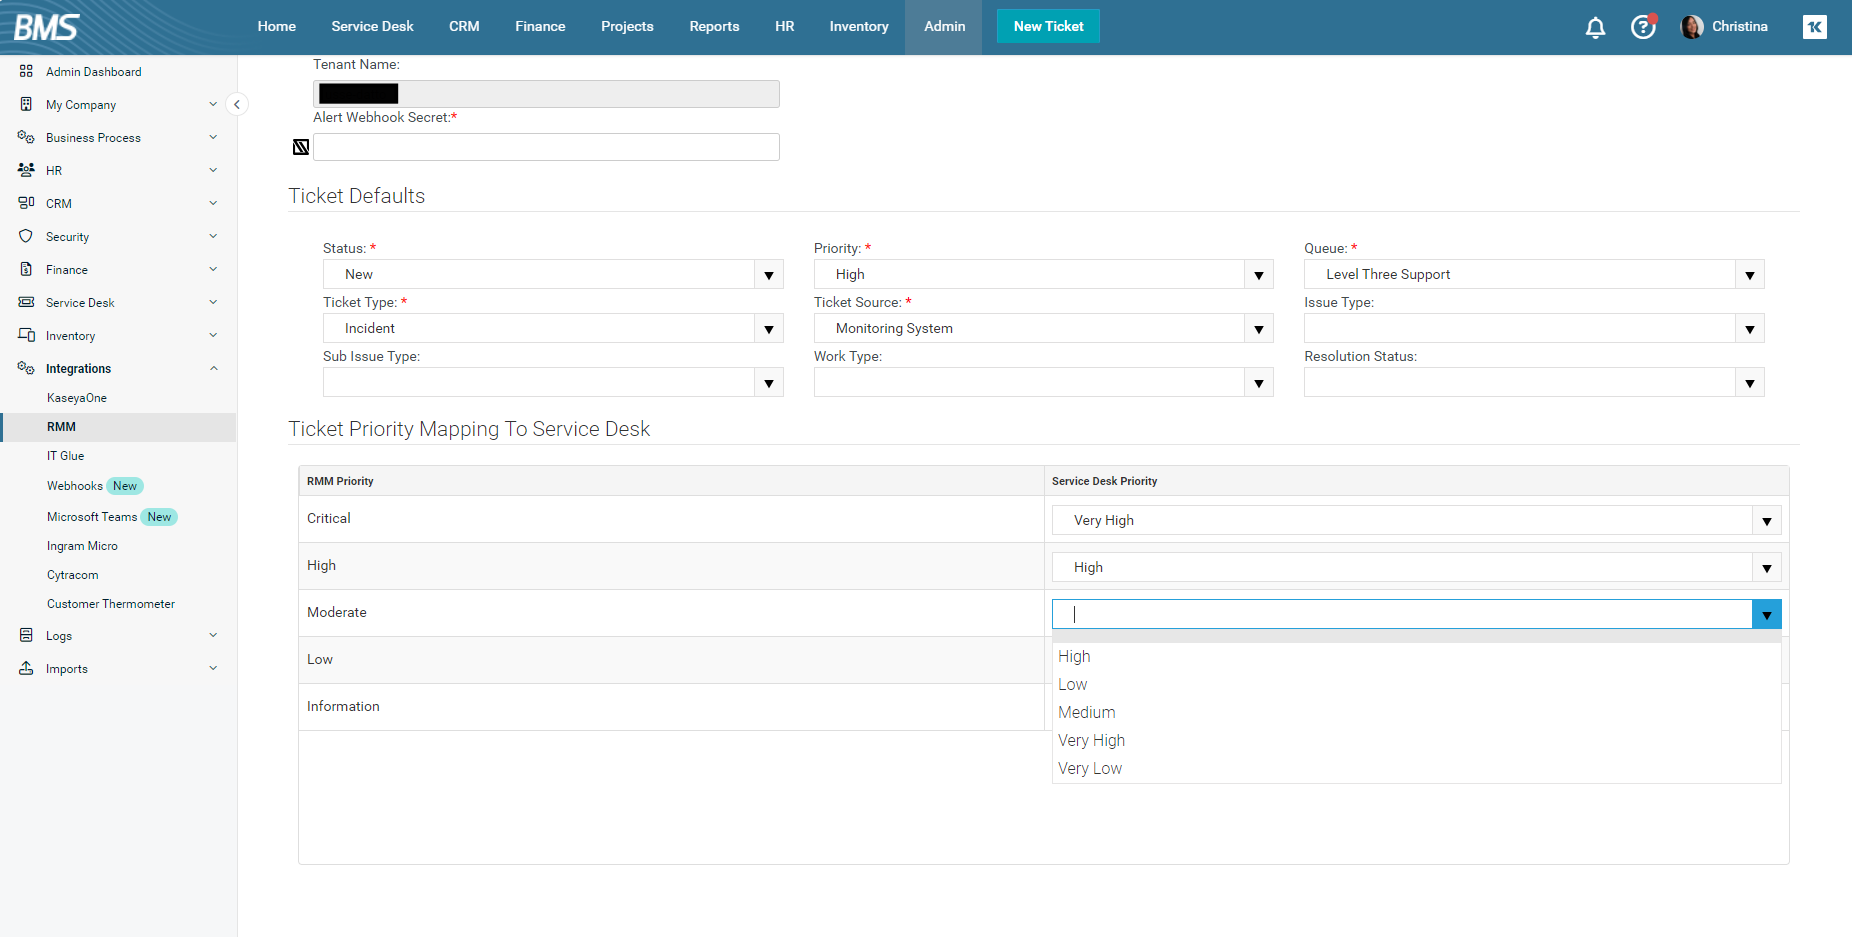
Ticket Defaults: Select the default for each field according to your choice.
-
Ticket Priority Mapping to Service Desk: Select the priority for each field according to your choice. Settings in the Ticket Priority Mapping to Service Desk section will override the priority set in Ticket Defaults section if there are conflicts.
-
Click Save.
-
-
-
Do the following on the Datto RMM side:
-
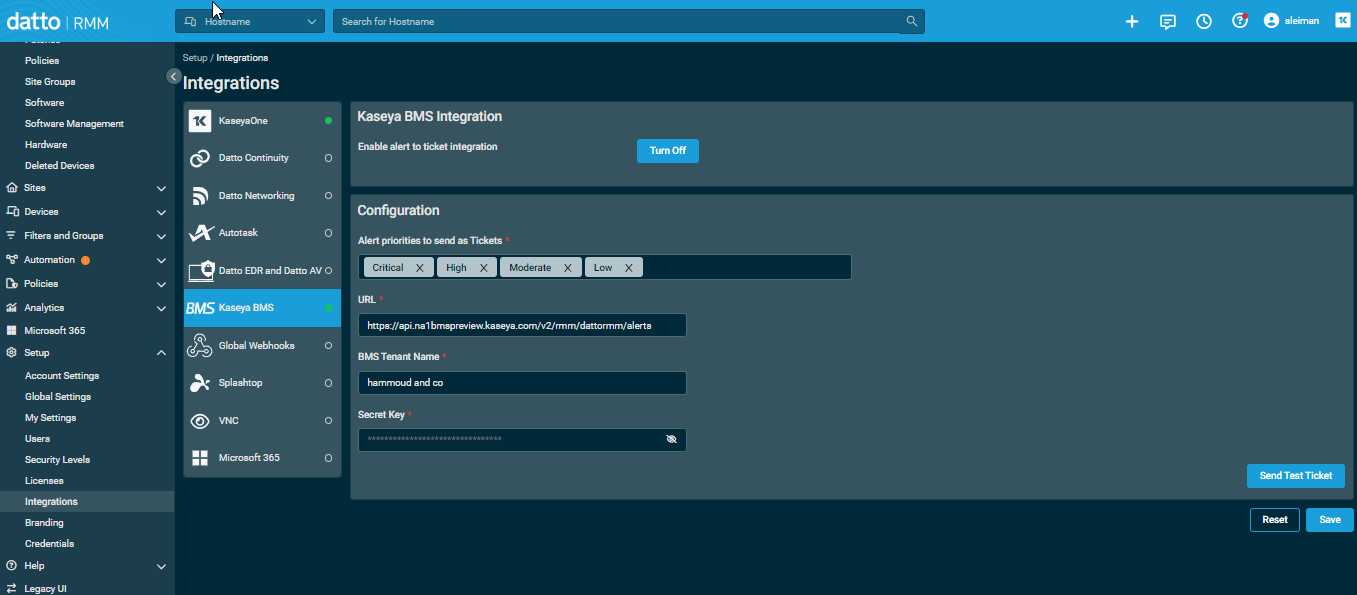
Navigate to Setup > Integrations > Kaseya BMS > Configuration section.
-
Alert priorities to send as Tickets: Select the appropriate priorities.
-
Copy information from Alerts Webhook URL, Tenant Name, and Alert Webhook Secret from BMS and paste them in URL, BMS Tenant Name and Secret Key fields in Datto RMM respectively.
-
Click Save. Now, Datto RMM is ready to trigger alerts to BMS.
-
Alerts are linked to a device. Alerts are triggered by certain actions from the Datto RMM side. For example, a new alert from Datto RMM will create a ticket in BMS. If you change the status of an alert in Datto RMM to Resolved, it will update the ticket in BMS and close it.
NOTE You can also close a ticket in BMS manually by changing the status to Completed, by merging it, or by updating it with workflow etc. These actions will also resolve the alert in Datto RMM.
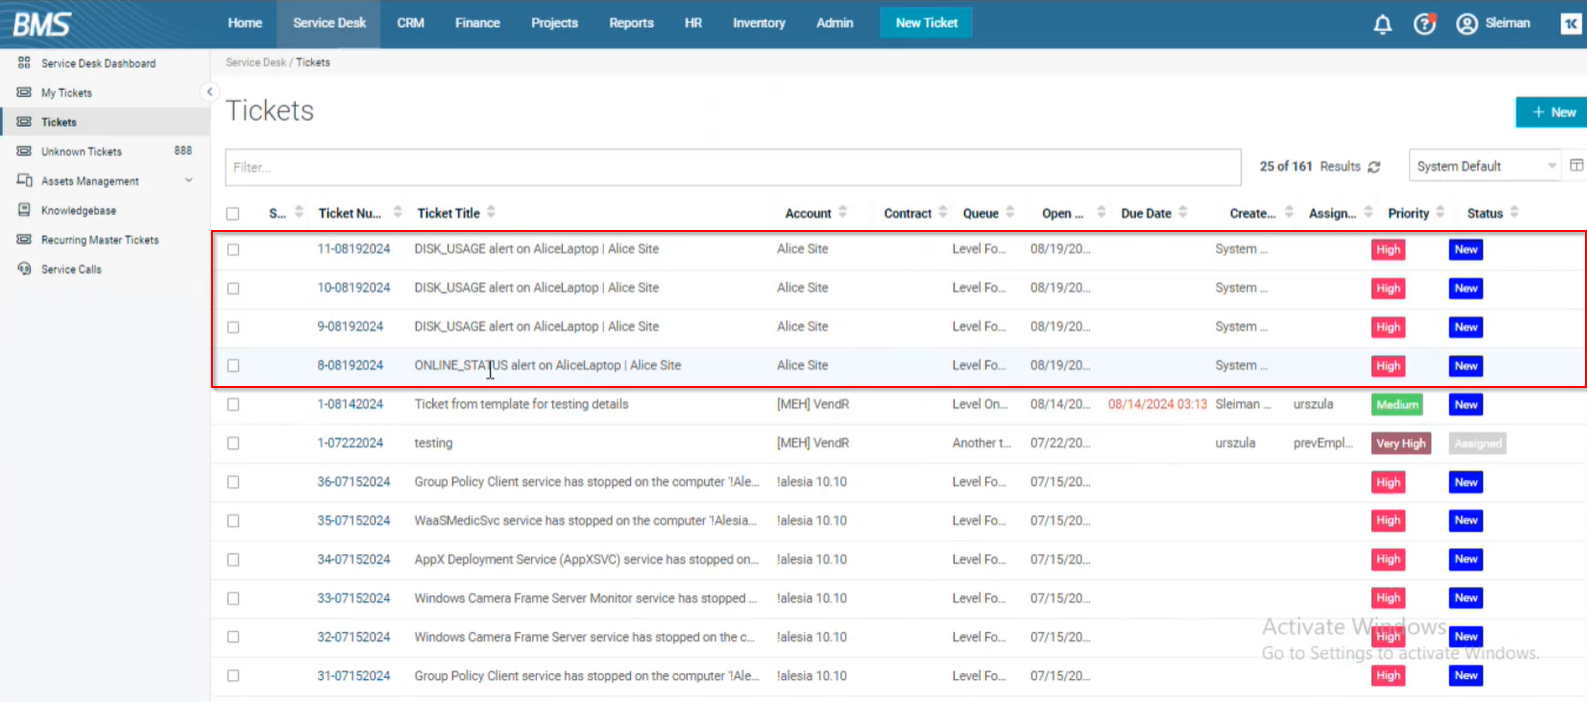
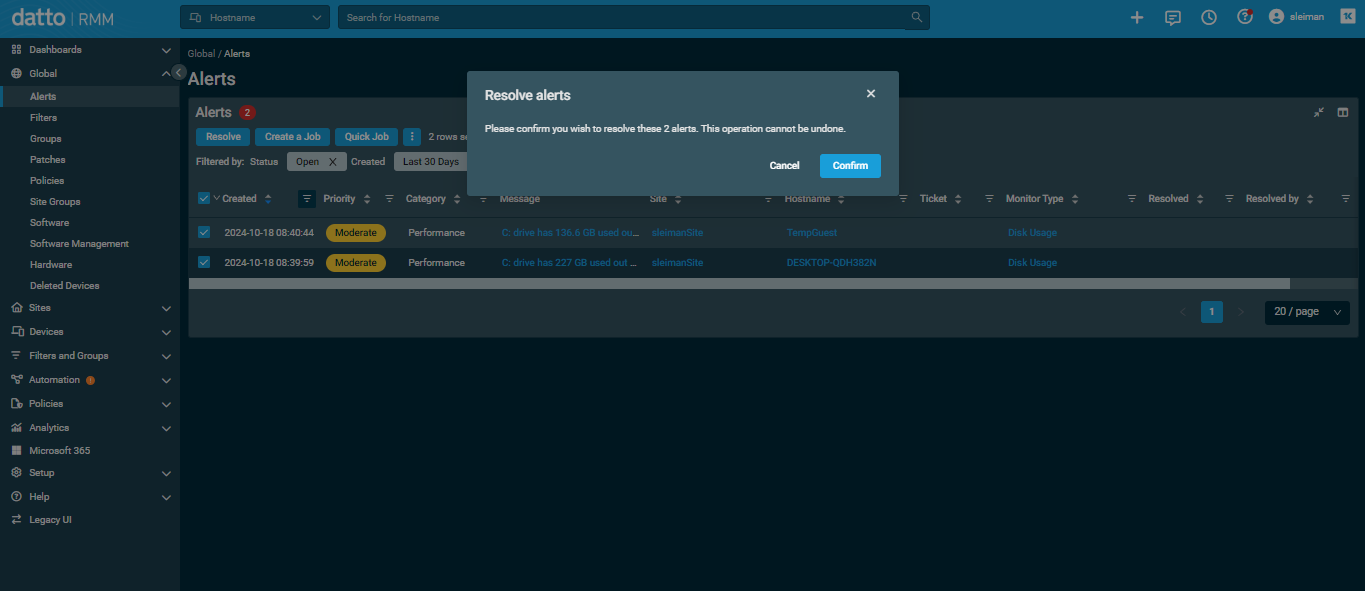
It will also create an entry related to this alert under the Integration Logs tab. 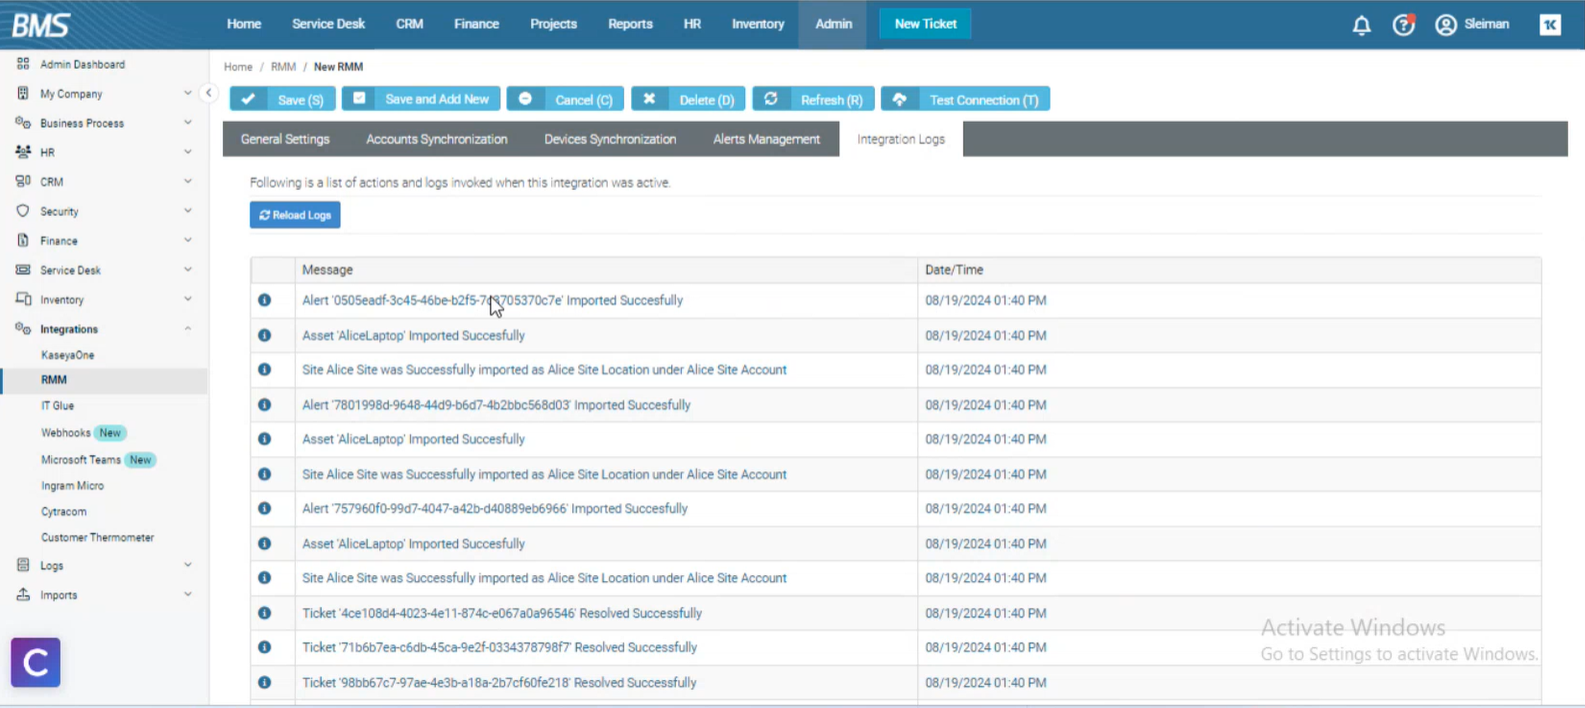
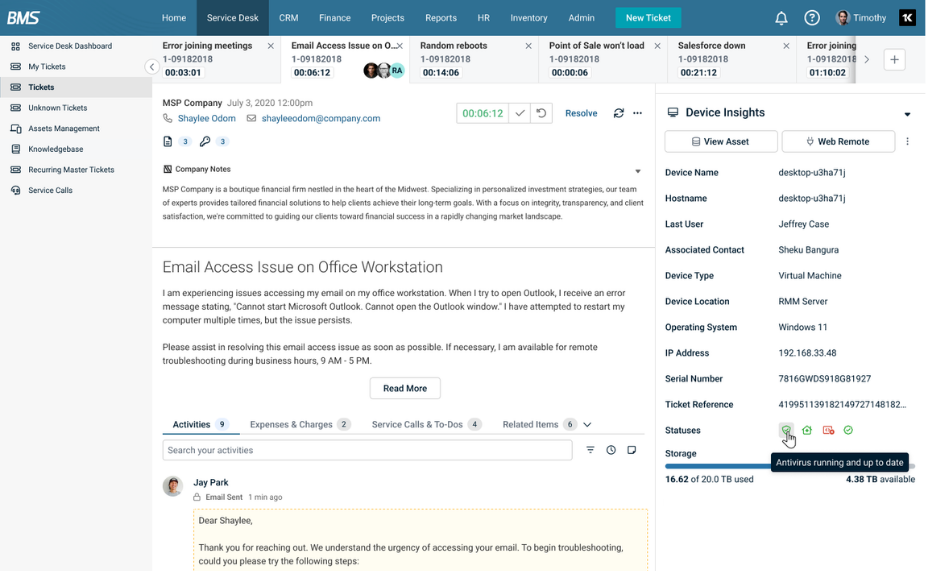
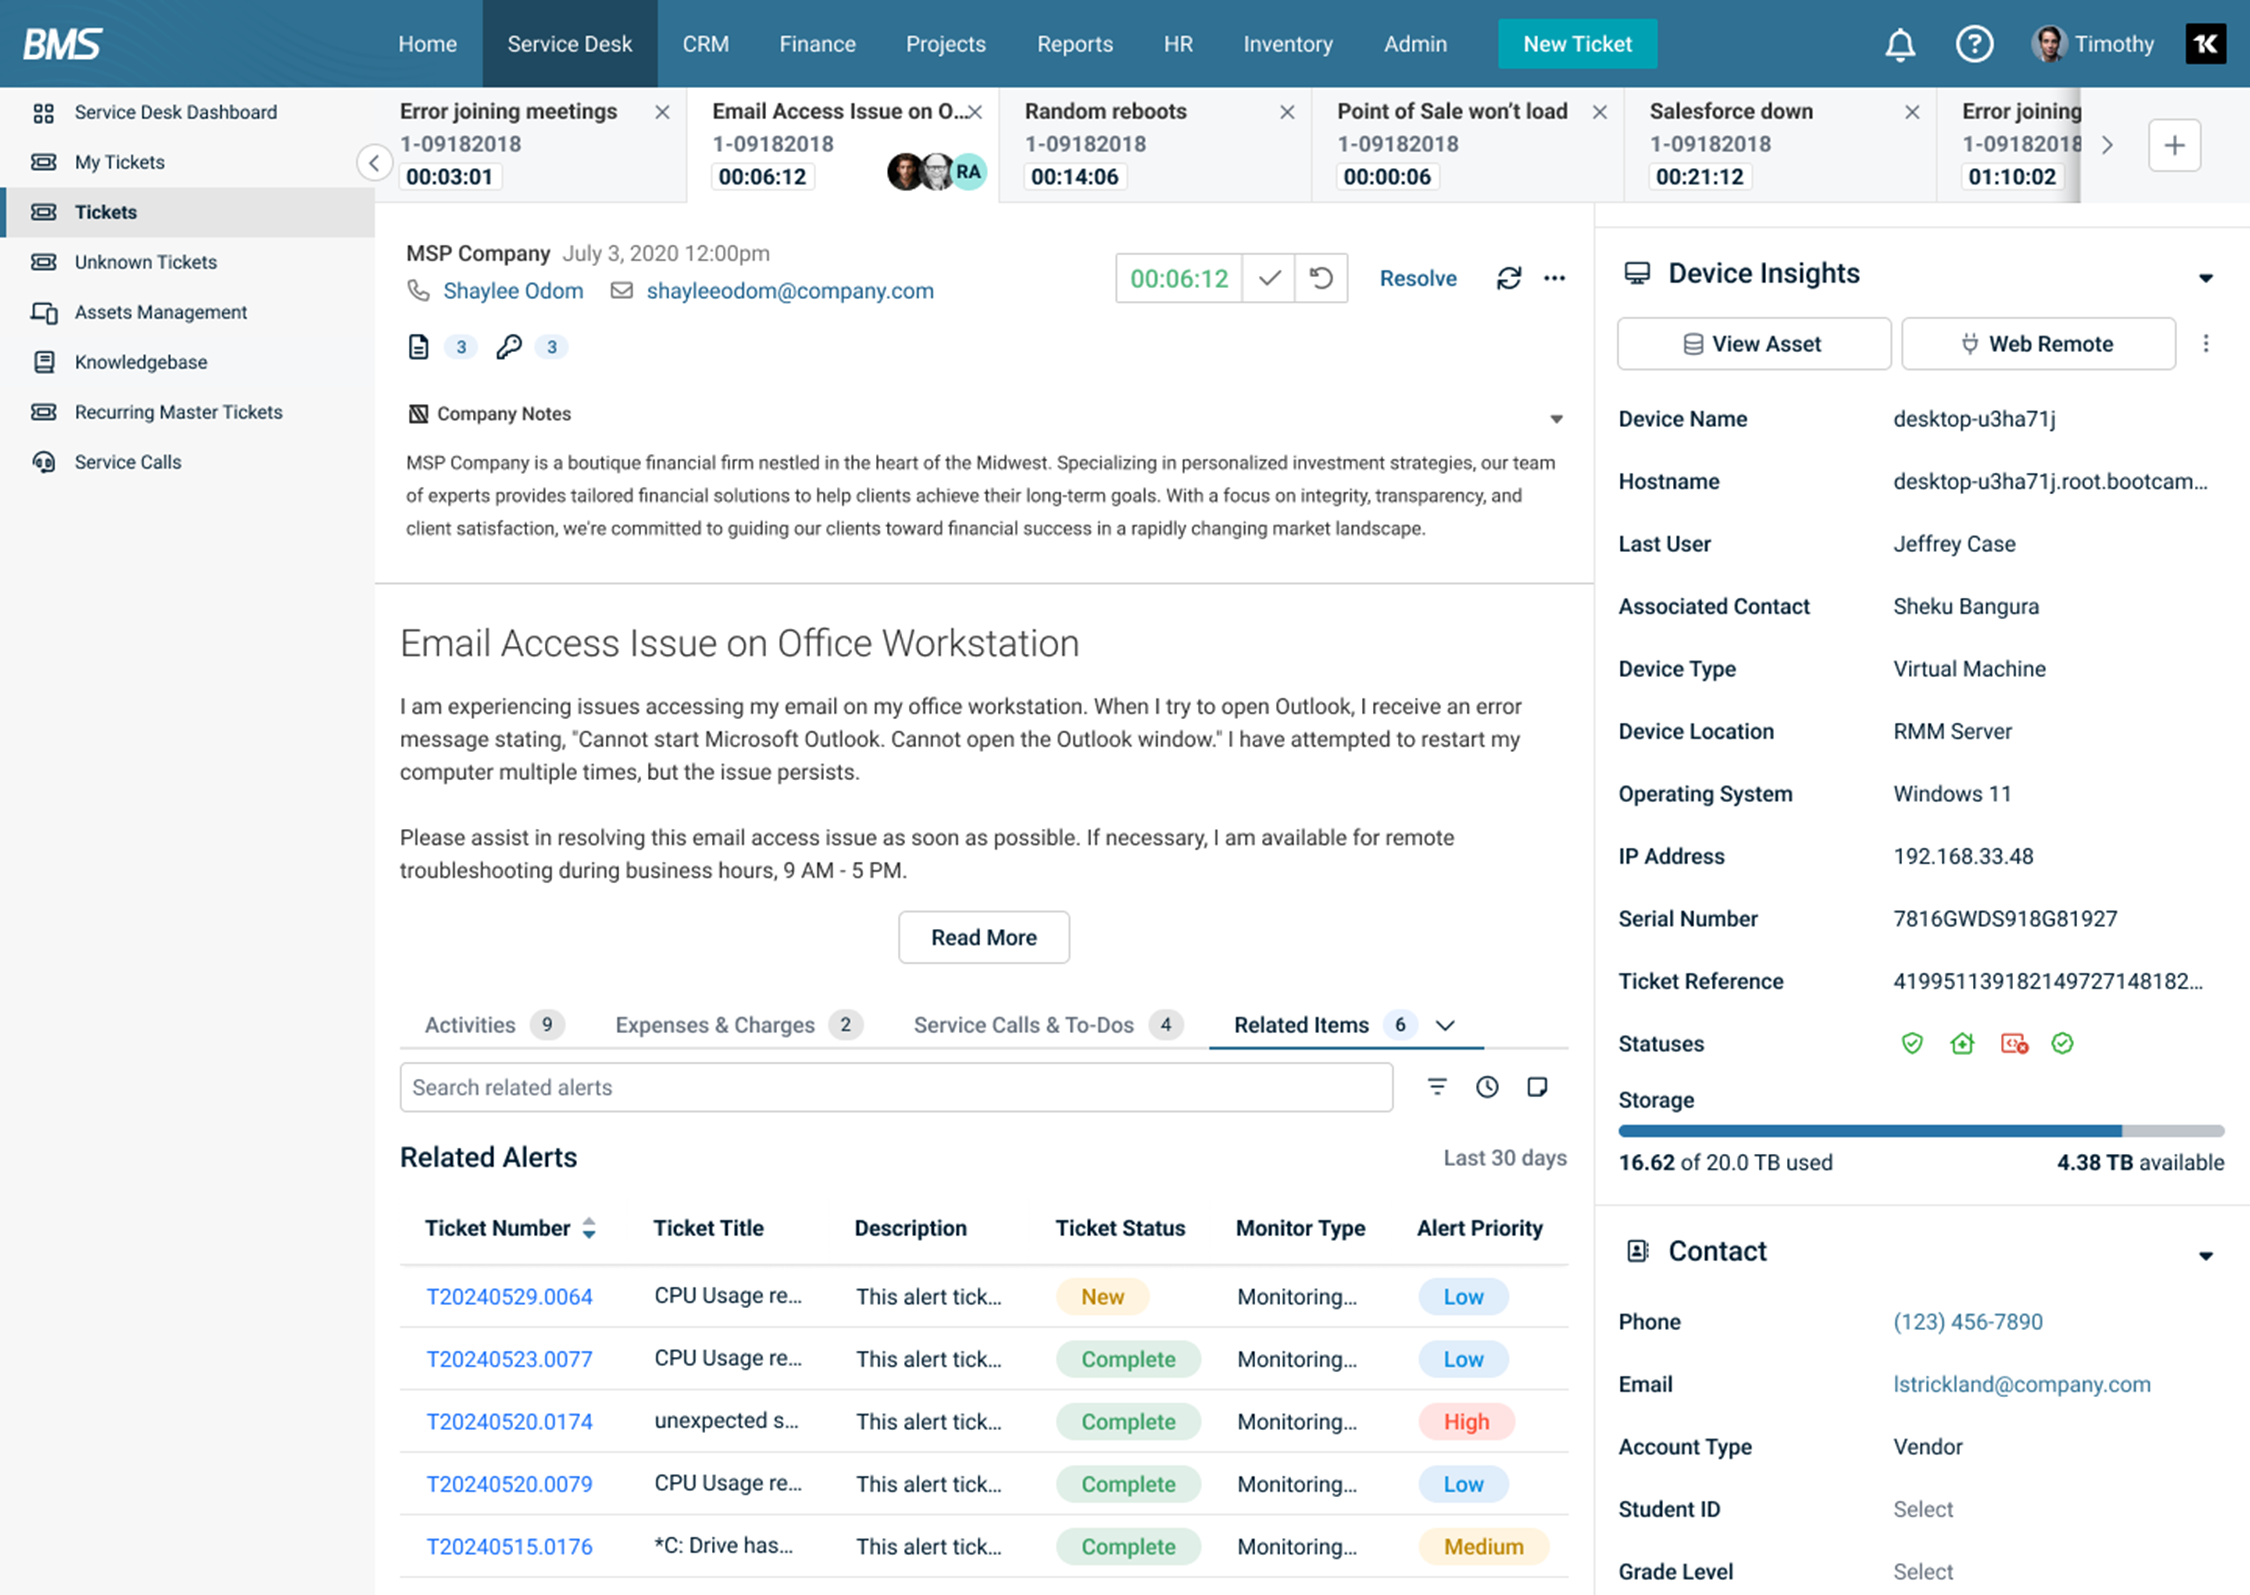
The ticket has a new tab on the right panel called Device Insights. The Device Insights tab has replaced the Hardware Asset tab. This tab provides some important information about the device or asset right inside the ticket. The information is provided as a ready reference for taking further action. It also shows statuses which include status of antivirus running in the system, status of patches applied, and status of software updates. The information is routed from Datto RMM. Additionally, you can view the asset and web remote to the asset. You can web remote both from BMS and Datto RMM.
NOTE The Storage information, under Device Insights tab, displays the total storage information of all the drives available in the device.
If you navigate to the Related Items > Alerts section of the ticket, you will be able to see more alerts related to the device that you have opened. These alerts will be from the past 30 days.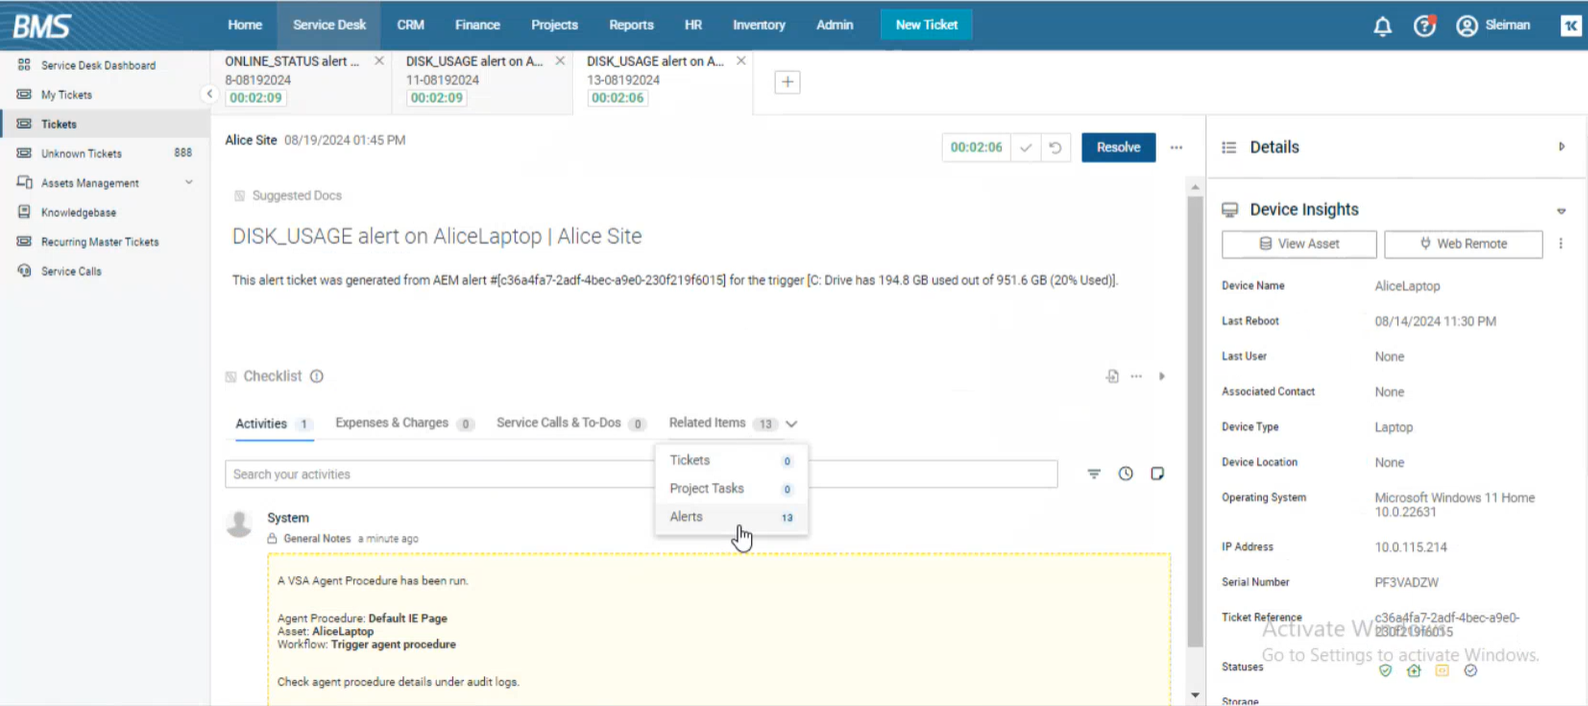
This functionality enables you to remotely access and manage affected hardware devices directly from within BMS, enhancing your remote support capabilities. You can access this functionality from a Service Desk ticket or Hardware Assets section.
Dependencies
-
Please ensure Remote Control functionality is enabled in your RMM General Settings. For more on enabling Remote Control, please see 1. Setting up the integration.
-
Note that web remote availability for users is based on role settings. To give this permission on roles, please see Web Remote permissions.
Web Remote from a Service Desk ticket
Steps
-
Go to Service Desk > My Tickets/Tickets
-
Select the applicable ticket
-
Within the Affected Hardware tab, click Web Remote.
NOTE If this is your first time logging into Datto RMM for the day, you will be prompted to log into Datto RMM prior to remoting into the device.
You will be redirected to a web remote session.
Web Remote from Hardware Assets section
Steps
-
Go to Service Desk > Assets Management > Hardware Assets.
You will be redirected to web remote session.
Web Remote permissions
Steps
-
Go to Admin > Security > Roles.
-
Select or create a role you want to grant web remote permissions to. For more on creating roles, see Roles.
-
Under Service Desk, enable Live Connect. The role now has access to web remote.
