Working with contracts
Introduction
The Contracts page registers billing agreements between you and your clients. The selected contract type determines how billing is processed. For automated billing, the contract has to be active to be pulled from VSA etc. There are five contract types.
- Time and Material
- Recurring Services
- Fixed Price
- Retainer by Amount
- Retainer by Hours
- A customer can have multiple contracts.
- You can pick a default contract for service tickets for a client, thus eliminating the guesswork if something is covered or not.
- You can link service level agreements (SLA) to a contract.
- You can clone contracts to create a copy of an existing contract.
Time and Materials
The customer is charged for all hours of work performed, any direct expenses incurred, and all materials purchased to support the resolution of tickets and the completion of projects. Time entered on tickets and tasks generates billable amounts for labor on invoices. The role assigned a labor time entry determines the rate charged for that labor. Default rates for roles can be adjusted on a per-contract basis.
Creating Time and Materials Contracts
- Select the Finance > Contracts page.
- Click New > Time and Materials.
- Enter the following in the Contract Information section.
- Contract Name
- Contract Description
- Account
- Start Date
- End Date
- SLA -A contract associated with an SLA overrides the Default SLA when the ticket is linked to the contract.
- Issue Invoice on- Overrides the default value set for the 'Issue Invoice on' field, either Start of Billing Cycle or End of Billing Cycle. The default is set using the Admin > Company Settings >Invoice tab.
- Reference Number
- Default Contract for Service Desk - Yes or No
- Contract Number - Only displays when editing a contract.
- Enter additional information in the Custom Fields section.
- Click Save.
- Add and Adjust rates for roles for this contract in the Billing Information tab. Roles are derived from Admin > Finance > Roles.
- Maximum Hours - Limits the hours billable for this role.
- Contract Billing Rate - Adjusts the default billing rate for this role.
- Optionally exclude roles and work types that can report hours to this contract using the Exclusions tab.
- If hours are reported using an excluded role or work type, the hours are reported against the Default Fallback Contract you specify.
- If there is no fallback contract specified, the entries will be counted as Labor hours.
- Upload files to the contract using the Attachments tab.
- Click Save.
- Activate the contract to begin using this to create billing entries.
Recurring Services
Services are billed on a contract length, weekly, monthly, quarterly, or yearly basis.
Creating Recurring Services Contracts
- Select the Finance > Contracts page.
- Click New > Recurring Services.
- Enter the following in the Contract Information section.
- Contract Name
- Contract Description
- Account
- Start Date
- End Date
- SLA -A contract associated with an SLA overrides the Default SLA when the ticket is linked to the contract.
- Contract Number - Only displays when editing a contract.
- Reference Number
- Billing Cycle - Contract Length, Weekly, Monthly, Quarterly, Yearly
- Issue Invoice on-
- Default Contract for Service Desk- Yes or No
- Billing Periods based on Calendar Year- Yes or No
Note: Billing entries are not generated for hours reported on tickets and tasks linked to a recurring service contract.To prevent generating billing lines for labor hours independently of a contract, set the Default Contract option to Yes for that contract. When a new ticket or task is created, the default contract is linked to the ticket or task automatically.
- Enter additional information in the Custom Fields section.
- Click Save.
- Click Add to add services in the Billing Information tab. You can adjust the calculated extended cost and price for each service add to this contract.
- Service
- Effective Date
- Unit Price
- Extended Unit Price
- Unit Cost
- Extended Unit Cost
- Units
- Total Price
- Total Cost
- Once you have added a service in the Billing Information tab, you can also edit it later. With Automated billing of services, MSPs want to be able to stop a service from a contract without having to delete the line item. A stop service button is available to facilitate this.
- Open a line item.
- Click the red-colored Stop Service button on the top right in the light purple area.
- Once this is done, it is logged in the Contract History tab.
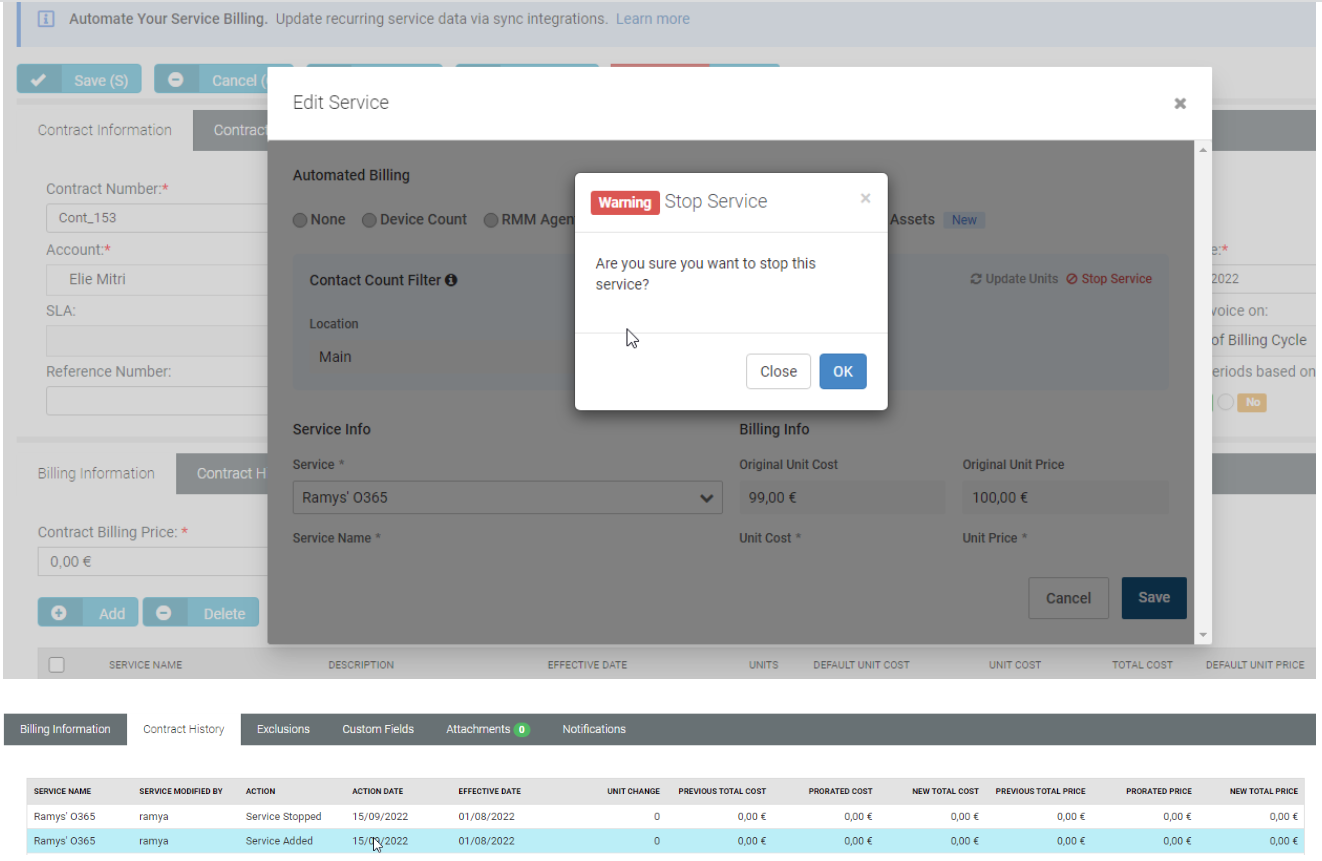
- Click Save.
- Review the Contract Billing Price. This is the total price for all the services added.
- Optionally exclude roles and work types that can report hours to this contract using the Exclusions tab.
- If hours are reported using an excluded role or work type, the hours are reported against the Default Fallback Contract you specify.
- Upload files to the contract using the Attachments tab.
- Click Save.
- Optionally reopen the contract and click Activate to begin using this contract to create billing entries.
- When the contract changes, you can review those changes using the Contract History tab.
Tip!
A detailed guide on recurring service billing is available here.Fixed Price
A fixed priced contract is not subject to any adjustment on the basis of the provider’s cost experience in performing the contract. A fixed-price contract is typically tied to a single project, but some users also use them for support contracts. In many contracts, the fixed price is divided into smaller milestone payments.
Creating Fixed Priced Contracts
- Select the Finance > Contracts page.
- Click New > Fixed Price.
- Enter the following in the Contract Information section.
- Contract Name
- Contract Description
- Account
- Start Date
- End Date - Milestones due dates default to this date.
- SLA -A contract associated with an SLA overrides the Default SLA when the ticket is linked to the contract.
- Contract Number - Only displays when editing a contract.
- Reference Number
- Default Contract for Service Desk - Yes or No
- Accumulating Contract - If Yes the total contract amount starts at zero (0) and increases each time you add a new milestone. If No, the total contract amount is set to that fixed amount. You can add milestones whenever you like, so long as the total contract amount does not exceed the fixed amount.
- Alter From Project - If Yes, a project phase milestone is added to the project linked to this contract each time you add a new milestone to the contract.
- Enter additional information in the Custom Fields section.
- Click Save.
- Click Add to add milestone payments in the Billing Information tab.
- Name
- Type
- Amount
- Due Date - Defaults to the end date of the contract. For milestone payments, billing review lists billable amounts using this date, you may wish to adjust this date for earlier milestone payments to ensure they display sooner in Billing Review.
- Description
NOTE The Billing Information tab displays Billed and Posted checkbox columns. Billing Review posts a line item. Generating an invoice using Billingbills that line item.
- Click Save.
- Review the following in the Billing Information tab
- Contract Billing Price - The total of all milestone amounts.
- Billed Amount
- Remaining Amount
- Optionally exclude roles and work types that can report hours to this contract using the Exclusions tab.
- If hours are reported using an excluded role or work type, the hours are reported against the Default Fallback Contract you specify.
- Upload files to the contract using the Attachments tab.
- Click Save.
- Optionally reopen the contract and click Activate to begin using this contract to create billing entries.
Retainer by Amount
The total price of the contract is prepaid. Clients schedule services when needed. Billings decrement the contract amount purchased. Billable labor time on tickets and tasks consume the amount. Charges and expenses donotconsume the amount.
Creating Retainer by Amount Contracts
- Select the Finance > Contracts page.
- Click New > Retainer by Amount.
- Enter the following in the Contract Information section.
- Contract Name
- Contract Description
- Account
- Start Date
- End Date
- SLA - A contract associated with an SLA overrides the Default SLA when the ticket is linked to the contract.
- Contract Number- Only displays when editing a contract.
- Reference Number
- Default Contract for Service Desk -Yes or No
NOTE To prevent generating billing lines for labor hours independently of a contract, set the Default Contract option to Yes for that contract. When a new ticket or task is created, the default contract is linked to the ticket or task automatically.
- Enter additional information in the Custom Fields section.
- Click Save.
- Adjust rates for roles for this contract in the Billing Information tab.
- Contract Billing Rate - Adjusts the default billing rate for this role.
- Review the following in the Billing Information tab
- Contract Billing Price - Enter the total amount that can be billed to this contract.
- Consumed Amount - The total amount of billings applied to this contract.
- Optionally exclude roles and work types that can report hours to this contract using the Exclusions tab.
- If hours are reported using an excluded role or work type, the hours are reported against the Default Fallback Contract you specify.
- Upload files to the contract using the Attachments tab.
- Click Save.
- Optionally reopen the contract and click Activate to begin using this contract to create billing entries.
Retainer by Hours
Hours of service are prepaid. Clients schedule services when needed. Labor time entries decrement the retainer hours purchased. The total price of the contract is calculated by multiplying the number of contract hours purchased by an average rate. Retainer by Hour contracts is billed by billing periods. The total hours specified by the contract are distributed evenly across all the billing periods contained by the contract's date range. When a billing period within the contract is closed, unconsumed retainer hours can be optionally carried forward to the next billing period.
When you had overages in a month and when invoice was generated for retainer by hours that were included in the billing contract, the invoice zeroed out the quantity and the amount field inconsistently earlier. You can now post labor hours that are applied to a Retainer by Hours contract that has overages that will be billed. Quantity will show hours and the amount will be x.x. You can then generate an invoice. Once the invoice is generated, the quantity will not change to 0.00.
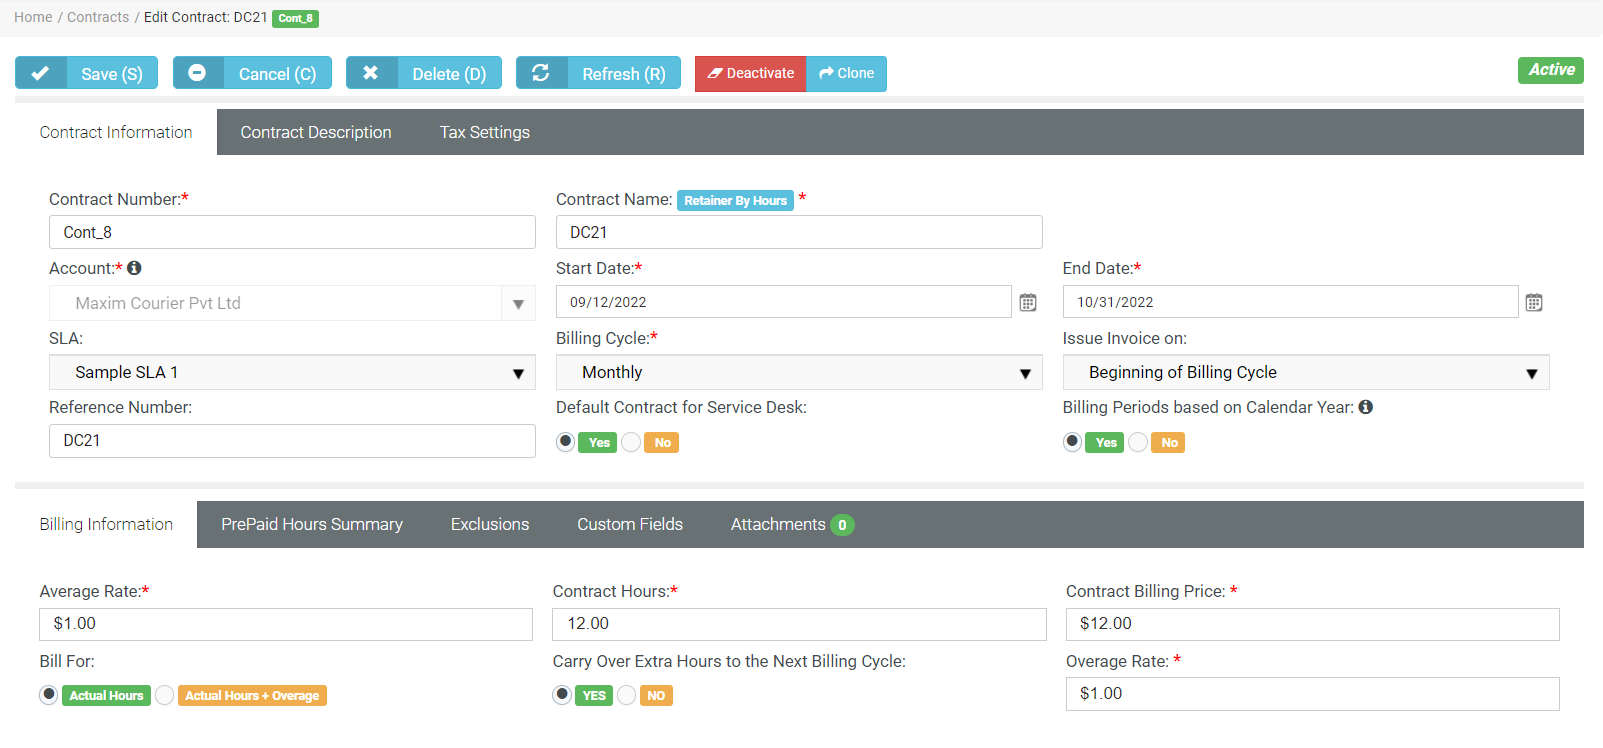
Creating Retainer by Hours Contracts
- Select Finance > Contracts page.
- Click New > Retainer by Hours.
- Enter the following in the Contract Information tab.
- Contract Number: This is automatically given by BMS. It is displayed only when editing a contract.
- Contract Name: Enter a name for the contract.
- Account: Select the appropriate account from the dropdown.
- Start Date: Select the start date from the calendar.
- End Date: Select the end date from the calendar.
- SLA: A contract associated with an SLA overrides the Default SLA when the ticket is linked to the contract. Select the appropriate SLA from the dropdown.
- Reference Number: Enter a reference number for the contract.
- Billing Cycle: Select the appropriate billing cycle period from the dropdown.
- Issue Invoice on: Select the appropriate option from the dropdown.
- Default Contract for Service Desk: By default, Yes is selected. To prevent generating billing lines for labor hours independently of a contract, set the Default Contract option to Yes for that contract. When a new ticket or task is created, the default contract is linked to the ticket or task automatically. However, you can click Yes or No according to your choice.
- Billing Periods Based on Calendar Year: By default, Yes is selected. Click Yes or No according to your choice. Read the tip that is given next to the field.
- Enter the following information in the Contract Description tab:
- Set the main points of the contract here. You can format the text to some extent with the in-built options available within the editor. Also, you have a Preview option where you can see the text as they would appear normally.
- Enter the following information in the Tax Settings tab:
- Select Taxable or Not Taxable according to the contract. By default, Not Taxable is selected.
- Income Account: Select the appropriate income account from the dropdown.
- Expense Account: Select the appropriate expense account from the dropdown.
- Click Save. The Billing Information, Prepaid Hours Summary, Exclusions, Custom Fields, and Attachments tabs appear now.
- Enter/Select the following information in the Billing Information tab.
- Average Rate: Enter the average rate that will be paid.
- Contract Hours: Enter the total number of contract hours that will be used.
- Contract Billing Price: This amount appears automatically. This is average rate x contract hours.
- Bill For:Select either Actual Hours or Actual Hours + Overage.
- Carry Over Extra Hours to the Next Billing Cycle: Click Yes or No. If you select Yes, unconsumed retainer hours are carried forward to the next billing period when a billing period is closed using Billing Review > Retainer Hours page.
- Overage Rate: Enter a rate for overage.
- In the Prepaid Hours Summary tab, you can review the hours consumed when labor time entries were applied to this contract.
- Do the following in the Exclusions tab. Optionally exclude roles and work types that can report hours to this contract.
- Default Fallback Contract: Click the + sign to search and select the default fallback contract. If hours are reported using an excluded role or work type, the hours are reported against the Default Fallback Contract you specify.
- Excluded Roles: Click Add to search and select roles that can be excluded from this contract.
- Excluded Worktypes: Click Add to search and select worktypes that can be excluded from this contract.
- Click Save.
- Enter relevant information in the Custom Fields tab if there are any fields.
- Do the following in the Attachmentstab:
- Upload or delete any attachments that you have already uploaded.
- Click Save.
- Click Activate (on the top right) to begin using this contract to create billing entries.
Process to Carry Over the Remaining Hours to the Next Billing Period
In the Retainer by Hours Contract, there is an option to carry over the remaining unused hours in the contract to the next billing period. (See fifth bullet point under step 7 above.) When you have selected Yes under this option, you can carry over the remaining unused hours in the contract to the next billing period.
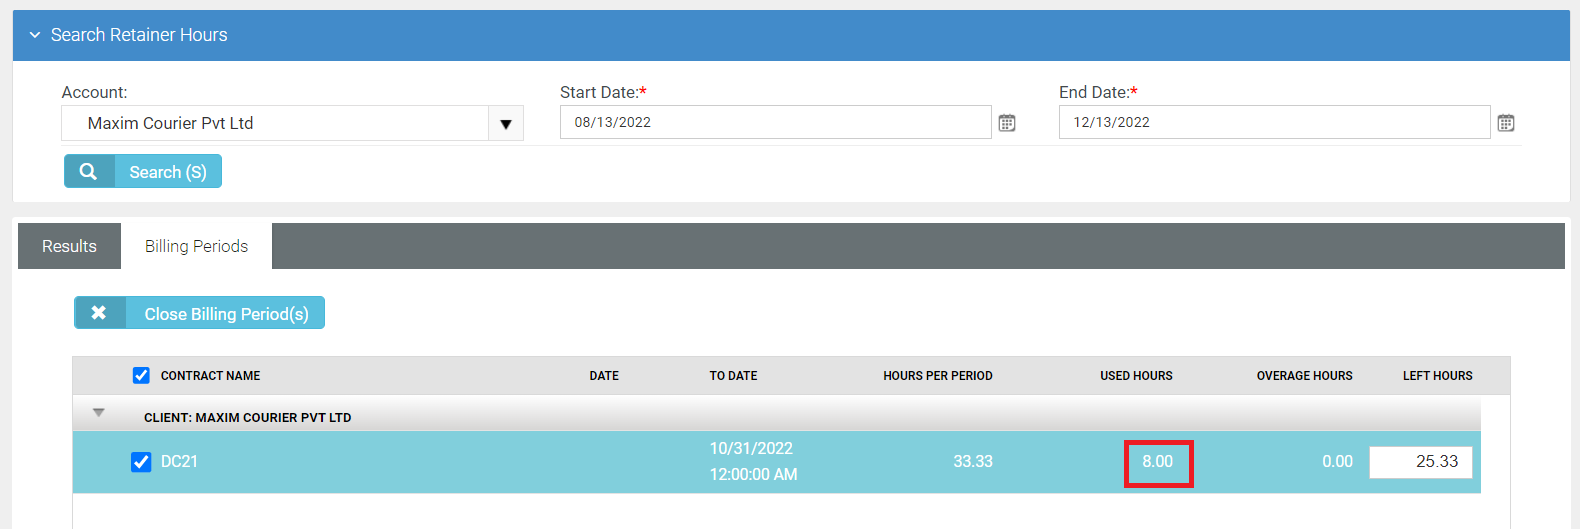
Let us study the above example. Imagine the total contract hours mentioned in the contract is 12 hours per month, and the billing period is monthly. By the end of the month, the client has used only 4 hours actually. He still has 8 hours of unused contract hours. In the next billing period, he should ideally get 8+12=20 hours. But sometimes, this doesn't happen if you follow the wrong process. In this scenario, ideally, you would want to bill for 4 hours now and carry forward the 8 hours to the next billing period. However, if the correct process is not followed in this case, the invoice can show incorrect hours at the end and the carryover hours will be lost. So, make sure you follow the below process.
- After you create the contract, activate the contract by clicking Activate on the top right.
- Create the relevant ticket in the Service Desk > Tickets page and link the contract.
- Add time spent to the ticket. (Go to Activities tab and click the time icon.) In this case, we have entered 4 hours.
- Click Save. The time entered is saved.
- Go to Finance > Billing Review > Labor Hours page.
- Search for the contract by selecting the appropriate account. This is the easiest way to search for the contract.
- You will find the contract with 4 hours under Hours to Bill.
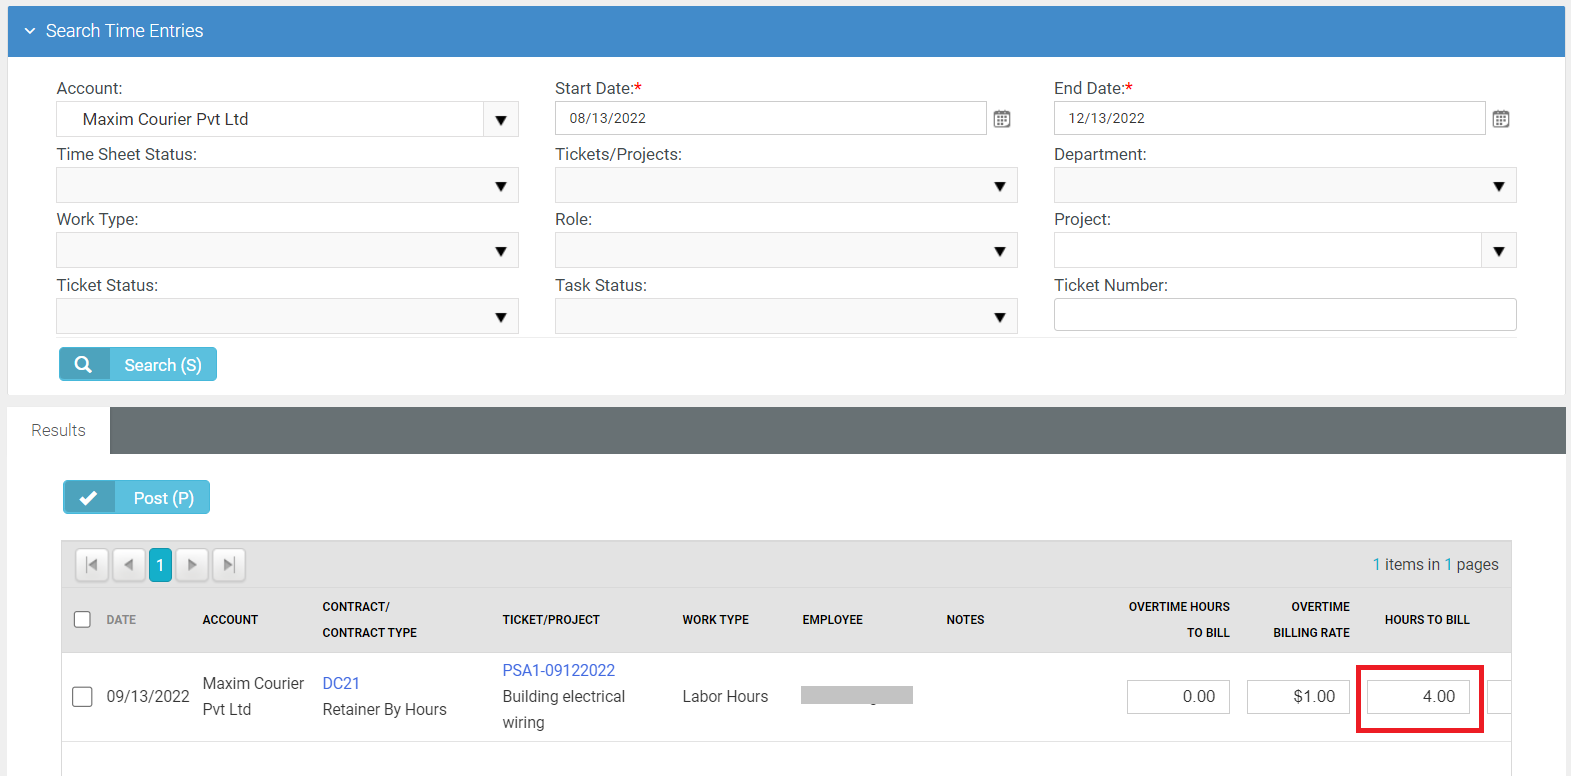
- Select the contract and click Post. BMS will ask for confirmation. Click Yes. The contract will then disappear from the grid.
- Go to Finance > Billing Review > Retainer Hours page.
- Search by Account and you will find the contract appearing below in the grid.
- Go to the Billing Periods tab and you will find that the used hours is reflecting correctly (in this case 8 hours).
- Come back to the Results tab, select the contract and click Post.
- Go back to the Billing Periods tab, select the contract and click Close Billing Period(s). This is a very important step. Make sure not to miss it. Now, your invoice will show the exact hours that will be carried over to the next billing period. In case BMS shows an error on the top of the page, you will need to close all previous billing periods.
IMPORTANT Once a billing period is closed, you cannot reopen it. It is closed forever.


