BMS-Xero integration
Introduction
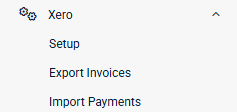
BMS integrates with Xero to keep your accounting data synced. You can export invoices from BMS, match payments to invoices in BMS, and add customer/supplier details directly in BMS. Using BMS with Xero integration keeps your accounting data synced. Use our Xero wizard to generate invoices in BMS and have everything synced with your accounting software. In your BMS, Navigate to Finance > Xero > Setup and follow through with the wizard to integrate to Xero successfully.
What's new
- BMS Integration with Xero supports OAuth 2.0. Using this we have implemented the offline mode scope which allows the user to keep their integrated session active. This means that there will no longer be a 30 mins limitation to an active session. We use refresh tokens to keep the sessions activated. The session will be disconnected once the user manually chooses to Disconnect from Xero from the setup page.
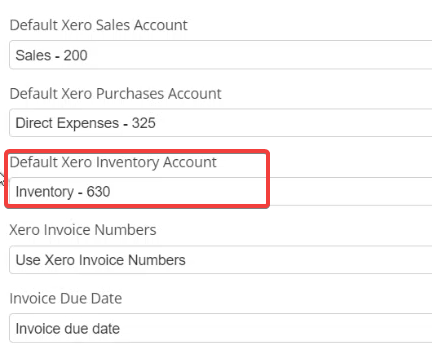
- Default Xero Purchases Account and Inventory Account in the Options tab. This is detailed in the Configuresection.
- Modified Since filter now available when importing Items and accounts in BMS.
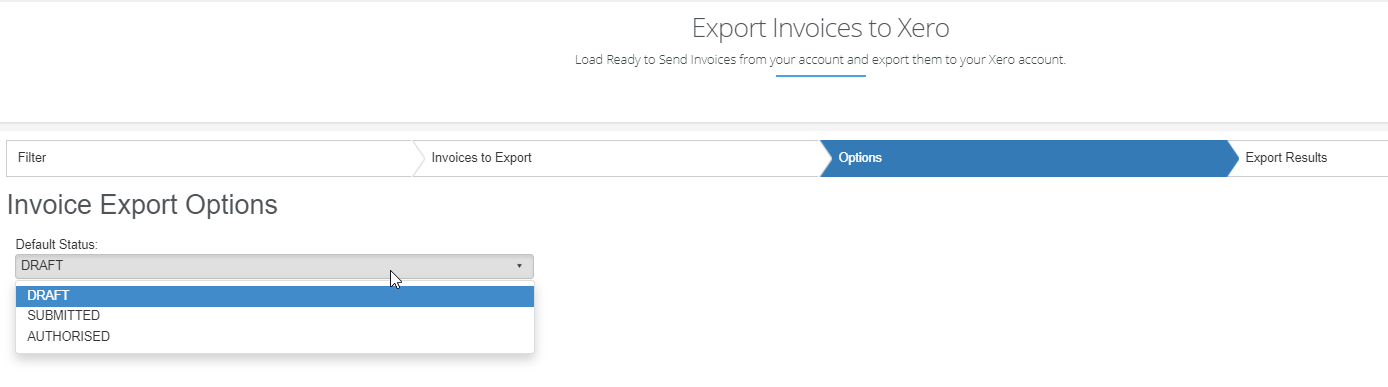
- You can set default statuses during Invoice export under Finance > Xero > Export invoices >Select Invoice > Options.
- Draft, submitted, and authorized are the statuses that can be selected.
- You can access synced invoices from Xero in your BMS using the deep link we have created in Xero.


Prerequisites
- Access to Finance module in BMS
- Active Xero Integration account
Setting up
BMS setup with Xero involves the following
- Authenticate
- Configure
- Importing Data from Xero
- Exporting Data to Xero
- Exporting BMS Invoices
- Importing Xero Payments
Authenticate
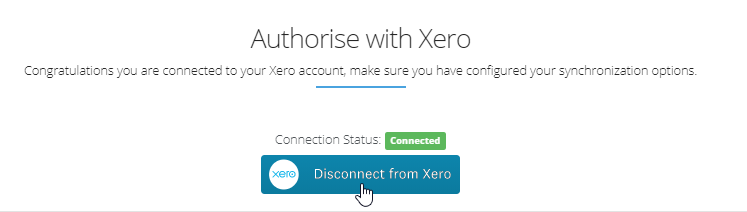
- In your BMS, Navigate to Finance > Xero > Setup.
- On the setup page, click on the Connect to Xero button.
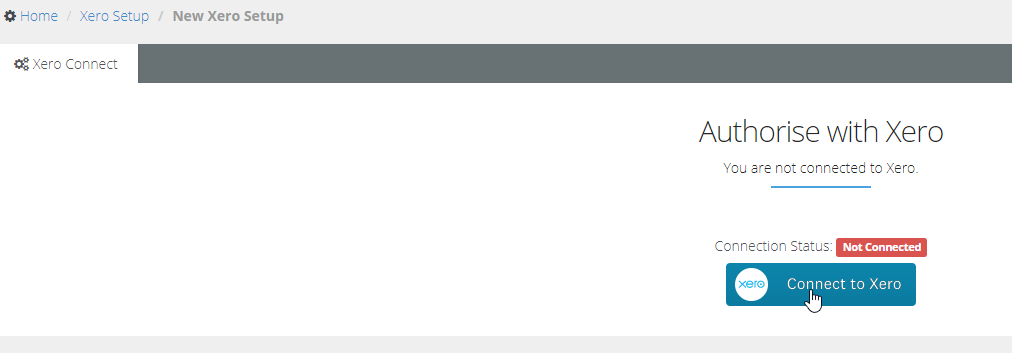
- This will redirect you to the Xero login page
- Login to your Xero account
- You will be asked to allow access to your organization data and user account
- Choose Allow access
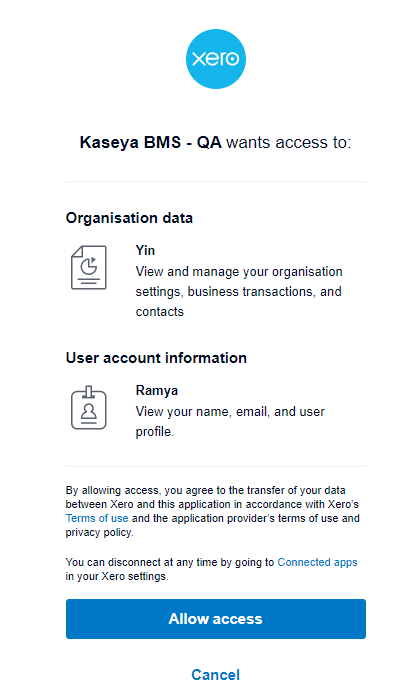
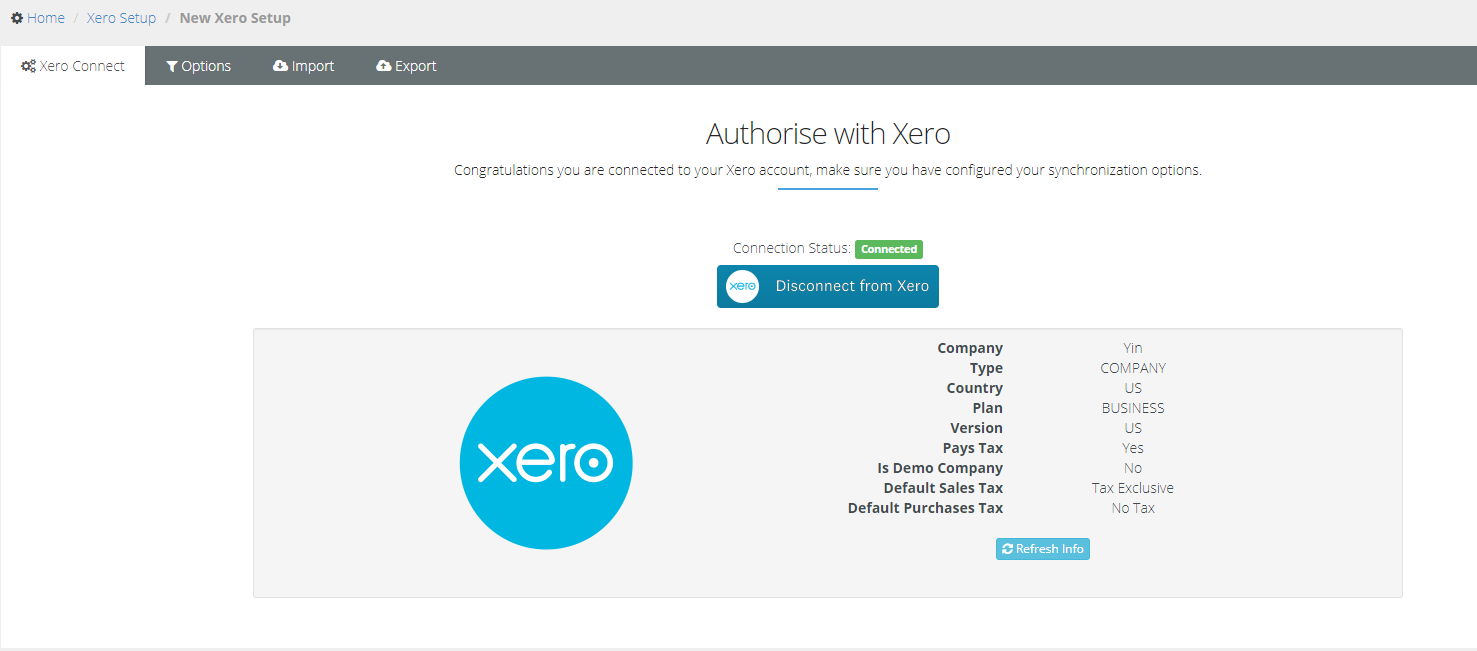
- With a successful authorization, the wizard should show you the connection status and the company details, and the option to Disconnect from Xero. when you want.
Configure
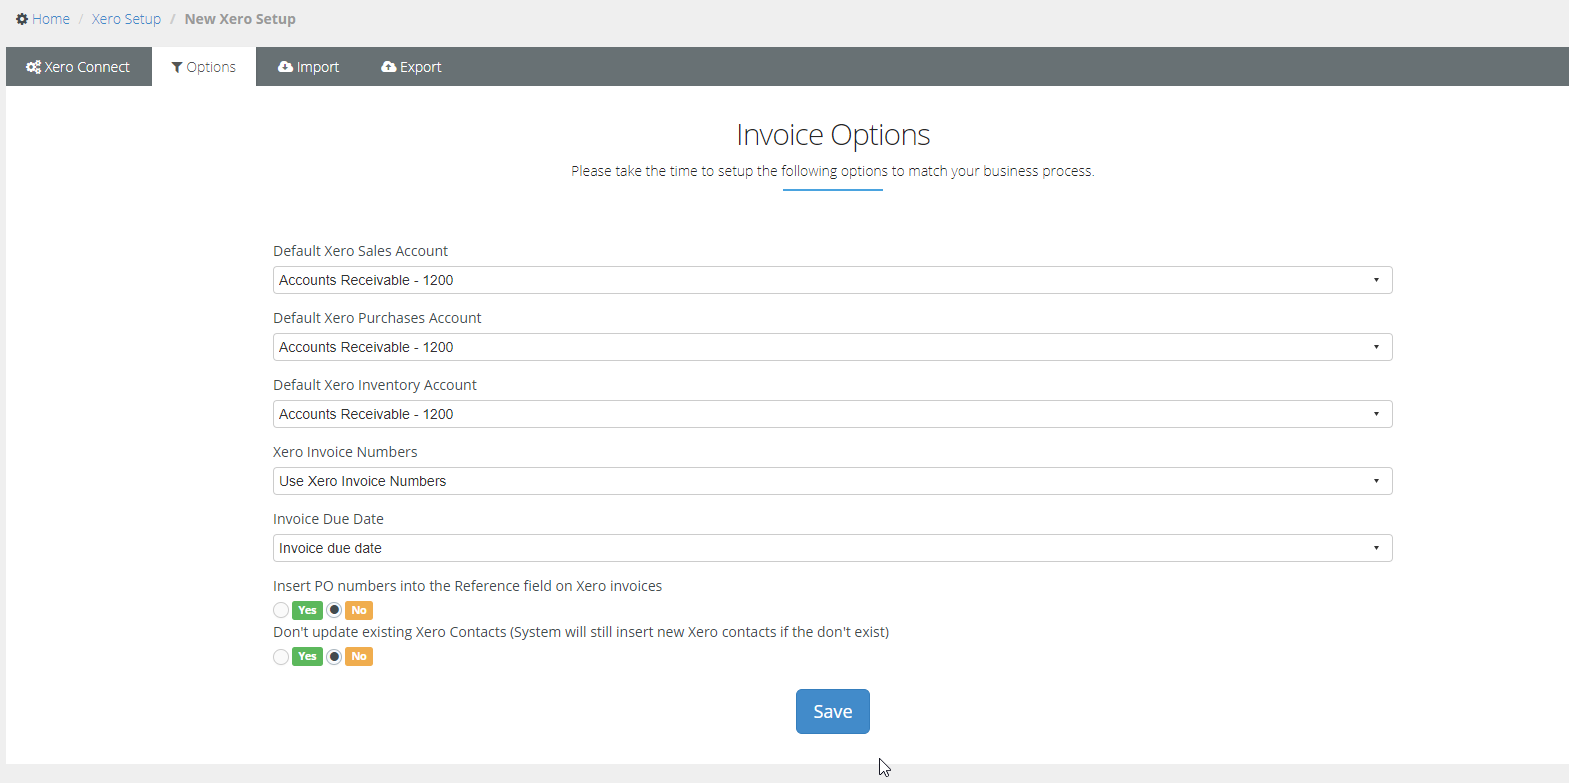
Once the setup is completed you will now see multiple tabs that allow you to set some basic rules for this integration that match your business process. The Options tab will determine the settings used when exporting invoices from BMS to Xero. The options available are as follows :
- Default Xero Sales Account
- Default Xero Purchases Account
- Default Xero Inventory Account
These options will be relied on when exporting an invoice having items with no defaults associated with it. When exporting an invoice if an item doesn't exist in Xero, the items will be created from BMS. We need to set some default options for it. The mapping is first checked for in Admin > Finance> Billing. If no mapping is found then the accounts are mapped using these settings here. This will correspond to your default sales and purchases account for a product in Xero.
-
- For Income Account, the default sales account will be used instead.
- For Expense Account, the default Purchases account will be used instead.
- For Products, only when you are tracking an item in Xero the Inventory Asset account will be seen.
- Xero Invoice Numbers
- This option will specify which invoice number will be used when the invoices are exported to Xero. There are three invoice options:
- Xero invoice numbers: This will follow the Xero incrementation scheme
- BMS invoice number: This will keep the same BMS Invoice Number
- BMS ID: This will use the BMS internal identifier.
- This option will specify which invoice number will be used when the invoices are exported to Xero. There are three invoice options:
- Invoice Due Date:
- This option will dictate how the Invoice Due Date will be set on the exported invoice in Xero.
- BMS Due Date
- BMS invoice generated date
- 7 Days from the BMS invoice date
- 14 Days from the BMS invoice date
- 30 Days from the BMS invoice date
- 20th of the invoice month
- 20th of the month following invoice month
- This option will dictate how the Invoice Due Date will be set on the exported invoice in Xero.
- Insert PO numbers into the Reference field on Xero invoices
- If enabled will allow the PO Number specified on the Invoice to be transferred to the reference field on the Xero Invoice.
- Don't update existing Xero Contacts (System will still insert new Xero contacts if they don't exist)
- Setting this option to “No” will update the Xero contact, on the invoice, every time an invoice is exported.
- Setting it to “Yes” will only link the invoice to the intended contact without updating any of his information.
- Email and Postal Address info will be updated
- In either case, if the contact was not found in Xero, it will be created automatically.
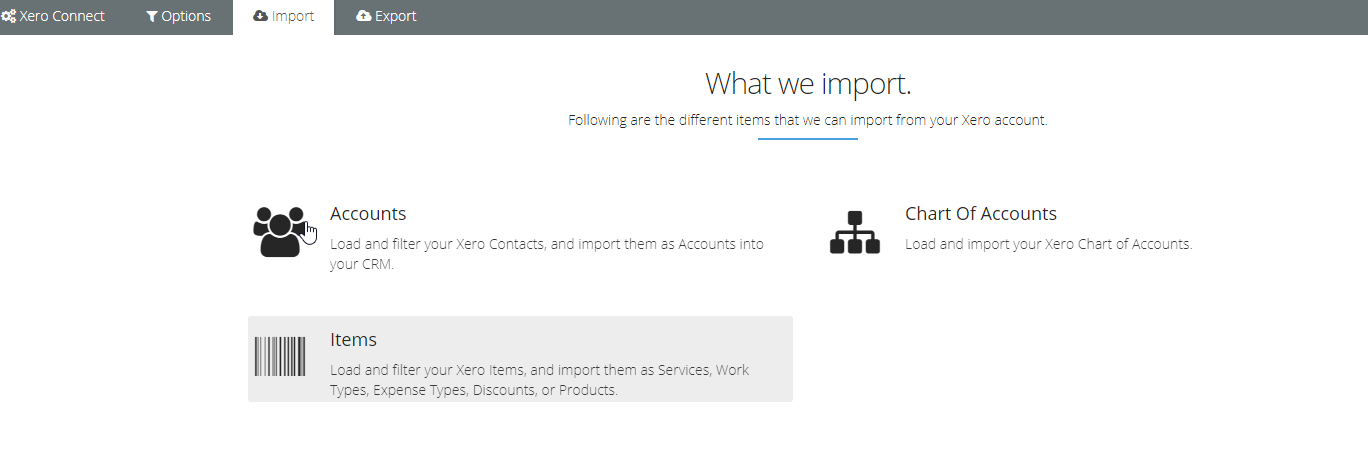
Importing data from Xero
Once connected to Xero, you will be able to load and import Xero data to BMS, such as:
- Contacts
- Items
- Accounts from the Chart of Accounts
Importing Accounts (Contacts)
In this section, you will be able to load contacts defined in a Xero account and import them as Accounts to BMS.
- In the Xero wizard, Choose Import >Accounts.
- Click on “Load Xero Contacts”, with or without filtration text.
- The Xero Contacts will be loaded into the grid.
- Select the desired contacts to be imported and hit Next.
- The following screen will show you status information about the import job created and when done you will be able to get more information about the import results.
- A “Show Transaction” button will be visible. Once you click it, a summary of events will appear.
- You can verify that the contacts have been successfully added to BMS by going to CRM>Accounts
Important
- If the Account in Xero has a default sales tax it will be imported as a Sales tax in BMS and link to its CRM accounts.
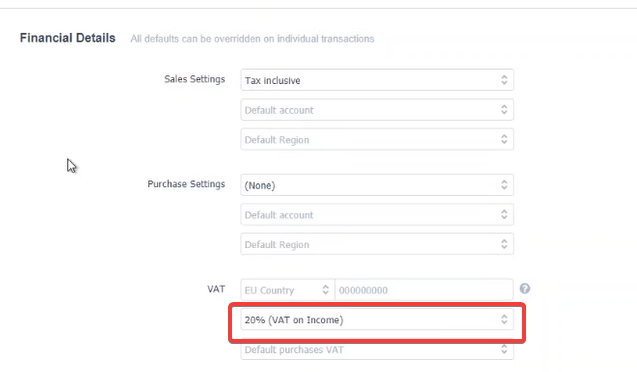
- Tax groups are not supported in BMS. All taxes imported from Xero will be imported as normal Tax, not Tax Group if it has multiple components. The reason behind this is that in Xero you can add the same Tax component for different taxes yet with different rates which are not allowed in BMS.
Chart of Accounts
In this section, you will be able to load accounts defined in a Xero Chart of Accounts and import them as Account Codes to Chart of Accounts.
- In the Xero wizard, Choose Import >Chart of Accounts.
- Click on “Load Xero Accounts”, with or without filtration text.
- The Xero Chart of accounts will be loaded into the grid.
- Select the desired accounts to be imported and hit “next” to process this Job.
- The following screen will show you status information about the import job created and when done you will be able to get more information about the import results.
- A “Show Transaction” button will be visible. Once you click it, a summary of events will appear.
- You can verify that the Chart of accounts was imported by going to Admin> Finance >Account Codes
Items
In this section, you will be able to load accounts defined in Xero Inventory Items and import them to BMS as Work Types, Services, Products, Discount Types, Expense Type.
- In the Xero wizard, Choose Import > Items.
- Click on “Load Xero Items”, with or without filtration text.
- The Xero Inventory Items List will be loaded into the grid to select from.
- Select the desired items to be imported and hit “next” to process this Job.
- You will be presented with a list of destination options to specify where the selected items will be imported.
- The following screen will show you status information about the import job created and when done you will be able to get more information about the import results.
- A “Show Transaction” button will be visible. Once you click it, a summary of events will appear.
- You can verify that the items were imported into the selected destination. For example, Services can be checked under Admin > Finance > Services.
Exporting data to Xero
Data can also be transferred from BMS to Xero. The following information will be exported:
- Accounts (Contacts)
- Accounts from the Chart of Accounts
- Items from:
- Service
- Work types
- Products
- Discount types
- Expense types
Exporting Accounts (Contacts)
In this section, you will be able to transfer accounts and account data from BMS to Xero as Contacts.
- In the Xero wizard, Choose Export> Accounts.
- Load the BMS accounts with or without filtration on Name/Code.
- Select the BMS accounts you wish to export and click “Next”
- Click on “Show Transaction logs” to view the export result.
- You can make sure the Accounts were successfully exported from BMS to Xero by logging in to Xero and going to Contacts.
Exporting Chart of Accounts
Here you can load the account codes defined in BMS's Chart of Accounts and export them to the chart of accounts of Xero.
- In the Xero wizard, Choose Export> Chart of Accounts.
- Click on “Load Chart of Accounts”.
- You can filter by Account/ Code or filter by Type.
- Select the COAs you wish to export and click “Next”.
- You can view the export results by clicking on “Show Transaction logs”.
- To verify if the COAs were successfully exported login to your Xero Account then go to Settings> Chart of Accounts
Exporting items
For the items, you will be able to export different types of items from BMS to Xero, and that includes Services, Work Types, Expense Types, Discount Types, and Products. The items exported will end up as Inventory items under the Xero account.
- In the Xero wizard, Choose Export>Items
- Choose the item types from which you want to export. You can select one of the following item types :
- Service
- Product
- Work Type
- Discount type
- Expense Type
- Click “Next”. The types of items selected earlier will be displayed.
- Choose the items to be exported and click “Next”.
- You will be directed to a page showing that the export is being processed.
- You can click on “Show Transaction Logs” to review the steps performed in the process of export.
- You can make sure your data was successfully exported by logging into Xero > Inventory.
Invoices are from the most important parts of this integration, the ability to export invoices allows you to process invoices in BMS, export those invoices once ready to Xero, and then handle the accounting process against those invoices in the Xero accounting system.
- Navigate to Finance> Xero> Export Invoices.
- There are two options on which you can filter the invoices to be exported:
- All invoices with statuses “Ready to send” or “Sent” or invoices whose due date falls between specific ranges. The date range is limited to thirty days.
- Click “Next”. You can perform a filter on the result on these fields: Customer, site, or Invoice number. Once the invoices to export are chosen, click next.
- The request will be processed and a message showing the status of the export will be displayed.
- To check the exported invoices in Xero, sign in to your Xero account.
- Go to Accounts> Sales> Invoices.
- Please note that the invoices displayed for exporting have to be in the statuses “Ready to Send” or “Sent”, and not already exported to Xero before.
- When exporting an invoice, the process will validate the availability of the items on the invoice starting with the customer. If the customer was found in Xero, then the invoice will link to it. If not found, then the sync tool will create the customer with the invoice. Matching happens on the customer name.
- Furthermore, the tool will validate the availability of the tax rate specified on the invoice in BMS and the items in the details of the invoice, then either link to those items or create new ones. It is recommended to always check the transaction logs after the Job has completed, to review which invoices were exported successfully and which failed.
- Its also recommended noting the Job Number (Job#) of the job being processed in case of any issue, so the support team can track the job and the transactions that were processed.
Following the export of invoices from BMS to Xero, the accounting process might include receiving payments against those invoices. Such process happens on the Xero side, and in order to keep both systems in sync, it is important to have the ability to import any payment that happened against an invoice exported from BMS to Xero, which will update the status of the invoices in BMS, the balance due and the related payments. Similarly to the import process explained in the previous sections, the process is fairly straight forward as follows:
- Navigate to Finance> Xero> Import Payments.
- You will be directed to a page that performs a filter on Payments-related fields. There are fields on which you can filter the payments to import.
- From and To Date
- Invoice Number
- Invoice Reference
- Invoice Contact
- Click “Next” to load the payments.
- Select the payments you want to import and click “Next”.
- Your request will be processed.
- Check the transaction logs to determine if the import was successful.
- To view the imported payments, go to Finance> Payments.
- Payments that are not related to invoices that were originally exported from BMS to Xero will fail to be exported with a message indicating so.
Introduction
This section details the fields of data mapping between BMS and Xero Integration. The term "PSA" applies to both BMS and Vorex users.
Prerequisite
Active setup with Xero. Refer to the first section on this page.
Data mapping
This integration allows two-way sync for items, contacts, and accounts. Invoices can be exported to Xero and Payments can be imported to PSA. 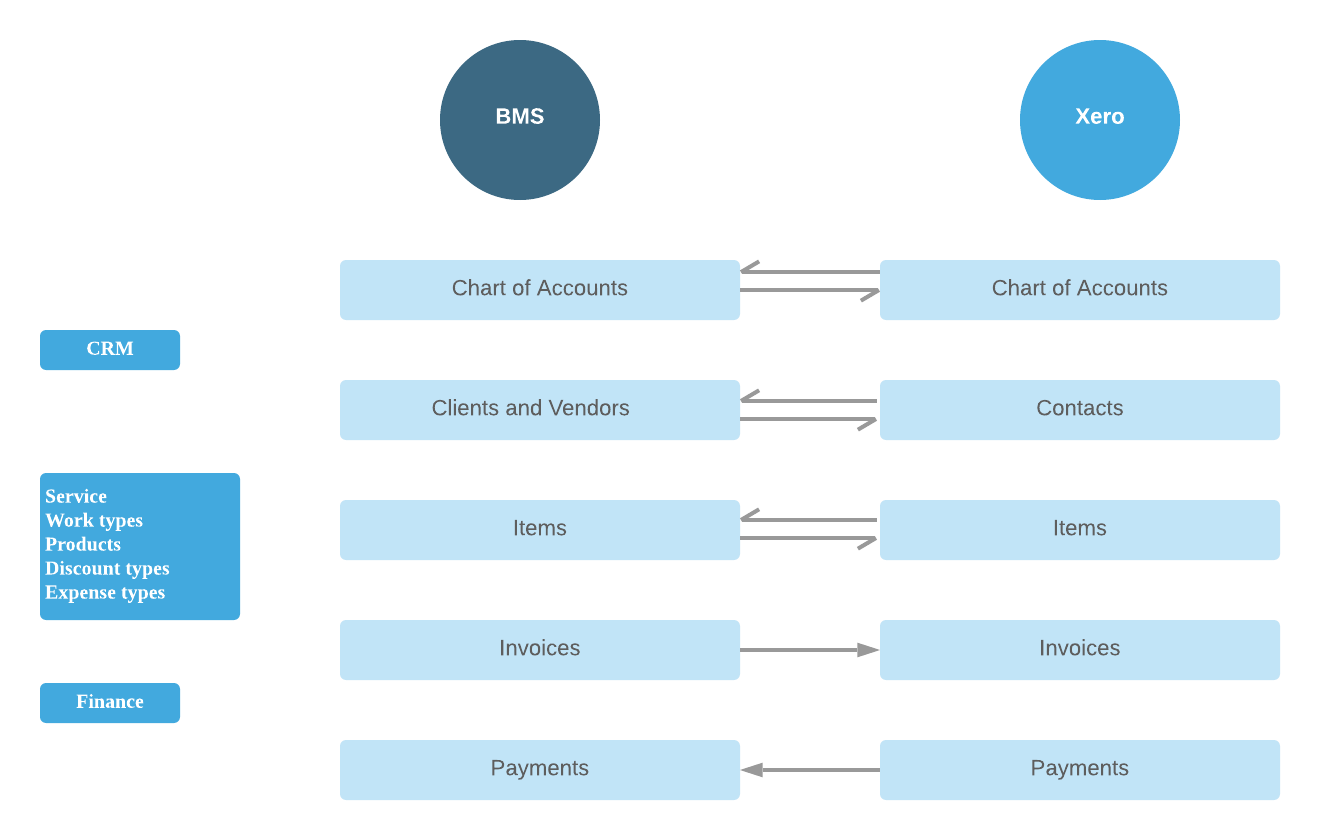
Account Code
|
PSA fields |
Xero field |
|---|---|
|
Account Code |
Code |
|
Account Name |
Name |
|
Description |
Description |
|
Account Type |
Type |
- Account codes: If it exists in Xero we link to the existing entry, we do not update it. If the code doesn't exist we create a new one.
- Account types: We link to the type based on the name if it exists in Xero, If it doesn't we take one by default. The name of default is called Other income.
Tax Rate
|
PSA fields |
Xero field |
|---|---|
|
Name |
Name |
|
Tax Rate |
Rate |
- For Tax groups, multiple tax components will be added.
- When importing Tax Rate, we take the name and rate and create it in PSA.
- If it has multiple tax components we disregard it and add it as a normal tax rate. We don’t create separate tax groups for tax components when importing.
Accounts
Exporting from PSA to Xero
|
PSA fields |
Xero field |
|---|---|
|
Account name |
Contact name |
|
Account code |
Account number |
|
Email address in Billing address |
Email address |
|
Phone number in Billing address |
Phone number |
|
Fax mentioned in Billing address |
Fax |
|
Tax |
VAT |
|
Shipping address |
Street Address |
|
Billing address |
Postal Address |
- If the account is active in PSA we set it as active in Xero. If the account is inactive it will be set as archived in Xero.
Importing to PSA from Xero
|
PSA fields |
Xero field |
|---|---|
|
Account name |
Contact name |
|
Account code |
Account number |
|
Default currency |
Currency |
|
Taxable |
VAT - Default sales VAT is set |
|
Sales Tax |
Value from Default sales VAT |
- If a mapping already exists only the name is updated else a new account is created in PSA.
- The main site is created and addresses are imported from Xero.
- Address fields are imported with the same data mapping as when exporting.
Items
Products, Services, Work type, Expense type, Discount type are items in Xero.
|
PSA fields |
Xero field |
|---|---|
|
Product Name |
Item Name |
|
Product Description |
Sales Description |
|
Expense Account |
Purchase Account |
|
Income Account |
Sales Account |
|
Requires Procurement (Yes/No) |
I track this item - Yes |
|
Product number |
Item code |
- For Inventory items (I track this item), the expense account will be the Cost of Goods Sold Account.
- Unit price in PSA will be the Unit price of the Sales item in Xero
Work Type
|
PSA fields |
Xero field |
|---|---|
|
Work Type Name |
Item Name |
|
Description |
Sales Description |
|
Income Account |
Sales Account |
|
Expense Account |
Purchase Account |
Services
|
PSA fields |
Xero field |
|---|---|
|
Service Name |
Name |
|
Unit Price |
Sales Unit price |
|
Unit Cost |
Purchase unit price |
|
Description |
Sales Description |
Expense Type
|
PSA fields |
Xero field |
|---|---|
|
Name |
Name |
|
Description |
Sales Description |
Discount Type
|
PSA fields |
Xero field |
|---|---|
|
Name |
Name |
|
Description |
Sales Description |
|
Discount type |
Will be set to Amount |
|
Value |
Sales unit price |
- For all the above items, if the item name is empty in Xero, the value in code will be taken.
- For the Taxable field, the mapping is from I sell this item. If a value is set in Xero it will be pushed to PSA. If it's empty or none then the item will be marked non-taxable.
- Income and Expense account mapping is the same for all the items.
Exporting items
The data is derived from the Setup options selected in PSA.
|
PSA fields |
Xero field |
|---|---|
|
Name |
Name |
|
Description |
Sales Description |
|
Discount type |
Will be set to Amount |
|
Value |
Sales unit price |
- When exporting an item the account is taken on the Item level.
- Item level option (Finance > Item type > Income account)
- If the item level is empty it will take the default option in the setup (Finance > Xero > Setup)
- Default Xero Inventory account, PSA doesn't have default inventory accounts so we rely on the setup option. Its always recommended to use the Inventory -630.
Exporting Invoices
The data is derived from the Setup options selected in PSA. Below are the fields when exporting an Invoice.
|
PSA fields |
Xero field |
|---|---|
|
Account |
Contact |
|
P.O.Number |
Reference number |
|
Invoice Date |
Invoice date ( Setting in Setup options ) |
|
Due Date |
Due date |
|
Tax Item |
Sales Tax |
|
Total Price |
Total ( auto-calculated based on items and tax) |
|
Grand Total |
Balance due |
| Address |
Billing address |
Invoice Items
|
PSA fields |
Xero field |
|---|---|
|
Item Name |
Item Code |
|
Description |
Description |
|
Quantity |
QTY |
|
Unit Price |
Unit Price |
|
Total Price |
Amount |
|
Taxable |
Taxable (Yes/No) |
- If the item is taxable in an invoice, the value will be sent to the Tax Rate field in Xero.
- If it's not taxable then it will be No VAT or Tax-exempt, depending on your company.
Payments
|
PSA fields |
Xero field |
|---|---|
|
Account |
Contact |
|
Payment Date |
Payment Date |
|
Reference # |
Reference no |
|
Invoice Number |
Invoice number |
|
Amount |
Amount Received |
Introduction
This section helps you with answers to frequently asked questions with Xero-BMS Integration.
Prerequisite
Active setup with Xero.
FAQs
- How do I reset an invoice export?
- When an invoice is exported from BMS to Xero, The flag Reset posted to accounting will be enabled. If you click on Reset posted to accounting the link between BMS and Xero for this invoice will be cleared and you can delete the invoice in Xero or void it in BMS as needed.
- How are contacts synced in BMS?
- Contacts in Xero are mapped to CRM accounts in BMS. If an account exists in BMS the account will be mapped to it or a new one will be created.
- Which Invoices can be exported from BMS?
- There are two options on which you can filter the invoices to be exported: All invoices with statuses “Ready to send” or “Sent” or invoices whose due date falls between specific ranges.
- Note: The date range is limited to thirty days
- What are the items that sync in this integration?
- Refer to our detailed data mapping section on this page.
- How often is data synced from BMS?
- This sync is manual. Every time you choose to export or import the data will be pushed to the software.
- How do I track credit memos or vendor credit applications?
- BMS doesn’t support credit memos at this time. You will have to apply them manually in Xero.
- How do I disconnect the integration with Xero?
- To disconnect the integration from BMS, Navigate to Finance > Xero.
- Click Setup
- Click Disconnect from Xero