Services
Introduction
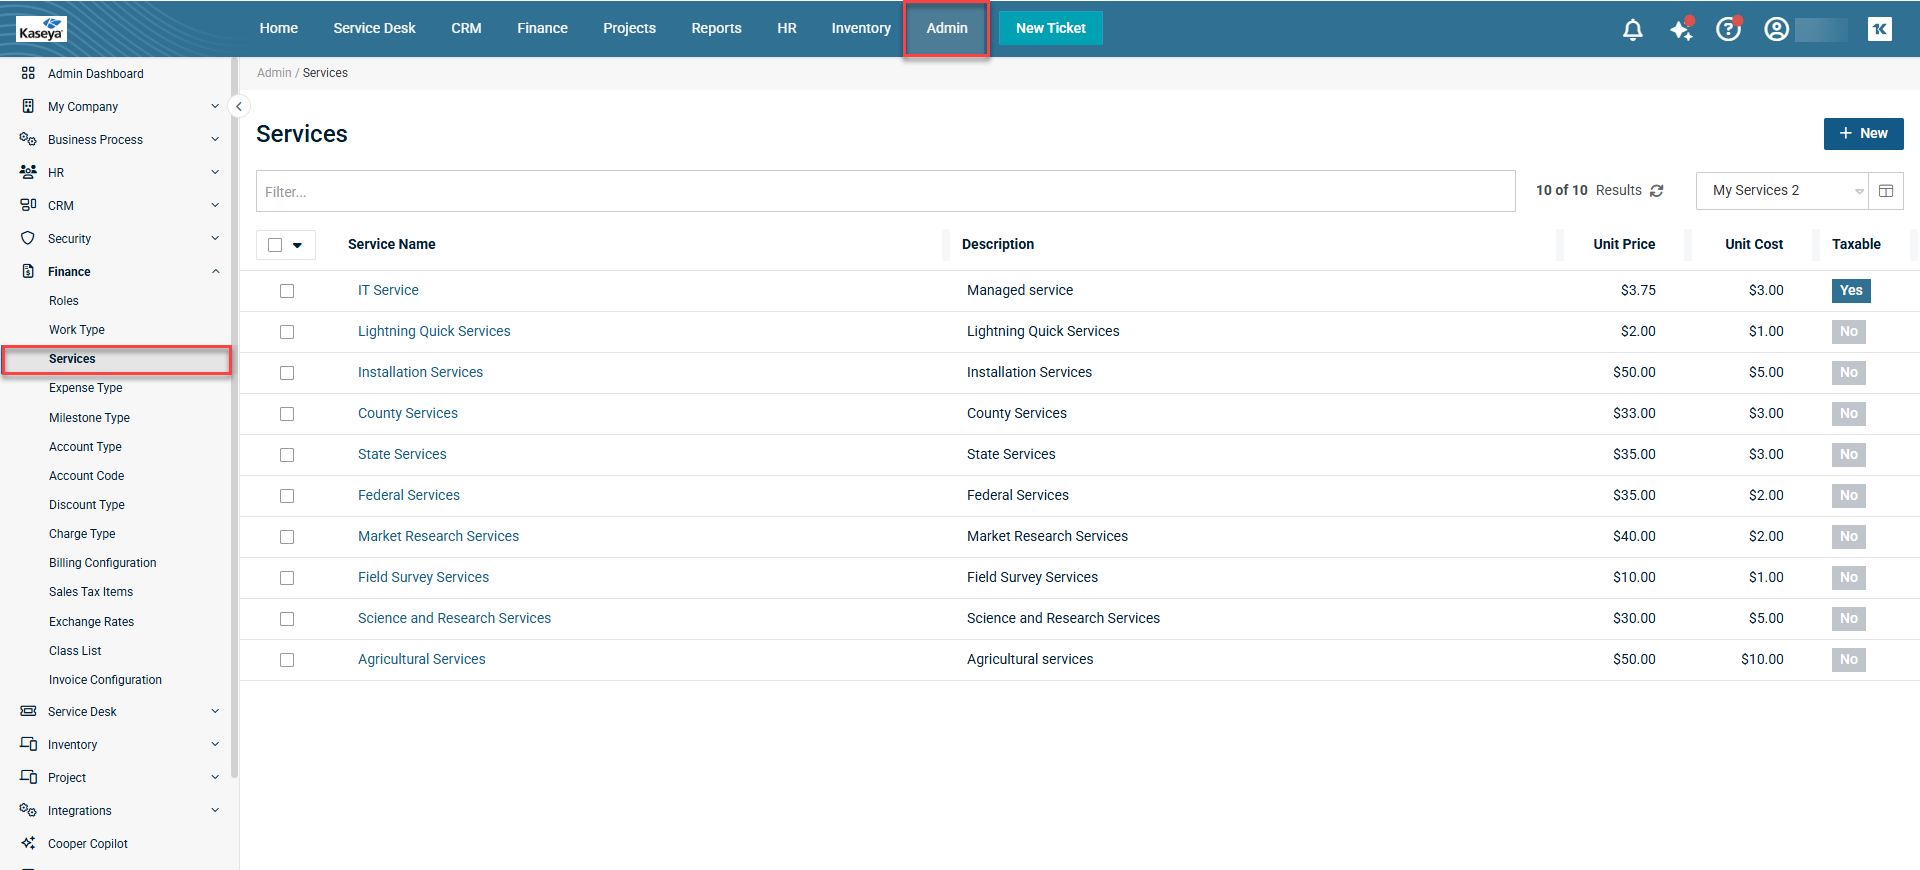
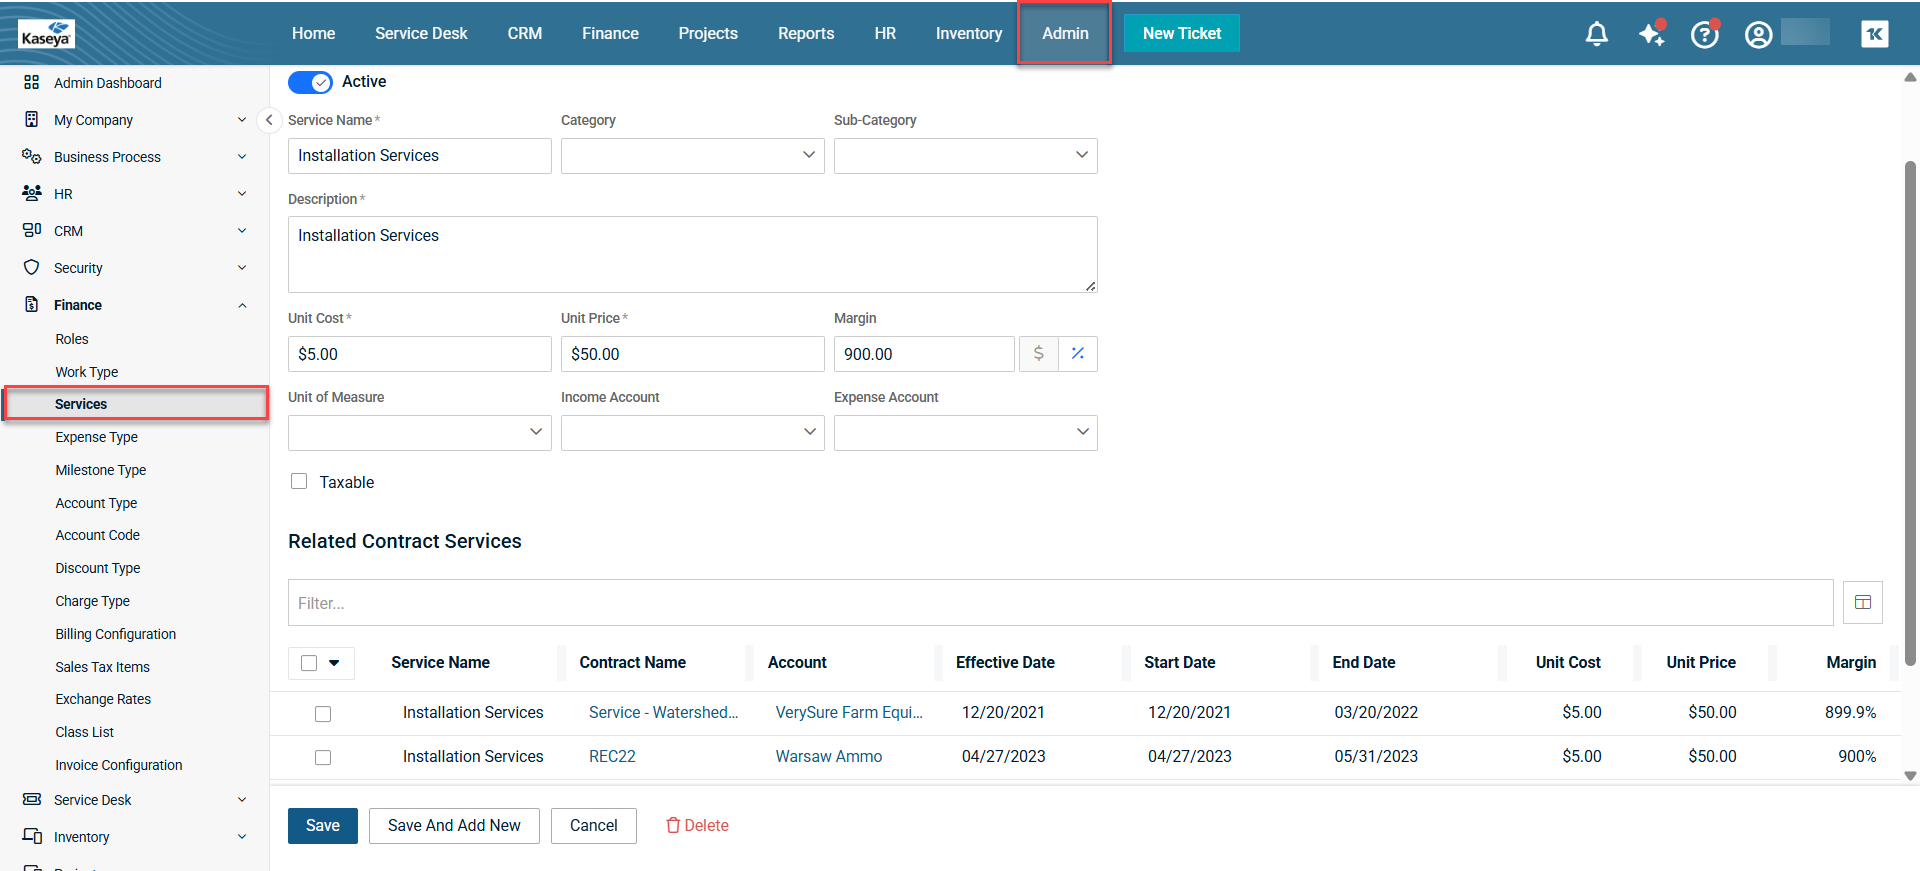
NAVIGATION Admin > Finance > Services
A service is work performed for a customer that is billed on a weekly, monthly, quarterly, or annual basis and is typically part of a recurring service contract. A flat fee is specified for each type of device or service that is supported in your client’s environment.
On the Services page, you can create services and see the existing list of services. Once you create a service, you have the option to add it to a recurring service contract from the Contracts page. For details, refer to Recurring services.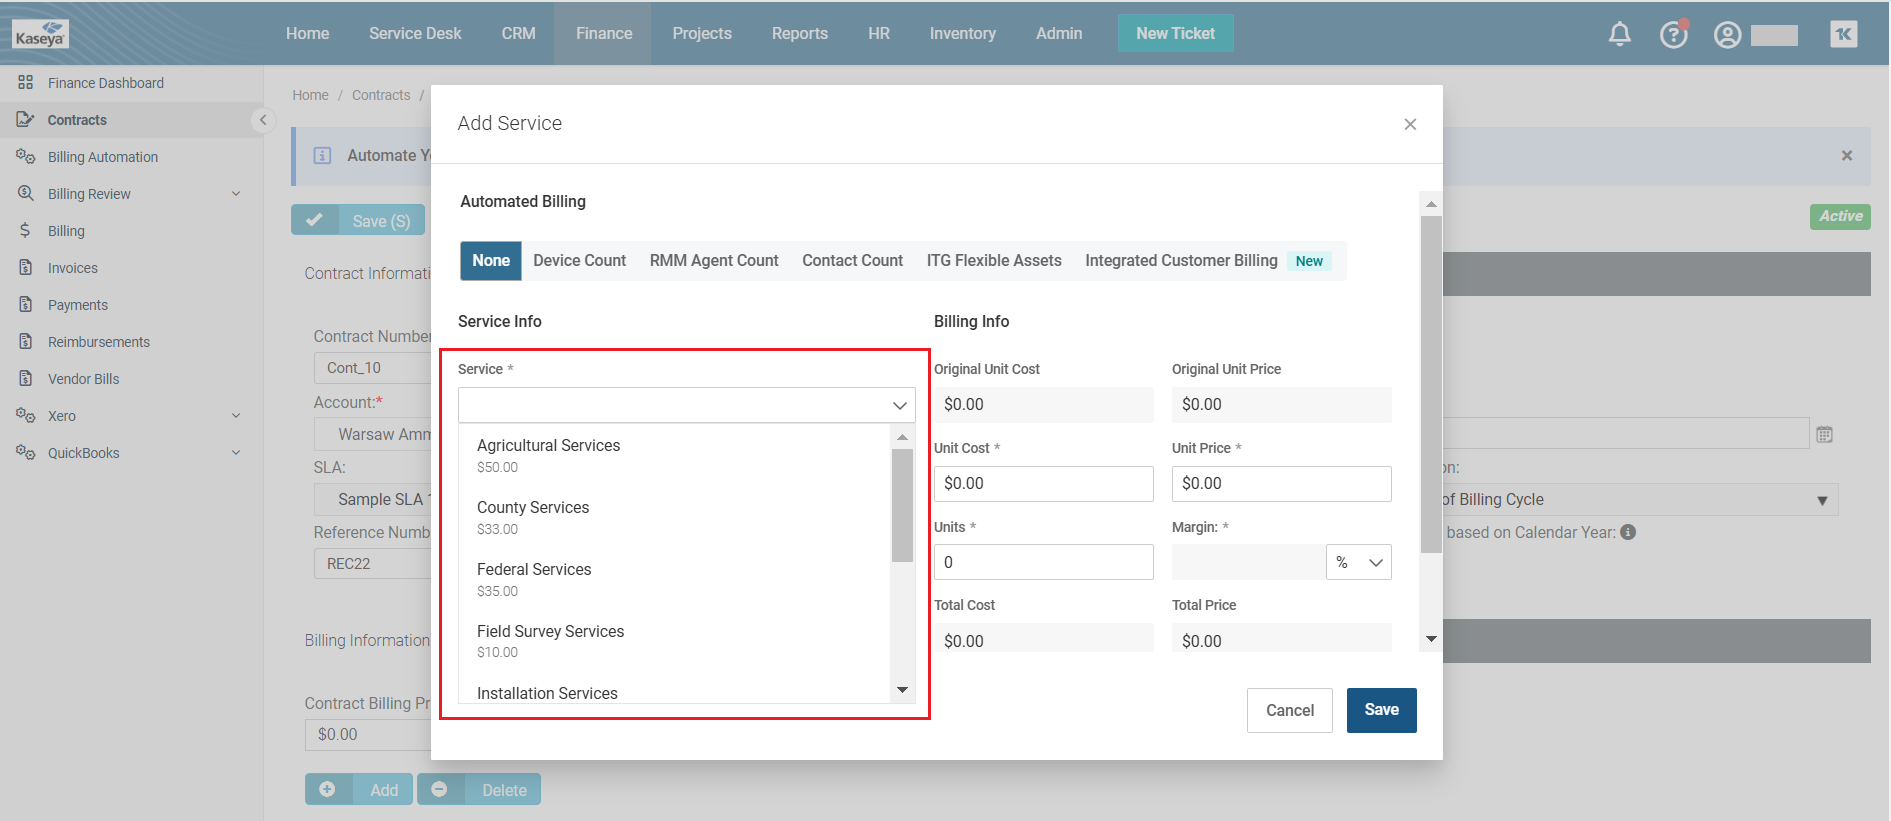
Searching for a service
You can use the Filter box to search for an existing service as follows:
-
Select one of the following items from the drop-down menu in the Filter box:
-
Service Name
-
Description
-
Income Account
-
Expense Account
-
Unit of Measure
-
Active
-
Taxable
-
Category
-
Sub-Category
-
-
Enter a keyword or part of a keyword and then click Apply. Some items may have multiple checkboxes as a drop-down menu. In such cases, select as many checkboxes as you want and click Apply or select the Select All checkbox to select all the items in the drop-down menu and then click Apply. The selected item(s) will appear in the Filter box.
-
Repeat the above process if you want to select more items from the Filter box. Each item selected from the Filter box drop-down menu will appear as a separate item in the Filter box. As soon as the selected items appear in the Filter box, the results are displayed in the table.
Creating a service
-
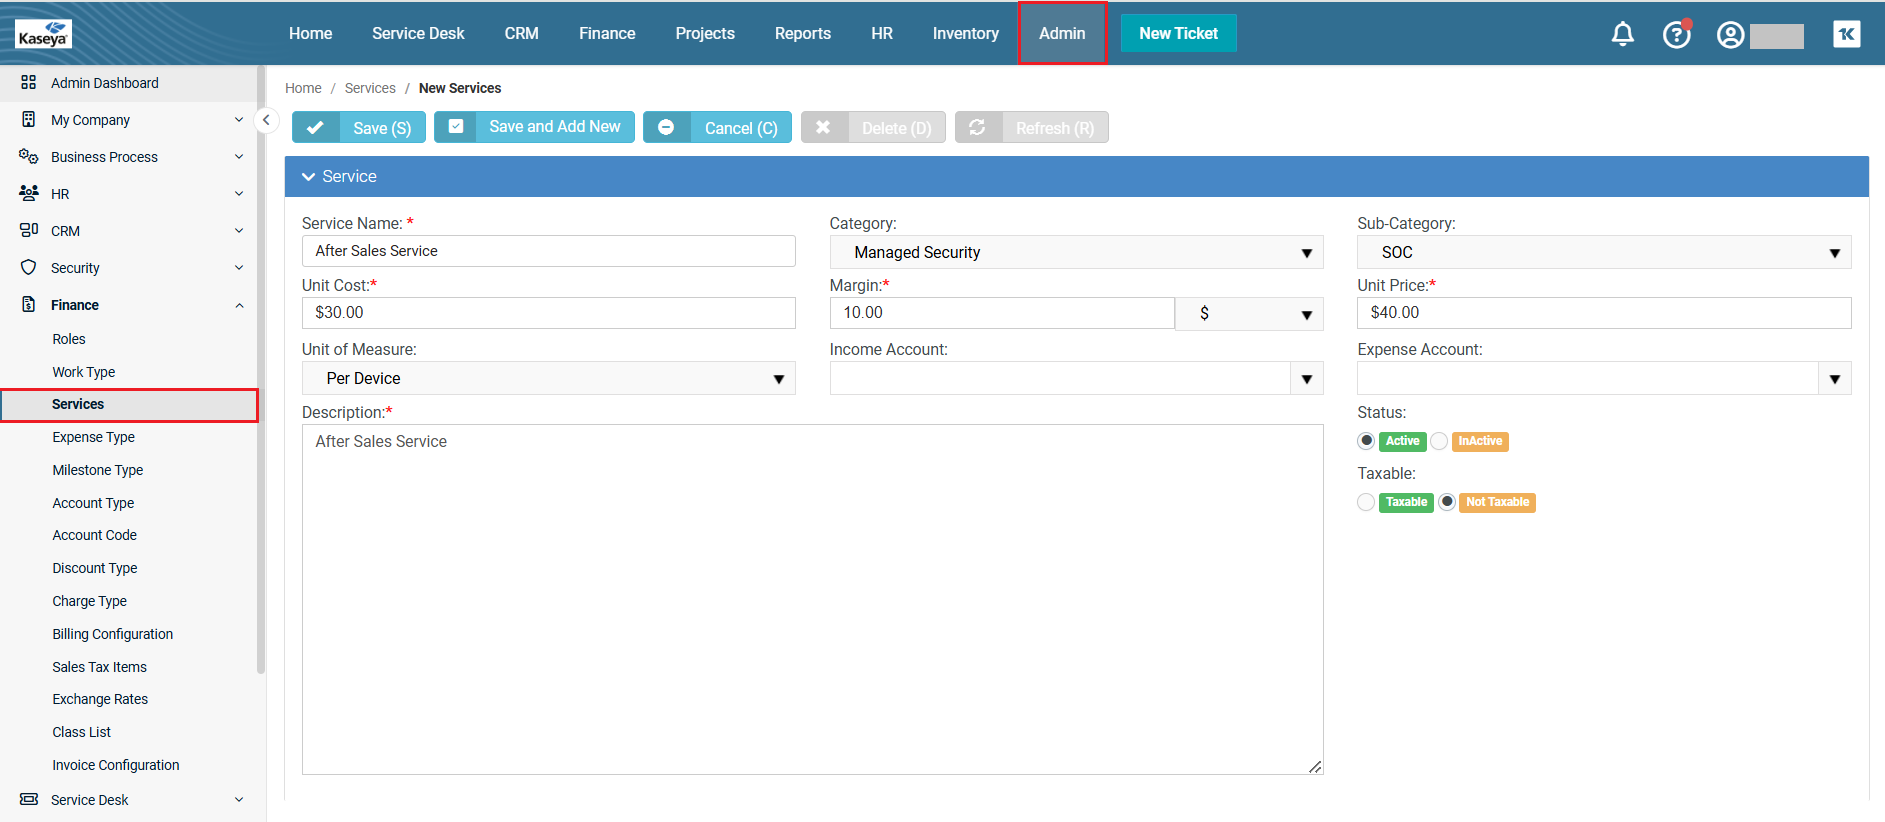
Click New to open the New Service page.
-
By default, the status of the new service is active. If you want the service to be inactive at the moment, turn off the toggle.
-
Service Name: Enter an appropriate name for the service.
-
Category: Select the appropriate category from the dropdown.
-
Sub-Category: Select the appropriate sub-category from the dropdown.
-
Description: Enter a brief description of the service.
-
Unit Cost: Enter the amount that would cost per unit of service. Enter unit price immediately after unit cost.
NOTE Unit price = unit cost + margin.
-
Unit Price: Enter an amount as unit price.
-
Margin: As soon as you enter the unit cost and unit price, the margin is automatically calculated. You can select either percentage or currency. By default, currency is selected. If you want to select percentage, click the percentage icon.
NOTE You can manually change the margin value if you want. If you do so, the unit price will also change accordingly.
-
Unit of Measure: Select the appropriate unit of measure from the drop-down menu.
-
Income Account: Select the appropriate income account from the drop-down menu.
-
Expense Account: Select the appropriate expense account from the drop-down menu.
-
Taxable: By default, the checkbox is not selected. If you want to make the service taxable, select the checkbox.
-
Click Save to create the service. To add another service right after this, click Save and Add New. To cancel everything that you have entered and/or selected so far, click Cancel. Clicking Cancel will take you to the Services page. The Related Contract Services section and Delete will become visible only after you save the service.
Editing a service
You can edit the fields of a service as well as undertake bulk updates to services that are related to different contracts from the edit page of the selected service.
Editing a service's fields without bulk updates
If you want to edit a service's fields without bulk updates or if you want to edit a service that is not related to a contract or contracts, complete the following steps:
-
Click the service that you want to edit. The services page opens in edit mode.
-
Make changes to the fields that you want to edit.
-
Skip the Related Contract Services section below if it is present. This section will be present only if the service that you are editing is related to a contract or contracts.
-
Click Save. To add another service right after this, click Save and Add New. To cancel everything that you have entered and/or selected so far, click Cancel. Clicking Cancel will take you to the Services page.
Bulk updating a service related to a contract or contracts
Bulk editing a service linked to one or more contracts allows you to update all relevant service details in a single action, with changes reflected immediately in the associated contracts. This eliminates the need to manually locate and update each contract whenever the service’s cost, price, or name changes.
The bulk editing option offers the following advantages:
- Preview of contracts that require updates
You can see the names of contracts related to the service. Additionally, you can go to the contract by clicking the contract name from the table and view its details in the contract's page.
-
Bulk service selection and modification
You can update all available fields of the service (or service line items) to reflect the changes across contracts for simultaneous updates.
-
Field-level update control
You have the option to choose specific fields to update and define how each should be modified.
-
Change preview before confirmation
You can preview all intended changes before applying them, ensuring accuracy and completeness.
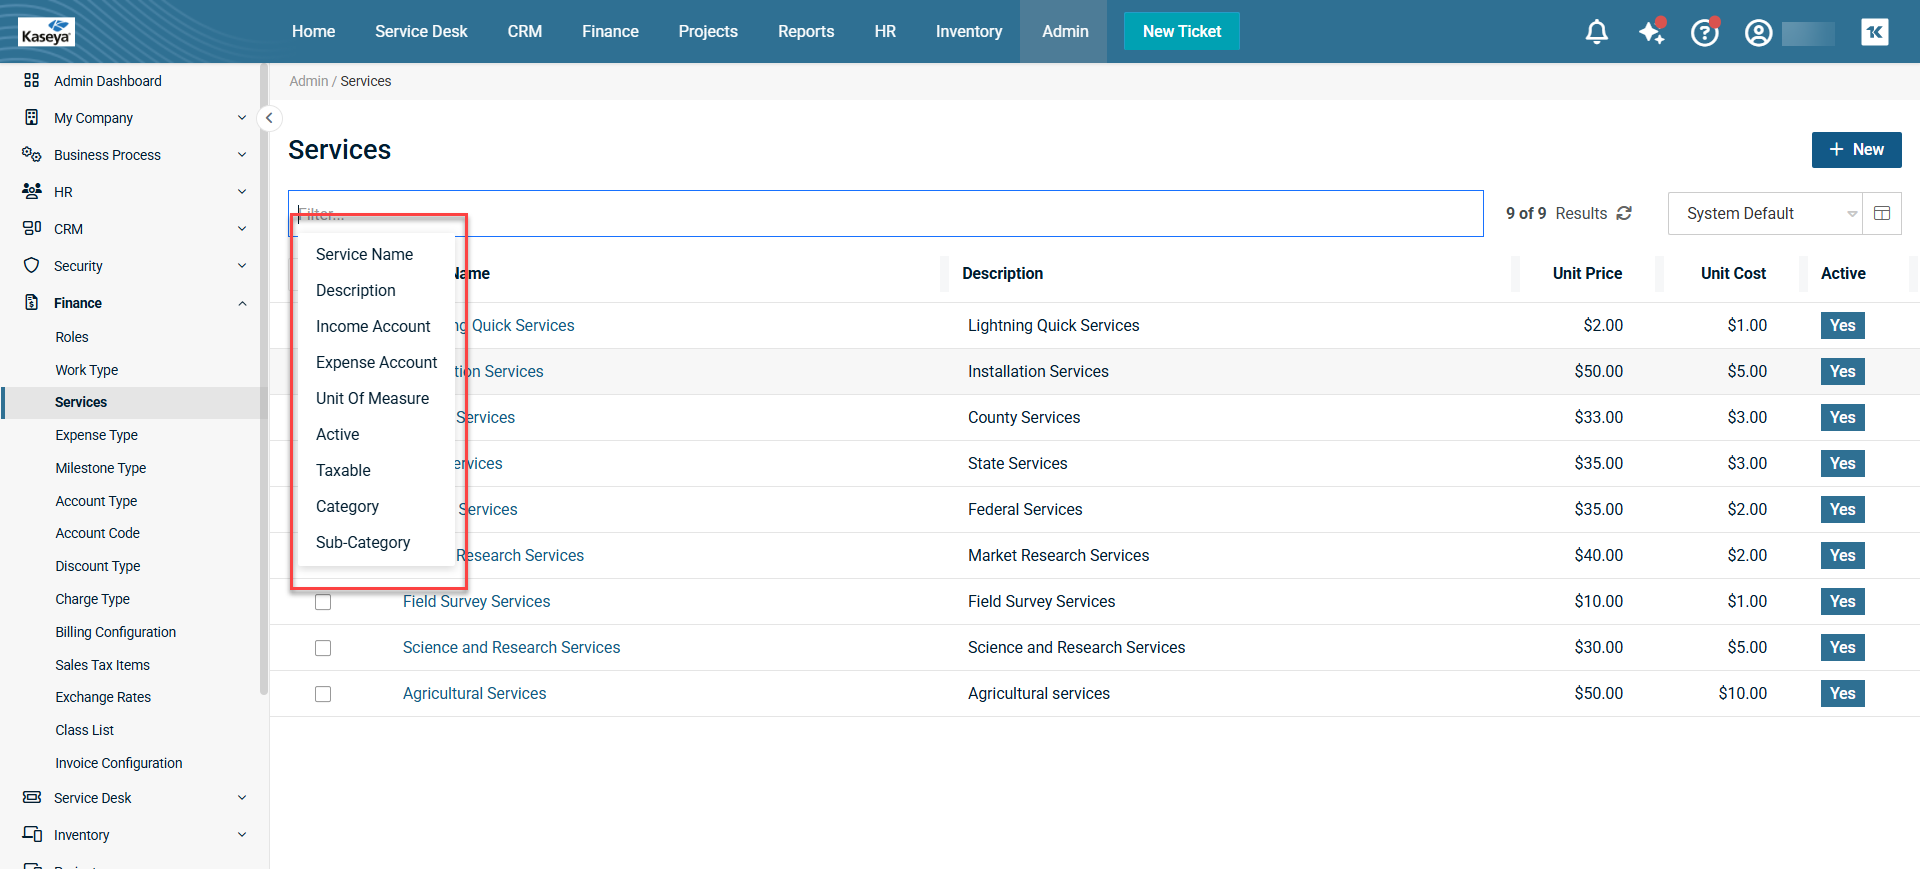
Searching for a related contract service
You can use the Filter box to search for a service within the table as follows:
-
Select one of the following items from the drop-down menu in the Filter box:
-
Service Name
-
Contract Name
-
Account
-
Effective Date
-
Start Date
-
End Date
-
Description
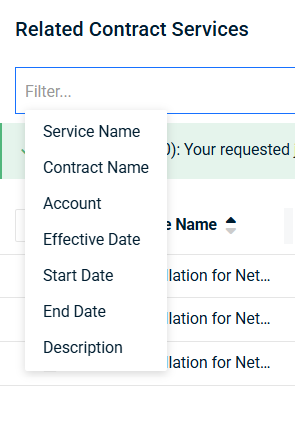
-
-
Enter a keyword or part of a keyword and then click Apply. The results are displayed in the table.
To bulk update a service, complete the following steps:
-
Click the service that is tied to a contract or contracts. The services page opens in edit mode. You will see the Related Contracts Services section in the lower half of the page.
-
Select the individual checkboxes of the service that you want to bulk update or select the checkbox in the header of the table to select all services at once.

-
Click Update from the drop-down menu of the checkbox in the header of the table. The Update Services window opens.


-
Make changes to the fields that you want to edit.
-
The Effective Date should be between the start date and the end date of the contract.
-
Click Next. Another Update Services window opens. This is a preview window of your changes. At this stage, you can choose to exclude some services tied to some contracts.
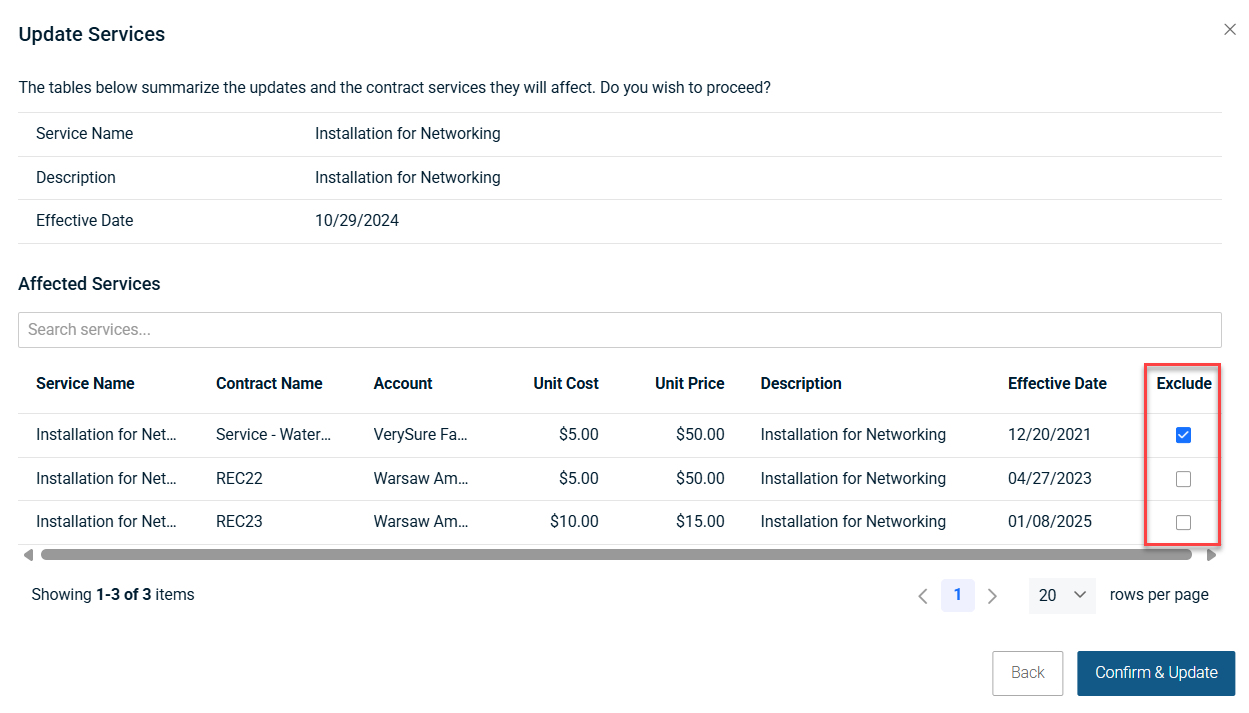
-
To exclude changes to services tied to certain contracts, select the respective contract's box under the Exclude column under the Affected Services section.
-
Click Confirm & Update. A green message appears above the Related Contract Services table on executing the request. The green message appears even if the bulk update did not happen. For example, if you have changed the names of the services, you'll be able to see the change in the table after the green message appears.

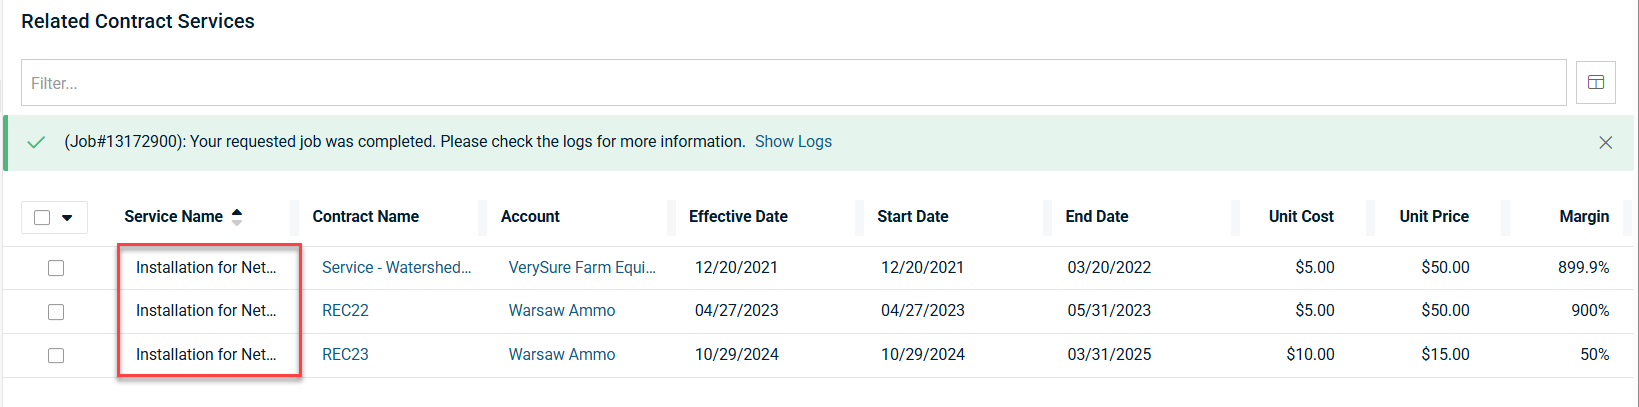
To see whether the bulk update was successful in each contract's case, click Show Logs in the green message.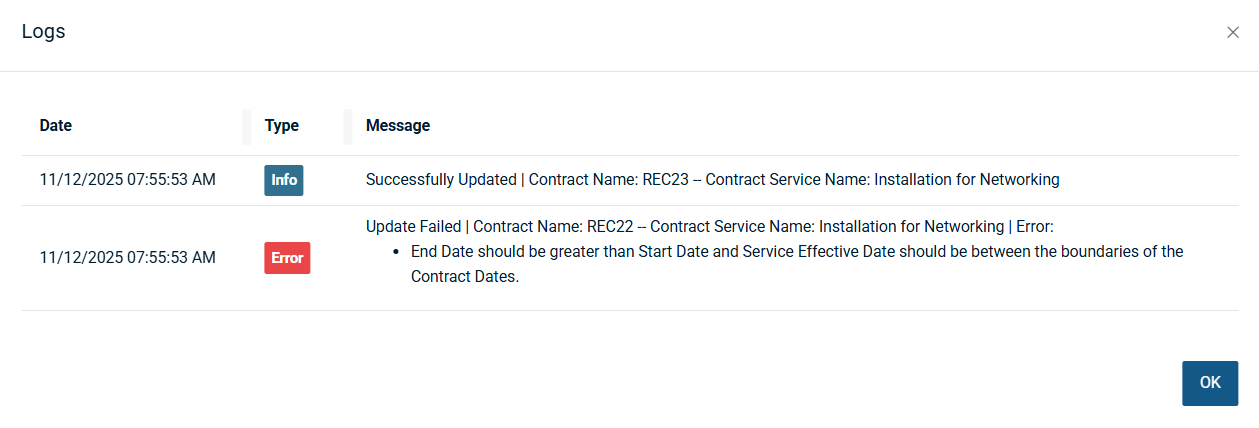
If you want to go back to the previous window, click Back. You'll be able to see the change of service name if you have updated the service name as well.
Deleting a service
-
Click the service that you want to delete. The Services page opens in edit mode.
-
Click Delete at the bottom of the page. BMS asks for confirmation.
-
Click Delete to delete the service.
Saving a customized view
The table that you see beyond the search area shows the default view; however, you can customize a view and save it. You can then click the saved view and the table will show the customized view with selected columns.
-
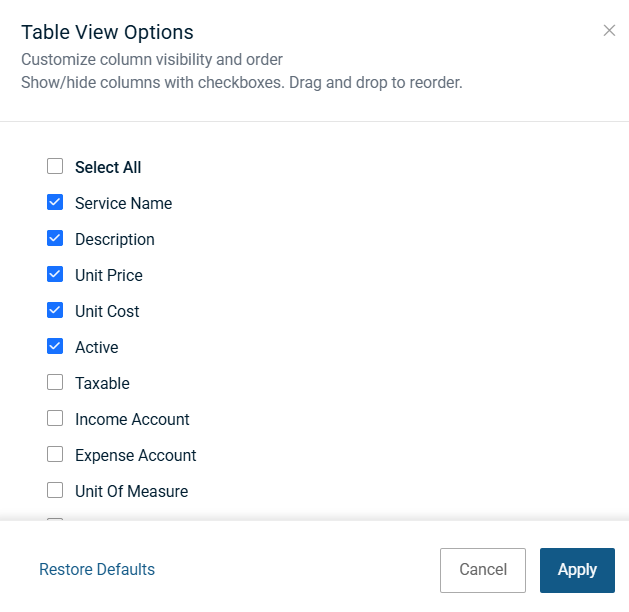
Click the Table View Options icon which is next to the System Default drop-down menu. The Table View Options window opens.
-
By default, some columns are selected. If you want additional columns to display, you can click the required columns and then click Apply. All the selected columns are displayed. If you want to restore default columns, click Restore Defaults.
NOTE You can drag and drop columns within the Table View Options window to create an order for the columns to appear.
-
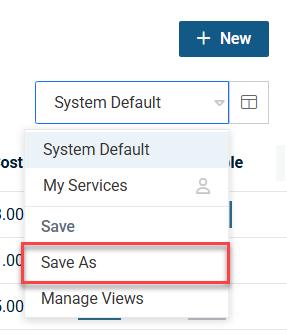
To save your customized view, click Save As from the System Default drop-down menu.
-
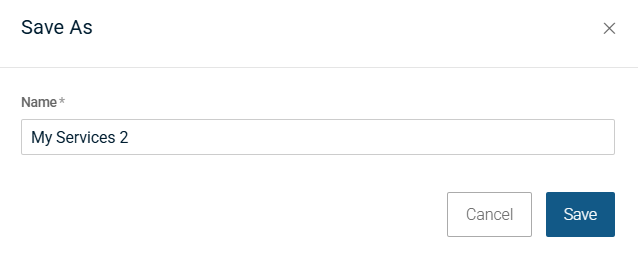
Enter an appropriate name for the customized view.
-
Click Save. The customized view now appears under this name.
Sharing a customized view
You can share your custom view with others. To share a customized view, complete the following steps:
-
Select Manage Views from the System Default drop-down menu. The Manage Views pop-up opens with two tabs - My Views and Shared With Me. The My Views tab shows your customized views. The Shared With Me tab shows customized views that were shared with you.
-
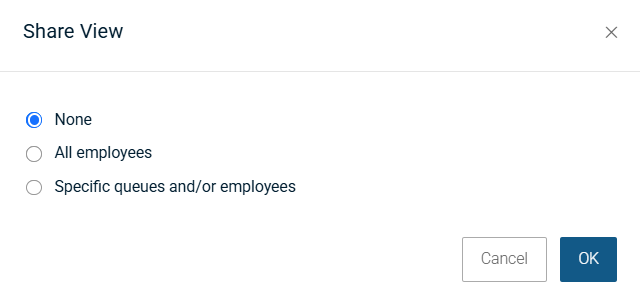
Click the share icon next to your view. The Share View pop-up opens.
-
By default, None is selected. Select your option. If you select All Employees, your selected customized view will be shared with all employees of your organization. If you select Specific queues and/or employees, your selected customized view will be shared only with selected queues or employees.
-
If you have selected All employees, click OK. If you have selected Specific queues and/or employees, enter the name of the queue in the Queue field or enter the name of the employee in the Employees field and then click OK. The customized views are shared with the specific queues or employees. You can select multiple queues or employees.
-
You'll be taken back to the Manage Views pop-up. Click Done.
You can edit or delete customized views by clicking the edit ![]() or delete
or delete ![]() icons respectively.
icons respectively.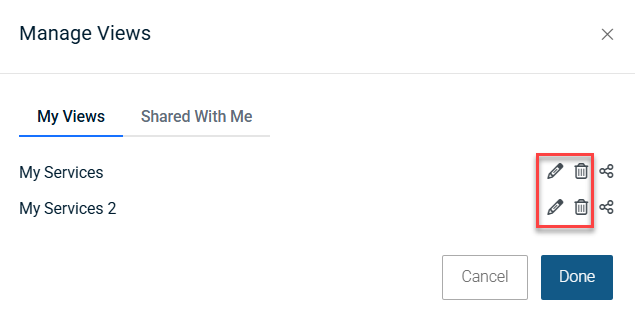
Exporting the table
You can export the data in the Services page table as an Excel workbook. The table might contain several pages in some cases depending on the number of services that you have created. You can export selected services or all the services as an Excel workbook.
-
In the Services page table, select all the services that you want to export by selecting the checkboxes next to each service or select the checkbox in the header of the table to select all services.
-
Just below the Filter box, click the drop-down menu and then click Export. You will see a downloaded Excel file with the name Services.csv in Downloads folder in your File Explorer.


