Exploring the Home page
Introduction
This guide provides you with setup and Glossary for the Home page in PSA. Every user in the system has access to the Home. It’s the starting point for day to day use. Your security role determines what Home options you have. The Home button is available on the top left corner of the global navigation bar.
Menu Bar
Home > Dashboard
The dashboard is a personalized dashboard for the logged-in user. It shows you a list of activities or events planned for your day.
- My To-Do List
- A place to set reminders. For example: stop by HR and get a benefit change form. Enter text, then click the calendar and set the date, or simply enter the word tomorrow. Press the Enter key on your keyboard to add the entry. To-Dos created for a ticket display the name of the ticket along with a link. You can click the link to access the ticket immediately.
- The user can remove items in the My To-Do List by clicking the red X in the Already Done tab and clicking on the red X. The user can reset the My To-Do List by clicking the yellow arrow if an item was completed by mistake.
- My Notes
- A quick summary of thoughts or ideas that you don’t want to forget during the day.
- The user can simply erase My Notesby highlighting the words and selecting delete on the keyboard.
- News
- Any notices or announcements broadcasted by PSA Administrator will be seen here.
- Company news is generated from the Admin module, Admin > My Company > Company News.
Home > My Queues
The My Queues folder displays one or more queues if you are a member of any ticket queues.
- A ticket is assigned to a queue using the Service Desk > Tickets > Ticket Details tab. You can search for all tickets assigned to the queues you are a member of using the Queue search parameter on the My Tickets (Home > My Tickets, Service Desk > My Tickets) page
- Employees are added to ticket queues under
- Admin > Service Desk > Queues page.
- HR > Employee > Associated Queues tab.
TIP If you are not assigned to any queues, the My Queues folder does not display in your Home module.
Home > Views
A view is a user-defined filtered search of a specific list page. The Views page shows all views created by yourself or shared with you by others. Selecting a view selects both the specific list page and the search filter parameters saved with that view.
Creating a View
- To create and save a new view by name on any listing page, Ticket listing, Asset listings for example.
- From the Views combo box, select an existing view, or enter new search parameters from scratch.
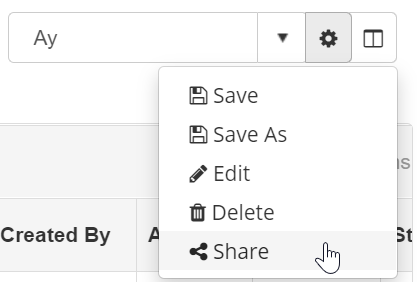
- Click the gear icon, class="fa fa-cog" color: #333 then click the Save As option, then enter a name.
- Optionally make your view Public or set it to be your Default for the page you're working with.
- You can Save, SaveAs, Edit, Delete, or Share your own view.
- You can SaveAs a view shared by someone else.
- When you share your own view, you can select both individual employees or queues of service desk employees to share it with.
Column Chooser
All list pages display a Column Chooser icon. Click the icon to select and order your column choices for a list page. You can then optionally save it as a view or export the data.
All list pages support the ability to Export the Current Page or All Pages to an .xls format file. Only currently displayed columns are exported in the order they are displayed. Use the Column Chooser to add, remove, or reorder columns before exporting.
If you have not created any views or have any shared views, the My Views folder will not display in your Home module.
Home > My Tickets
The My Tickets page manages tickets assigned to yourself as the primary assignee. If you assign the ticket to another employee, the ticket no longer displays on this page. Ticket assignments to queues are ignored by this page. You can search for all tickets assigned to the queues you are a member of using the Queue search parameter.
Home > My Tasks
The My Tasks page enables you to update tasks assigned to you by project managers of projects. You can enter time and update other properties of tasks. A task may have child tasks you can update as well. Time entered on tasks updates your timesheet as well. This page does not display tasks of archived projects.
Home > My Grouped Tasks
The My Grouped Tasks page lists all tasks you are assigned to by project first, then by the task. The My Grouped Tasks page enables you to update tasks assigned to you by project managers of projects. You can enter time and update other properties of tasks. A task may have child tasks you can update as well. Time entered on tasks updates your timesheet as well. This page does not display tasks of archived projects.
Home > My Service Calls
The My Service Calls page enables you to update service calls created to assist customers. Service calls are usually associated with one or more tickets or tasks, but can also be scheduled independently. You can see any service calls you create on your My Service Calls page.
Home > My Projects
The My Projects page enables you to see and update projects that you are assigned to.
Home > My Calendar
The My Calendar page provides a calendar view of all your scheduled BMS events.
- Appointments
- Activities
- Tasks
- To-Dos
- Service Calls
- Calendar views include Day, Work Week, Month, Timeline.
- You can hide all events for a category by deselecting it in the checkbox.
- You can add a new appointment by double-clicking anywhere on the calendar. Enter the following:
- Subject
- Start Time
- End Time
- Reminder
- Description
- Recurrence - Click to enter recurring appointment options.
- Click the Export Calendar button to download an "icalendar" file for importing into other calendar software.
- Click the Download Outlook Extension to download an Outlook Extension that synchronizes your PSA calendar with your Outlook calendar.
Outlook Extension
The Outlook Extension synchronizes your PSA calendar with your Outlook calendar. This includes:
- Appointments
- Activities
- Tasks
- To-Dos
- Service Calls
NOTE The Outlook extension only supports Outlook 2010 and later.
Installing the Extension
- Select the Home > My Calendar page.
- Click Download Outlook Extension.
- Run the installer on the computer containing your Outlook application.
- Start Outlook.
- A new tab displays in your Outlook application.
- Enter the following in the Settings > Login tab.
- User Name
- Password
- Company Name
- Click Save.
- Set your preferences on the Calendar tab.
- Enable Calendar Integration
- Get Past Calendar Items
- Get Future Calendar Items
- When Opening Outlook
- Calendar Options
- Tasks
- CRM Activities
- To-Dos
- Enable Automatic Update Every "N" Minutes
- Click Save.
- A 'data saved' confirmation message displays.

Home > My Expense Reports
My Expenses page enables you to maintain all your expenses, no matter where they are entered into the system. This includes expenses for tickets and tasks. You can also enter expenses without linking them to tickets or tasks, such as for your own company's expenses.
You can enter expense entries for any date on any expense report. You are required to enter a date in the header of the expense report but the date does not restrict you. You can submit your reports for approval and also print the expense sheet.
Adding Expenses
- Select the Home >My Expense Reportspage.
- ClickNew.
- Enter the following in theExpense Sheet Infotab.
- Name
- Date
- Notes
- Enter the following in theExpense Infotab.
- Expense Type
- Date - The date the expense was incurred
- Amount Spent
- Mark Up / Down - Adjust up or down by amount ($) or percent (%).
- Payment Types- Cash, Check, Debit Card, Credit Card, Other, Company Credit Card.
- Classification - Reimbursable or Non-Reimbursable
- Notes
- Billable - Yes or No
- Expense Associated with
- Project - Select a project.
- Ticket - Select a ticket.
- Internal Expense - Expenses are added internally.
- Enter the following in the Expense Entries > Receipts tab.
- Upload a new file
- Have Receipt - Yes or No
- Notes
- Click Save to save the expense report.
Approving Expense Reports
- Submitted expense reports can be manually approved or auto-approved.
- If your company uses approval routes, submitted expense reports display in the My Approval folder of the appropriate persons for review. The submitted expense report is then approved or rejected.
- If your company does not use approval routes, the submitted expense report is auto-approved.
- The Approval History tab shows the history of submitted expense reports.
Statuses
- An expense report can have the following statuses.
- Open
- Submitted
- Approved
- Rejected
- A Submitted or Approved expense report cannot be edited.
- A Rejected expense report can be subsequently Submitted and Approved.
Notification
- You are notified about approvals and rejections in several ways.
- A message displays in the Settings > My Messages inbox.
- You may also receive an email message.
- The status of the expense report will show Approved or Rejected.
Actions
- Print Expense Sheet
- Submit for Approval
Home > My Approvals
The My Approvals page approves or rejects timesheets and expense reports submitted by employees on two separate tabs. If you are not an approver or submitted time sheets and expense reports are auto-approved, the My Approvals page does not display in your Home module.
Your designation as a direct approver or secondary approver is defined using the Admin > Business Process > Approval Routes page. There are separate approval routes for Expenses and Timesheets.
Notification
You are notified about submitted timesheets and expense reports in several ways.
- A message displays in the Settings > My Messages inbox.
- You may also receive an email message.
- The My Approval page lists timesheets and expense reports waiting to be approved or rejected.
Approving or Rejecting Timesheets and Expense Reports
- Select the Home >My Approvalspage.
- Click the Timesheet Approvalstab.
- Select submitted timesheets in theDirect ApprovalsorSecondary Approvalssections.
- ClickApprove SelectedorReject Selected.
- If you reject the selected rows, you can include an explanatory note. Rejected timesheets can be subsequently submitted for approval.
- Select theExpense Reportstab.
- Repeat steps 3 and 4 for expense reports.
Home > My Templates
My Templates page enables you to maintain your own set of ticket templates. To make ticket creation easier, when you create a ticket, you can select one of your ticket templates to pre-populate selected fields for you.
Ticket templates can include adding questions in the description field of the ticket. These questions can then prompt ticket editors to ask these standard questions when contacting customers.
Your ticket templates can be shared with other team members. If you don't share a ticket template, it can only be viewed by yourself and PSA administrators.
Admins can change the owners for any particular template as needed. The template owner field is displayed.
- Navigate to Home > My Templates > Template Owner.
- This is a required field and lists all the users in its dropdown.
- Applies to Ticket, Ticket note, Ticket Time entry template.
- If an employee owns any templates, user deletion will throw an error. Clear this link to proceed with the deletion.
Creating Tickets Templates
- Select the Home >Ticket Templatespage.
- ClickNew.
- Select one of the three types of ticket templates.
- Ticket Templates- Defines custom templates for tickets. You select this type of template using theFrom Templatefield when adding a new ticket.
- Ticket Note Templates- Defines custom templates for notes in tickets. You select this type of template using theFrom Templatefield when adding a note to a ticket.
- Ticket Time Entry Templates- Defines custom templates for time log entries in tickets. You select this type of template using theFrom Templatefield when adding a time log entry to a ticket.
- Enter values in each of the fields provided.
- These will serve as default field values when you create a new ticket, note, or time entry, based on this template.
- Click Save.
Home > Collaborations
The Collaborations page maintains discussion threads about a project, shared with all project team members. Project team members include the project manager and any employees assigned to be members of a task. You can create a new thread topic at any time.
Creating Project Discussions Threads
- Select the Home >Collaborationpage.
- Select a project.
- SelectNew Threadto create the first comment in the thread.
- Subject
- Type- Question, Reply, Information, News
- Content
- ClickSave.
- Once you create a comment, you can optionally select the followingActions:
- Edit- Changes a comment you created.
- Comment- Replies to this specific comment.
- Delete- Deletes the comment.
- As another user reading this thread, you can clickReplyto create a new comment for the entire thread.
Home > My Timesheets
My Timesheets page maintains your time sheets. Time sheets are saved automatically after you add or change time entries.
- Time sheets include all the time entries you enter anywhere in the system. This includes time entries for tickets and tasks.
- You can also enter time sheet entries without linking them to tickets or tasks, such as for administrative tasks. Work types for classifying administrative tasks are defined using the Admin > My Company > Administrative Work page.
- A time sheet specifies a weekly date range when it is created, always starting on the same day of the week. Each user can only have one time sheet for each weekly date range.
- Time sheets are automatically created the first time a time entry is created within that time sheet's weekly date range. Or you can manually create a time sheet for a new weekly date range before any entries have been created.
- The scheduling pattern for creating time sheets is specified using the Admin > Company Settings > Time Sheet tab. This same page sets whether future and past time sheets can be viewed.
- If Preload Time Sheets is Yes on the Time Sheet tab then scheduled events on ticket and tasks will preload any future time sheets you create. If No, then only actual time entries display on time sheets.
- If your administrative task time sheet entries are similar from one week to the next, you can save time by copying a time sheet to a new weekly date range. Ticket and task time sheet entries will not be included.
- If you attempt to add a task that is closed or on hold, then 0 times is shown allotted. You cannot change this.
Approving Time sheets
Submitted time sheets can be manually approved or auto-approved.
- If your company uses approval routes, submitted time sheets display in the My Approval folder of the appropriate persons for review. The submitted time sheet is then approved or rejected.
- If your company does not use approval routes, the submitted time sheet is auto-approved.
- The Approval History tab shows the history of submitted time sheets.
Statuses
A timesheet can have the following statuses.
- Open
- Submitted
- Approved
- Rejected
A Submitted or Approved time sheet cannot be edited. A Rejected time sheet can be subsequently Submitted and Approved.
Notification
You are notified about approvals and rejections in several ways.
- A message displays in the Settings > My Messages inbox.
- You will also receive an email notification.
- The status of the time sheet will show Approval or Rejected.
Actions
- Add Tasks - Adds time entries to tasks in projects.
- Add Admin Tasks - Adds administrative work tasks.
- Submit for Approval - Submits the time sheet for approval.
- Print Time Sheet - Creates a PDF of the time sheet.
- Copy Time Sheet - Copies administrative task time sheet entries to a new time sheet with a different weekly date range. Ticket and task time entries are not copied.
Adding Timesheets
- Select the Home >My Timesheetpage.
- ClickNew. Create Time Sheetdialog displays.
- Select Week Range- You can only select a weekly date range that does not yet exist for your user account.
- Click Create.
- A blank timesheet display, since this is a new timesheet.
- ClickAdd Admin Tasks.
- Select theTrainingtask. The administrative work task is added to the timesheet.
- Enter hours for at least one day of the week.
NOTE You must enter hours to prevent an added task from being removed from the timesheet when you leave this page.
- ClickAdd Tasks.
Note:You must be a member of an active project sharing the same date range as this time sheet to see tasks listed in this dialog.
- Select a project task.
- Enter hours for at least one day in the project task.
- The time sheet is saved automatically.
Home > Dispatch Calendar
The Dispatch Calendar page provides a calendar view of all employee scheduled BMS events. Event types can include:
- Appointments
- Activities
- Tasks
- To-Dos
- Service Calls
Actions
- Employee calendar filtering- By default you see your own calendar and the calendars of all subordinate employees that report to you. You filter the list of employee calendars displayed by:
- Resource
- Queue
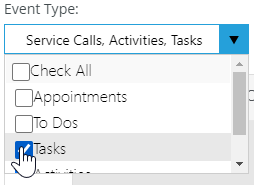
- Event Type
- Employee calendar time selection- Change the scale of calendar time displayed using the Day, Work Week, Month, Timelineoptions. You can also jump to date by using the date picker.
- Add appointments- Click a date for a single employee to add a new appointment.
- Subject
- Start Time
- End Time
- Reminder
- Description
- Recurrence- Click to enter recurring appointment options.
- Dispatch Actions- Click this link to display:
- Dispatch Only- Displays only employee dispatch calendars.
- View Tickets- Displays a ticket search list. Select a view to filter the ticket list.
- Adding Service Calls to Tickets- WhenView Ticketsis selected, you can drag and drop a specific ticket on to an employee's calendar date. Doing so opens theservice calldialog. Enter additional details for the service call, then clickSave. The new service call now displays in theDispatch Calendar, the employee'sMy Service Callspage, and in the corresponding ticket.
Home > Adjust Time Sheets
Use the Adjust Time sheets page to adjust the time sheets of any employee. Access to this page is determined by your assigned security role.
By default, the page lists all time sheets for all users. Enter search parameters to filter the list.
- Week Start, From, To
- Week-End, From, To
- Status
- Employee Name
Click any time sheet row to adjust time sheet entries. See My Time sheet for details about editing time sheet entries.
Home > Adjust Expenses
Use the Adjust Expenses page to adjust the expenses of any employee. Access to this page is determined by your assigned security role.
By default, the page lists all expense reports for all users. Enter search parameters to filter the list.
- Name
- Status
- Date, From, To
- Last Update, From, To
- Employee Name
Click any expense report row to adjust expense report entries.
Home > Downloads
The Downloads page provides connector tools you can use to integrate and synchronize data between BMS and external applications.
Click any of the Download buttons to download these tools.
- QuoteWerks Connector - For more information see, QuoteWerks Integration Guide.
- QuickBooks Sync- For more information see, Quickbooks Sync.
- Outlook Sync - Helps you synchronize the PSA calendar with your Outlook calendar


