New Client Portal experience
Introduction
The BMS Client Portal has been updated to match the new and improved Service Desk interface for a cohesive and more streamlined experience. Enjoy a consolidated search bar, matching icons, and the new in-line capability so you can simply click a line item to modify and edit content as you work. The Client Portal has been updated with ease of access in mind primarily to give you a seamless CRM experience with a refreshingly new look. The features are now intuitive and easy to follow.
Prerequisite
Client Portal configuration. The contact should have set the Has Client Portal Access to Yes in the Contacts page. For more information, see Working with Client Portal access.
My Profile
There are two important aspects in My Profile which you should look into.
You should set your Service Desk Experience to New View as your default view in case it is not. By default, New View is selected. However, in case you want to switch over to the Legacy View, you can do so by going to Service Desk Experience and selecting Legacy View.
You can enable MFA for your login. By default, this is not enabled.
- Go to your profile > My Settings. By default, you are taken to the Personal Information tab.
- Click Enable MFA. The MFA will be enabled.

To disable MFA for the client portal user, see the last section in Enabling multi-factor authentication.
Enabling MFA for all Client Portal users
If you are an admin, you can enable MFA for all Client Portal users at once.
-
Navigate to Admin > My Company > Company Settings > User Account.
-
Require MFA for Client Portal Users: This option is disabled by default.
-
Click Yes. This will enable MFA for all Client Portal users.
My Tickets
The My Tickets page is revamped in a way to pretty much resemble the My Tickets page under BMS' Service Desk. In the My Tickets page, you can see your own tickets created within the Client Portal or sent from your email to the MSP.
Search Pane
The search pane or filter pane is actually the place where you can search for various tickets with various categories and keywords. Once you place the cursor inside the search box, you will see various categories as a dropdown. Select the category, enter the keywords and press Apply. Sometimes, you can select additional subcategories within a category, enter keywords and then press Apply. You can use the search in multiple ways in various permutations and combinations. The more categories you select, the more they get added within the search space and the results will be filtered according to these categories and keywords. You can clear filters individually or all at once.

Refreshing the Page
You can click the refresh button next to the search box to refresh the page. It will show the latest tickets then.
Multiple Tabs
You will be able to see all tickets one below the other. At the same time, you will be able to see more than one ticket, side by side in an arranged tab form. When you create a ticket newly, it resides as a new tab next to the older ticket. You will see the the same behavior when you open a ticket as well. Those tickets remain there as tabs, next to each other, until you dismiss them from the view by clicking on x on the top right corner of the tab.

Columns
You will see seven columns related to the tickets. The columns are Ticket Number, Title, Contract, Open Date, Created by, Priority, and Status. You can organize the tickets according to descending or ascending order by clicking the relevant arrows in each column. You can add more columns from the List View Options window.

Views
The tickets page with a list of tickets and their columns is called a view. You can save and switch between different views. You can customize your own view by adding more columns from the List View Options window and then saving it with a name. The System Default is the default view. Once you save a view, that view will be visible right after the Default View. Saved view will get added here. The user icon next to a view indicates that the view is not owned by the current user. Manage views will list the views owned and shared with you. You can see who the owner of the shared views is and reach out for any changes.


Exporting
You can select as many tickets as you want and export the tickets and their information to a .CSV file.

A Ticket and its Inside View
Title and Description
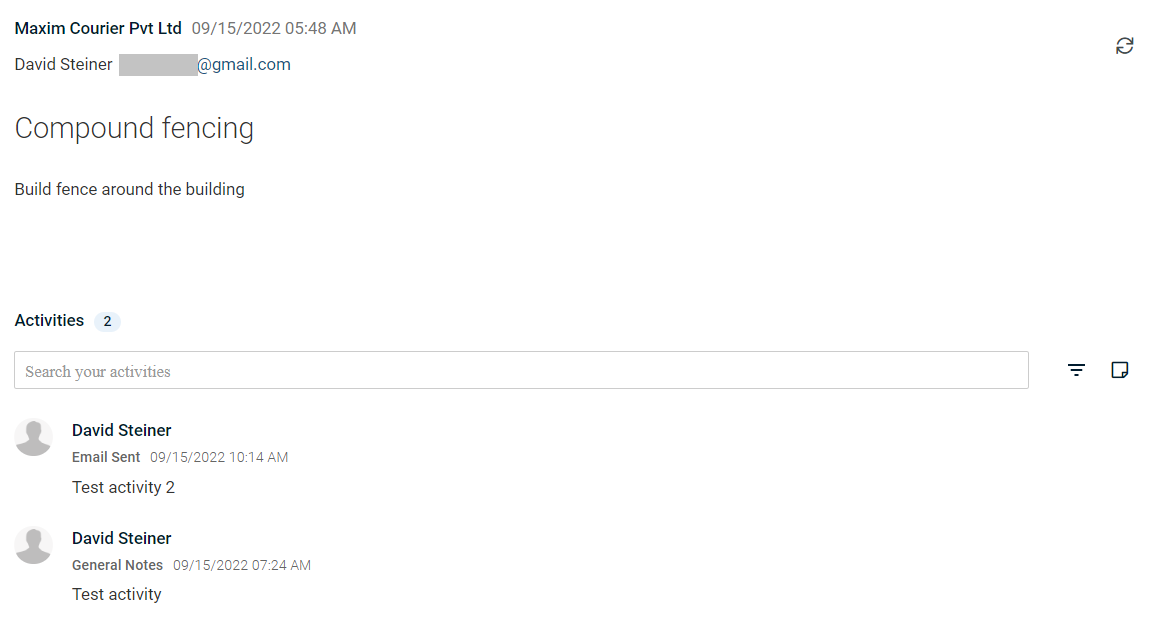
When you open a ticket, you will see the ticket title and a short description below it as the prominent text. You will also see the account name followed by the contact name and their email on the top left side of the ticket. The ticket title and the description are non-editable.
The Activities Tab
The Activities tab is the only tab that you will find in tickets in the Client Portal. The total number of activities listed one below the other is shown right next to the Activities tab. Once you enter the activity in the Note, activities are listed one below the other below the search box. The search box gives you the ability to search various activities according to different filters. You can select as many filters as you want from the Filter by box and apply them to search for various activities. The results will then be filtered as per your selected search criteria.
Adding Notes
You can use the Note icon to add notes to the ticket. You can click the Note icon to open the Add Note window. By default, you are taken to the Note Details tab. You will also be able to see Notifications and Attachments tabs.
- You can classify the type of note by selecting a type from the dropdown.
- You can enter your notes under the Note Details tab.
- You can select contacts and resources in the Notifications tab. Once you select and save them, the contacts and resources will receive notifications. You can also add email IDs in the Other Emails section.
- You can add attachments under the Attachments tab.
The Side Panel
You will see a side panel on to the right side of the ticket with many sections and details.
Details
The Details section lists out details regarding the ticket. It lists all minuscule details of the ticket one below the other in detail.
Contact
The Contact section lists out details regarding the account and its main contact person like name, phone number, email, and account type etc.

RMM Integration
The RMM Integration section will appear only if there is an active RMM integration (either VSA or Continuum) in place. The integration section lists out details regarding these integrations in place.

Affected Assets
The Affected Assets section lists out the assets that are affected by this ticket.

Attachments
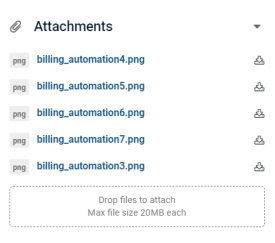
This is the section where you can drag and drop selected files into the dotted line field to upload the attachments. You can drag and drop multiple files at once. The area will show up to five attachments at the same time.
Duplicate Alarm
This section will notify you whenever there is a duplicate ticket on the same subject.

Tickets Page
The Tickets page is a common page where you will see tickets of other users from the same account. All other features, explained above, remain the same.


